
104574 Issue D
ECN: 07 007
- 5 -
- 4 -
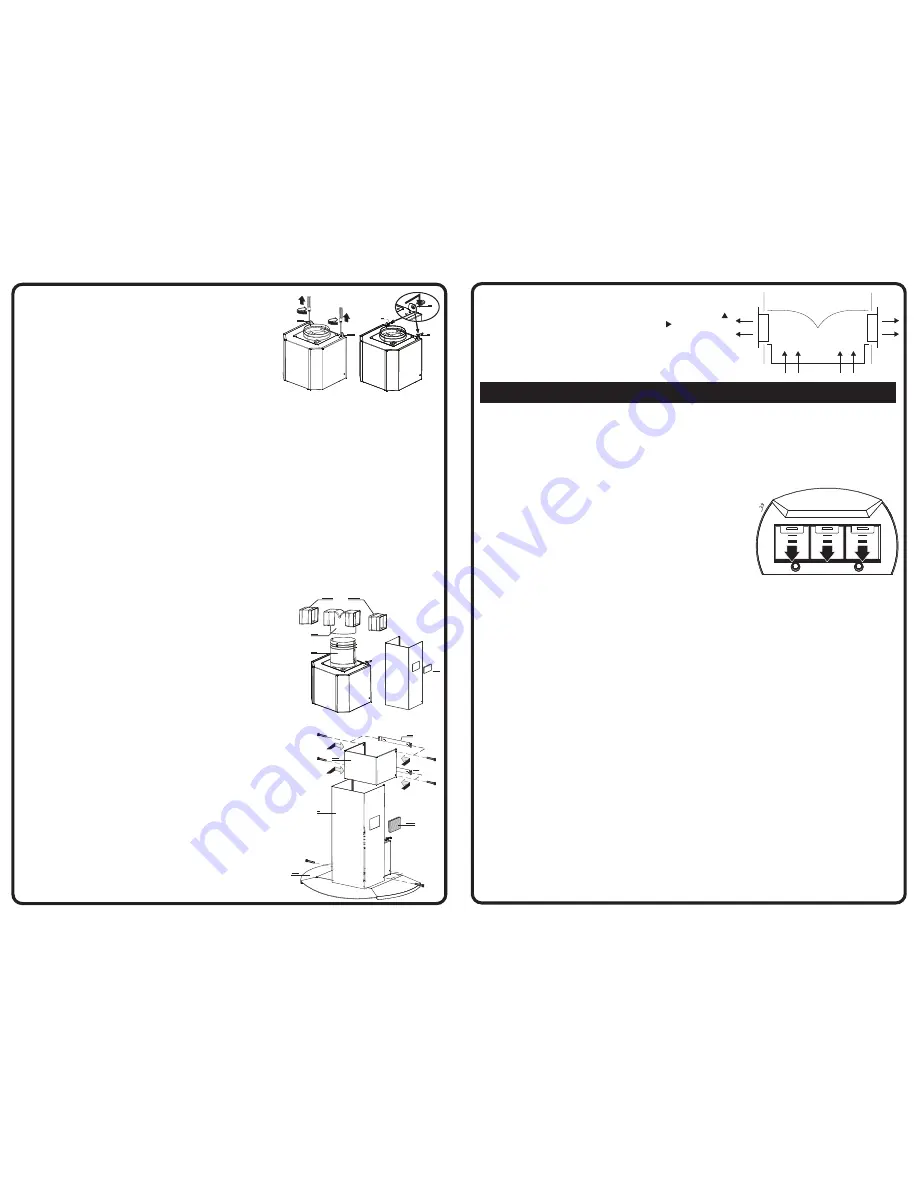
Ducting or Recirculation fitting
Ducting fitting
The hood can be ducted to the outside using either rigid
or flexible ducting Ø150mm .
Recirculation fitting
The filtered air is returned to the room through
the two plastic side grills
G
on the lower
chimney element
I
.
Connect the additional spigot
P
to the round
fan outlet,
pushing it downwards, and fit spigot
R
to additional spigot in a similar manner (make
sure that the two additional side recirculation
spigots
are fitted to spigot
R
). Cut the
additional spigot
P
to correspond with
outlets 1and 2 , which must be formed directly
on the piece. Make sure that the height of the
assembly
R + P corresponds to the height of
the chimney outlet. (fig.7).
Fit the activated charcoal filters inside the
canopy (see paragraph on Maintenance ).
Do not fit the venting grilles until after the chimney
has been installed.
Fitting the telescopic chimney
To fit the upper section
S
first expand the two side
pieces slightly, hook them behind the brackets
2
and
close them
together again until they touch. Fix the
upper section
S
to the brackets
2
using four of
the screws provided in the bag of accessories
(fig. 8).
Fit the lower section I as above, between the
upper section
S
and the canopy
C
using two of
the screws provided in the bag of accessories.
Fig. 8
Fig. 7
R
P1
P1
P
G
G
S
I
2
C
2
Fixing the canopy
Before starting to fix the canopy it will be necessary to
adjust
the support brackets
S1
by turning the
adjustment screws in a clockwise direction until their
reach their limit (Fig.3):
a) Hook the canopy onto the two size
4.2 x 44.4 screws
1
fitted as described
above (Fig.4 ).
b) Level the hood by turning the adjustment
screws and then locking them.
Electrical connection and working test
Before connecting to the mains supply ensure that the
mains voltage corresponds with the voltage on the rating
plate inside the hood.
Connect the canopy hood to the suitable mains connector.
The appliance must be earthed.
Once the electrical connection has been completed, check that
worktop illumination, motor and speed work properly.
Fig. 4
1
1
1
Fig. 3
S1
S1
Constant maintenance guarantees proper operation and long-term reliability.
Particular attention should be paid to the metal grease filters and, for recirculation
hoods only, to the activated charcoal filters. The appliance is equipped with a
system that indicates
automatically when it is time to carry out maintenance
operations.
Metal grease filters
Cleaning
These filters must be washed when LED
Motor
T2
starts to flash,or at least once
every two months,using a normal household
detergent; their compact size also enables
them to be washed in a dishwasher.
Replacement
Remove the filters one at a time, pushing
the handle towards the rear of the hood (fig.
11).
When replacing, ensure that the handle faces
outwards.
Enabling the alarm signal
The hood is already set up to trigger an alarm
indicating saturation of the metal grease
filters,so this function does not need to be
enabled.
Resetting the alarm signal
To turn the alarm signal off,proceed as follows:
Turn off the Lights
T1
and the Suction Motor
T2
;
Press the Speed
T4
and hold for at least
three
seconds, until the Led flashes to confirm.
Note: the saturated filters alarm will only come into
operation when the suction motor is turned on.
WARNING - There could be a possible fire hazard
if the filters are not replaced according to these
instructions.
M A I N T E N A N C E
Fig. 11
Fig. 9
Chimney with venting grilles: Snap the venting
grilles into position in the apertures located
on the chimney section, so that the symbol
is turned upwards and the symbol faces
forwards. Also, when the hood is used in
recirculation mode, ensure that the grilles are
properly secured
to the inside of the recirculation
spigot
R
( fig.9).


