background image


Installation 


Before drilling any holes check that the area behind the surface to be drilled is clear of any


       electrical cables, pipes etc. The cabinet must take a weight bearing of at least 40kgs weight


Whenever possible protect the Rangehood with a fabric sheet or similar.


WARNING: Failure to install the screws or fixing devices in accordance with these instructions  

       may result in an electrical hazard

The power plug shall be accessible for disconnection of the  

       appliance after installation. 


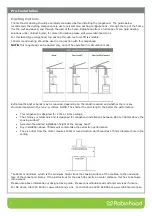
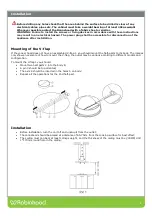
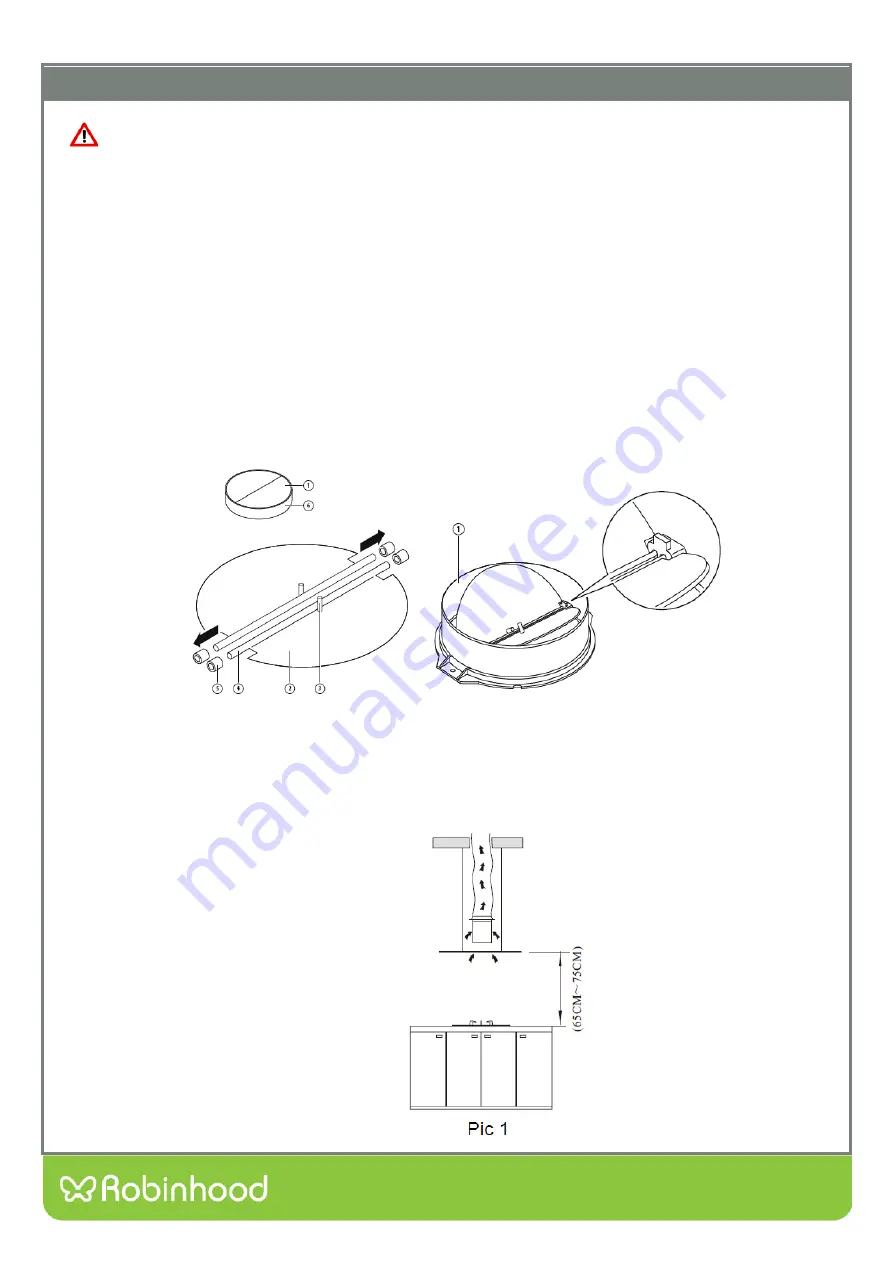
Mounting of the V-flap 

If the cooker hood does not have an assembled V-flap 1, you should mount the half-parts to its body. The images 

only show an example of how to mount the V-flap, the outlet may be various according to different models and 

configuration. 
To mount the V-flap 1 you should: 


Mount two half-parts 2 into the body 6; 


A pin 3 should be top oriented; 


The axis 4 should be inserted in the holes 5 on body; 


Repeat all the operations for the 2nd half-part. 
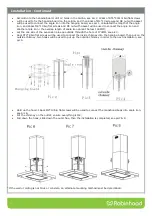


Installation 


Before installation, turn the unit off and unplug it from the outlet; 


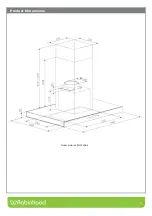
The rangehood should be placed at a distance of 65-75cm from the cooking surface for best effect; 


The ceiling must can bear at least 120kgs weight, and the thickness of the ceiling must be 

30MM, drill 

1*170mm round hole in the ceiling; 


Summary of Contents for RIJ3CL9BK

Page 1: ...1 Description ROBINHOOD ISLAND RANGEHOOD 90CM BLACK GLASS Model Numbers RIJ3CL9BK Model may vary slightly from images pictured Issue 1 Model pictured RIJ3CL9BK ...

Page 2: ...2 Product Dimensions Model pictured RIJ3CL9BK ...

Page 3: ...g gas or other fuels The minimum distance between an electric or gas hob surface and the lowest part of the rangehood is 650mm If the instructions for the hob specify a greater distance this has to be taken into account Regulations concerning the discharge of air have to be fulfilled Stainless steel or powder coat is very easily damaged during installation if abraded or knocked by tools Protect th...

Page 4: ...ge hood is tested and approved before it leaves the factory Product rating 220 240V 50Hz 273W Contents of packaging 1 x Rangehood 1 x hanging board 8 x angle iron 2 x chimney pieces upper and lower 1 x 150mm outlet Typical equipment required o electric drill o screwdriver o tape measure o spirit level o duct tape o jig saw and ladder ...

Page 5: ...re is any structural material in the run e g rafters NOTE The shorter the duct length the better the performance This rangehood is designed for 2 4m or 2 7m ceilings The chimney is telescopic and is designed for rangehood installations between 650 to 750mm above the cooking surface Ascertain the desired installation height of the canopy hood Any installation above 750mm will compromise the extract...

Page 6: ...od does not have an assembled V flap 1 you should mount the half parts to its body The images only show an example of how to mount the V flap the outlet may be various according to different models and configuration To mount the V flap 1 you should Mount two half parts 2 into the body 6 A pin 3 should be top oriented The axis 4 should be inserted in the holes 5 on body Repeat all the operations fo...

Page 7: ...100MM Let the one side of the expansion pipe go outside through the hole of 170MM see pic 3 4pcs ST4 8 big flat screws will be used to connect the inside chimney into the hanging board then put on the outside chimney two hooks will be used to put up the outside chimney in order to the next installation see pic 4 Hold up the hood 16pcs M4 10 big flat screws will be used to connect the rangehood bod...

Page 8: ...nt Low Medium High 3 Press the Low button the indicating light will beam and the motor runs at low speed Press it again and the motor will stop 4 Press the Medium button the indicating light will beam and the motor runs at mid speed Press it again and the motor will stop 5 Press the High button the indicating light will beam and the motor runs at high speed Press it again and the motor will stop W...

Page 9: ...he grain of the stainless steel to prevent any unsightly crisscross scratching patterns from appearing Control Panel Surface The inlay control panel can be cleaned using warm soapy water Ensure the cloth is clean and well wrung before cleaning Use a dry soft cloth to remove any excess moisture left after cleaning Important Using neutral detergents and avoid using harsh cleaning chemicals strong ho...

Page 10: ...r change Power wire cut off Change power wire Switch damage Contact Service Department Appliance vibrates violently Motor screw loosen Contact Service Department Fixing brackets loose Tighten the fixing brackets Insufficient suction The distance between the body and the cooktop too long Readjust the distance Cross ventilation too strong or too closed in the kitchen Reduce cross ventilation or open...

Page 11: ...ers sugar soap metal pads and strongly alkaline or acidic cleaners Heat damage including from washing the product at high temperatures Impact or mishandling the product including the impact caused by objects scraped along thrown or dropped on the product surface or excessive weight being placed on the product Structural or support changes in or affecting the building or the application where the p...

Page 12: ...expense of making a claim under this warranty This warranty is given by Shriro Australia Pty Ltd ABN 28 002 386 129 Telephone 1800 648 556 Facsimile 1800 628 577 Email customercare shriro com au www robinhood com au Attention Customer Services Manager Warranty exclusions 1 The warranty does not apply where in Shriro s opinion The defect is caused by misuse wear and tear dirt fire or accidental dam...

Reviews: