4
Installation
Mounting to a stud is recommended. However, if fitted to other wall linings (plasterboard, concrete etc.) suitable
fixings will be required. Before drilling any holes check that the wall and ceiling are clear of any electrical cables, pipes
etc. It is recommended that at least 2 people are used to install this appliance.
1.
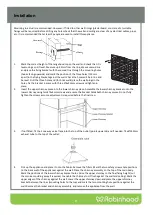
Mark the correct height of the rangehood top on the wall and check that it is
level using a spirit level. Measure up 22mm from the line, draw a second line
and place the fixing bracket with the second line through the mounting holes
(hooks facing upwards) and mark the position of the three holes (115mm
apart) in the fixing bracket against the wall. Check the holes will be in line and
be level. Drill the three holes and (for brick walls) place the wall plugs in the
holes. Fix the bracket in place with three ST4x40mm screws and tighten in
place.
2.
Insert the upper chimney piece into the lower chimney piece. Assemble the lower chimney bracket onto the
lower chimney using two ST4x8mm screws and ensure the bracket holds both chimney pieces. Do not fully
tighten the screws as some adjustment is required before the final step.
3.
If not fitted, fit the 2 one‐way valve flaps into the top of the outlet (points upwards) and if needed, fit a Ø150mm
exhaust tube to the top of the outlet.
4.
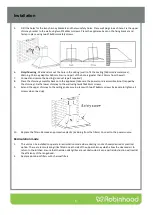
Pick up the appliance and place it onto the hooks. Remove the filters. Mark the two safety screws hole positions
(in the back wall of the appliance) against the wall. Place the chimney assembly on the top of the main body.
Mark the positions of the lower chimney bracket holes. Raise the upper chimney to the final fixing height (cut
the cornice moulding away if required, to enable the chimney to sit flush against the wall and ceiling). Mark the
upper edges of the chimney against the wall. Lower the upper chimney down and place the upper chimney
bracket between the lines (mounting holes to the top) and mark the two mounting hole positions against the
wall. Remove the bracket and chimney assembly, and remove the appliance from the wall.


