background image


EN 


2
3


23 

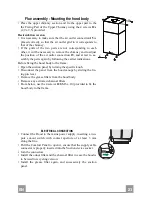
Flue assembly - Mounting the hood body  

•  Place the upper chimney section and fix the upper part to the 

the Fixing Part of the Upper Chimney using the 4 screws 12c 
(2,9 x 9,5) provided. 

Recirculation version 
•  It is necessary to make sure that the air outlet connection 15 is 

placed correctly so that the air outlet grid in it corresponds to 
that of the chimney.  

•  If the grids of the two parts are not corresponding to each 

other, it will be necessary to remove the chimney and to adjust 
the position of the air outlet connection 15, and at last to as-
sembly the parts again by following the earlier indications. 

Before fixing the hood body to the frame: 
•  Open the suction panel by turning the specific knob. 
•  Disconnect the panel from the hood canopy by sliding the fix-

ing pin lever.


•  Remove the grease filters from the hood body. 
•  Remove any activated charcoal filters. 
•  From below, use the 4 screws 12f (M6 x 10) provided to fix the 

hood body to the frame.


12c

12f

ELECTRICAL CONNECTION 

•  Connect the Hood to the mains power supply, inserting a two-

pole cut-out switch with contact aperture of at least 3 mm 
along the line. 

•  Pull the Comfort Panel to open it, ensure that the supply cable 

connector is properly inserted into the Suction device socket 

•  Join the connectors.  
•  Install the odour filter and the charcoal filter in case the hood is 

to be used in recycling version. 

• Install the grease filter again, and successively the suction 

panel. 


Summary of Contents for CUBIX CENTRALE 600

Page 1: ...Libretto di Istruzioni Instructions Manual Manuel d Instructions Bedienungsanleitung Cubix Centrale 600...

Page 2: ...EN 3 3 Instructions Manual INDEX RECOMMENDATIONS AND SUGGESTIONS 17 CHARACTERISTICS 18 INSTALLATION 20 USE 24 MAINTENANCE 25...

Page 3: ...FR 4 4 Manuel d Instructions SOMMAIRE CONSEILS ET SUGGESTIONS 28 CARACTERISTIQUES 29 INSTALLATION 31 UTILISATION 35 ENTRETIEN 36...

Page 4: ...of aeration must be guaranteed in the room in order to prevent the backflow of exhaust gas The kitchen must have an opening communicating directly with the open air in order to guarantee the entry of...

Page 5: ...EN 1 8 18 CHARACTERISTICS Dimensions 448 598...

Page 6: ...Piece 15 1 Air Outlet Connection 25 2 Pipe clamps 26 1 Fixing Part of the upper Chimney 29 1 Air outlet connection tube Ref Q ty Installation Components 11 4 Wall Plugs 10 12c 4 Screws 2 9 x 9 5 12f...

Page 7: ...ceilings with wall thickness of 20 mm drill 10 mm immediately insert the Dowels 11 supplied For wooden beam ceilings drill according to the wood screws used For wooden shelf drill 7 mm For the power s...

Page 8: ...crews do not come out of their housing in the adjustment slot It is now possible to place and tighten the 4 safety screws Proceed as follows drill the ceiling with a 10 mm bit taking as refer ence the...

Page 9: ...connection insert the reducer flange 9 on the dumper 10 Fix the pipe in position using sufficient pipe clamps not supplied Remove any activated charcoal filters 10 150 25 120 25 9 10 RECIRCULATION VER...

Page 10: ...efore fixing the hood body to the frame Open the suction panel by turning the specific knob Disconnect the panel from the hood canopy by sliding the fix ing pin lever Remove the grease filters from th...

Page 11: ...esidual smells Can be enabled at any speed and is disabled by pressing the button briefly T3 Speed on Third speed T4 Speed Fixed Max speed Flashing Intensive speed Suitable for the strongest cooking v...

Page 12: ...ull the Comfort Panel to open it Disconnect the panel from the hood canopy by sliding the fix ing pin lever The comfort panel must never be washed in a dishwasher Clean the outside using a damp cloth...

Page 13: ...ilters are washable and must be cleaned when the LED S1 lights up or at least every 2 months of operation or more frequently for particularly heavy usage Remove the filters one at a time by pushing th...

Page 14: ...twice Activated charcoal filter saturation alarm ENABLED LED flashes once Activated charcoal filter saturation alarm DISABLED REPLACING THE ACTIVATED CHARCOAL FILTER Alarm signal reset Switch off the...

Page 15: ...e la hotte par exemple des appareils fonctionnant au gaz vous devez pr voir une a ration suffisante du milieu Si la cuisine en est d pourvue pratiquez une ouverture qui communique avec l ext rieur po...

Page 16: ...FR 2 9 29 CARACTERISTIQUES Encombrement 448 598...

Page 17: ...Corps Hotte 15 1 Raccord Sortie Air 25 2 Colliers de serrage serre tube 26 1 Fixation de la Chemin e Sup rieur 29 1 Tuyau Raccord Sortie de l Air R f Q t Composants pour l installation 11 4 Chevilles...

Page 18: ...vec paisseur r sistante de 20 mm 10 mm in s rer imm diatement les Chevilles 11 fournies avec l appareil Plafond en Poutrage en Bois en fonction des Vis Bois utilis es tag re en Bois 7 mm Passage du C...

Page 19: ...isser les 4 vis de s cu rit pour effectuer cette op ration suivre les instruc tions suivantes percer le plafond avec une m che de 10 en uti lisant les trous qui se trouvent sur les c t s u dis positif...

Page 20: ...que de r duction 9 sur la buse avec cla pet 10 Fixer le tube par des colliers appropri s Le mat riau n cessaire n est pas fourni Retirer les ventuels filtres anti odeur au charbon actif 10 150 25 120...

Page 21: ...rocher le panneau du corps de la hotte en faisant coulisser le levier du goujon de fixation sp cialement pr vu Retirer les Filtres anti graisse du Corps de la Hotte Retirer les ventuels Filtres Anti o...

Page 22: ...fonction est id ale pour compl ter l limination des odeurs r siduelles Il est possible de l activer depuis n importe quelle vitesse on la d sactive en appuyant bri vement sur la touche T3 Vitesse Allu...

Page 23: ...ier D crocher le panneau du corps de la hotte en faisant coulisser le levier du goujon de fixation sp cialement pr vu En aucun cas le confort panel ne doit tre lav au lave vaisselle Le nettoyer l ext...

Page 24: ...uvent tre lav s au lave vaisselle et n cessitent d tre nettoy s lorsque la Led S1 s allume ou au moins environ tous les 2 mois d emploi ou plus fr quemment en cas d emploi particuli rement intense Ret...

Page 25: ...aturation Filtre anti odeur au Charbon actif ACTIV E 1 clignotement Del Alarme de saturation Filtre anti odeur au Charbon actif D SACTIV E REMPLACEMENT FILTRE AU CHARBON ACTIF Remise l tat initial du...

Page 26: ...of this product please contact your local city office your household waste disposal service or the shop where you purchased the product Le symbole sur le produit ou son emballage indique que ce produi...

Reviews: