background image

64

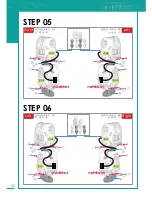
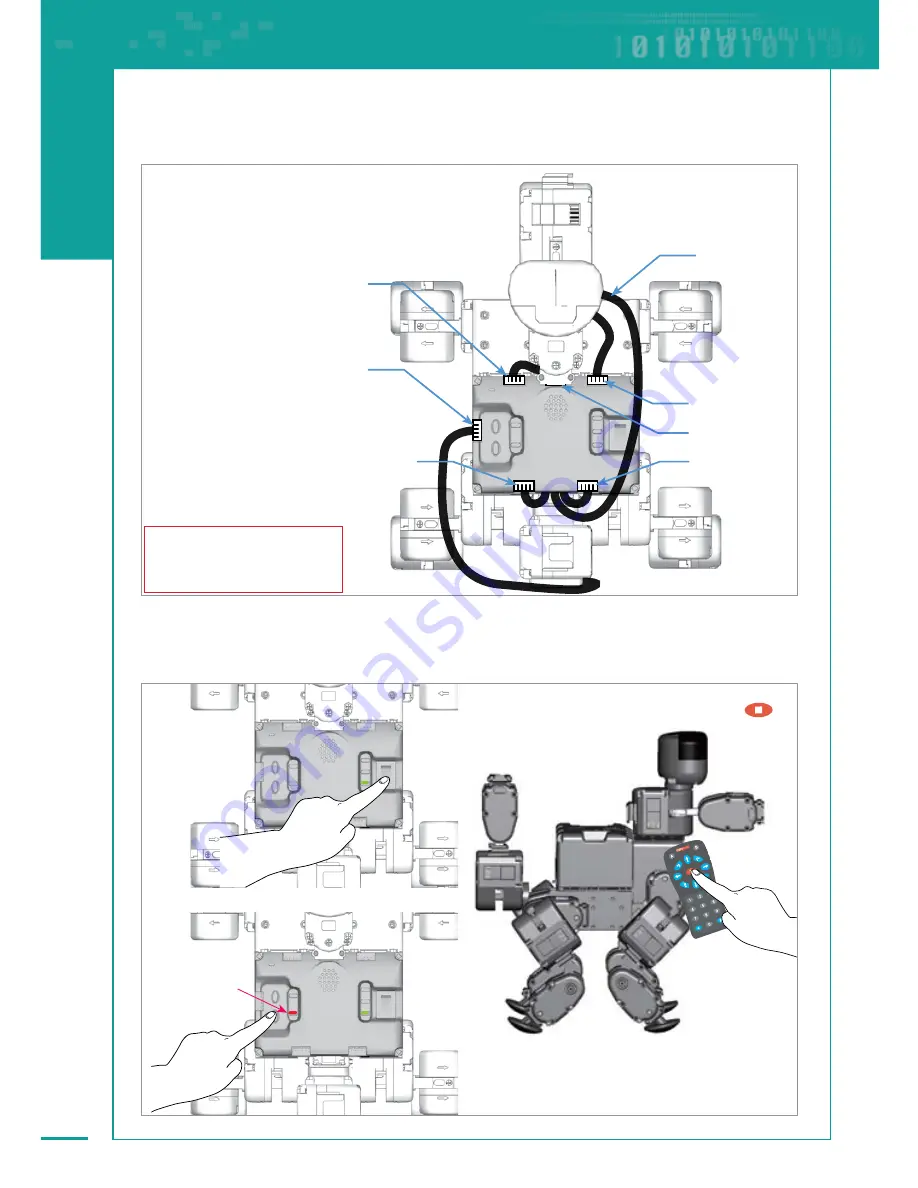
STEP 17

Sensor

Head

Left Front Leg

Right Front Leg

Tail

Right Rear Leg

Left Rear Leg

All cables, other than the sensor 
cable from the head, can be 
plugged into any of the connectors

STEP 18

: Check the basic posture (

)

: Power ON

:  Check PF1 

Red LED

※ If battery is not sufficiently charged connect the 

power adapter to run the robot.

Summary of Contents for DIY Robot kit

Page 1: ...USER S GUIDE RoboBuilder Co Ltd Innovative DIY Robot kit with Motion File Shared on the Internet Age 14 and up ...

Page 2: ......

Page 3: ...g or loose outlet It may cause an electric shock or fire Make sure that the power plug is inserted firmly into the outlet so that the power cord can t get loose A loose connection may cause a fire Do not forcibly bend or pull the power cord or place it under a heavy object It may cause an electric shock or fire Do not handle the power cord with wet hands It may cause an electric shock Do not conne...

Page 4: ...roduct do not use water or solvent such as benzene and alcohol but use a soft and dry cloth only It may cause a failure to the product Keep the robot or parts away from children s reach Do not leave the product with power on Battery damage may cause a product failure Accumulated gear backlash may cause abnormal robot actions if the product is operated for a long time or executes repeatedly excessi...

Page 5: ...8 MotionBuilder 68 RBC Upgrade Tool 70 Connecting RoboBuilder with PC 71 Checking PC serial port 71 Checking Robot Platform 72 Operating Control Box 73 Using Remote Control 74 Programming 75 Creating New Robot File 76 Modifying Robot File 81 Quick Easy Motion Teaching Programming Method 84 Modifying Downloaded Robot File 86 Transferring Robot File to Control Box 88 Playing with Robot 90 Recharging...

Page 6: ...can build three standard robot platforms HUNO DINO and DOGY for which building instructions are provided with the kit Various other robots of user s own design can also be easily created The robot can easily perform complex motions by running robot files that are programmed by user or from robot files that can be downloaded from the In ternet Chapter 1 Introduction to RoboBuilder ...

Page 7: ...Smooth and Natural motions realized through precise motion control both in wheel mode 360 and position control mode 0 to 332 Distributed Controls Quick and Easy troubleshooting and upgrading are ensured as the main control control box and remote control wCK joint actuators are separated Built in Connector You can easily connect signal line and power line by using two built in connectors installed ...

Page 8: ...and download robot files access the RoboBuilder homepage http www RoboBuilder net and go to COMMUNITY page ㆍ Motion files created by a user with MotionBuilder can be shared online as well as offline However any motion files that are modified after being downloaded must but uploaded back to the RoboBuilder homepage if the user wishes to share these with other users ㆍ All downloaded motion files fro...

Page 9: ...20 J2 8 J1 2 J3 3 Control Box 1 Leg Cover 2 B5 12 B16 24 B12 17 B8 15 Nut 84 B40 66 Shoe Plate 2 Power Supply 1 PC Cable 1 Remote Controller 1 J6 7 J5 1 J7 3 J9 1 J8 1 J11 5 J12 2 J4 3 J10 3 B6 9 Software CD 1 User s guide 1 User s guide B Gold 10 The parts within this product are subject to change without notice this may occur if the design of the product changes or is improved ...

Page 10: ...roller Atmega 128 External case Engineering plastic Battery operating time Approx 10 30 minutes Introduction HUNO is a humanoid walking robot designed to resemble a human being This robot is one of the best robots that can be built with RoboBuilder kit A simple remote control can be used to initiate basic motions such as walking running kicking and a hand stand The user can also enjoy more complex...

Page 11: ...lastic Battery operating time Approx 10 30 minutes Introduction DINO is a three legged robot designed to resemble a dinosaur This robot can perform fun motions using its tail It can move faster than the HUNO and can use it s tail to dem onstrate various motions The user can enjoy entertaining motions such as dancing tail show tail attacks responding to sounds and detecting objects by programming n...

Page 12: ...a 128 External case Engineering plastic Battery operating time Approx 10 30 minutes Introduction DOGY is a four legged walking robot designed to resemble a dog This robot can move the fastest amongst the three standard robots The user can enjoy entertaining motions such as push ups handstands standing on two legs rolling etc The user can also program motions so that the robot responds to sounds an...

Page 13: ...or order Model wCK Module Color Sound Recognition Speaker Degree of Freedom Actuator Torque Distance Sensor LED on Actuator CREATOR 5710K Black Y N 16 8kg cm 12 EA 11kg cm 4 EA N N CREATOR 5720T S02 Transparent Y Y 16 8kg cm 12 EA 11kg cm 4 EA Y Y EXPERT 5730K Black Y Y Y N ...

Page 14: ...ures and skills needed to assemble the three different standard robot platforms HUNO DINO and DOGY The user can apply the same information and knowledge to create their own robots using the same parts included in the package Chapter 2 Assembling RoboBuilder ...

Page 15: ...uilding service this will incur an additional cost as set by the local distributor or agent The Basic Postures of the three standard robot platforms are as shown in below pictures If a robot doesn t show the exact Basic Posture when you push the red button on the remote controller the robot doesn t move properly or the red Error lamp is turned on then the robot may not be built correctly or may ha...

Page 16: ...ise motion control In this case please refer to troubleshooting material available on the product CD and information from our homepage to help fix the problem 1 hour of assembly time is the average time that is required for a user who has average building skill to build one of the three standard robot platforms Thus the building time may vary depending on the level of the user and work environment...

Page 17: ... rotate the axis using the joint part as shown in figure below Putting wCK module and joint together When putting a wCK module and a joint together be careful to set the direction of the rotating axis of the wCK module as shown in below Wrong assembly X Correct assembly O Recommended tool EDISON EDM 100 precision screwdriver type Blade thickness 3mm Blade length 100mm ...

Page 18: ...important In this case adjust the axis angle of the wCK module correctly by following the illustration shown in the CAUTION picture A red highlight is added to help highlight this If not assembled as shown in the picture it may cause abnormal operation or a failure The angle adjustment is critically important displays the STEP number displays the position of assembly Left or right from the robot s...

Page 19: ... some parts of a HUNO the user can transform it into a DOGY in approximately 30 minutes When the robot transformed from the HUNO to DOGY the PF LED on the control box must be set to change the platform type then the DOGY is ready for action and can be controlled by the remote control The sound generated by the robot is automatically changed for the various standard platforms ...

Page 20: ...21 Chapter 2 Assembling RoboBuilder HUNO DINO ...

Page 21: ... comes from Humanoid as it resembles the appearence of a human being The assembly of HUNO consists of total 20 steps The required parts for each step and the related assembly instructions are provided here Completed HUNO ...

Page 22: ...nd Part 2 Head Part 1 Sensor Module wCK module Cable 16 J4 2 J2 6 J6 4 Control Box 1 Shoe Plate 2 Leg Cover 2 B5 8 B16 16 B12 10 B8 9 Nut 56 B40 40 The components within this product are subject to change without notice this may occur if the design of the product changes or is improved B Gold 3 H U N O B6 7 ...

Page 23: ... STEP 01 02 03 04 01 STEP 05 06 02 STEP 07 08 03 STEP 09 10 04 STEP 11 12 05 STEP 13 06 All building instructions for HUNO are exactly the same as the ones for DINO except for the arms and the tail STEP 14 07 STEP 15 16 08 ...

Page 24: ...oBuilder ID MAP Front View Rear View The ID map of the wCK robot modules for HUNO are as follows 11 14 15 12 13 10 06 01 05 00 07 02 08 03 09 04 14 15 11 12 13 10 06 01 05 00 07 02 08 03 09 04 STEP 17 09 STEP 18 19 20 10 H U N O ...

Page 25: ... ⓐ STEP 02 ID 13 Left Connect both wCK cables first before attaching it to body frame ⓐ ID 10 B40 B8 ⓐ J2 B40 B8 ⓐ J2 ID 10 ID 13 The adjustment of the connecting angle is critically important The adjustment of the connecting angle is critically important 8mm Bolt 40mm Bolt Joint 2 ...

Page 26: ...nnecting angle is critically important ID 00 ⓐ The adjustment of the connecting angle is critically important ID 05 ⓐ B40 B8 ⓐ J2 Connect both wCK cables first before attaching it to body frame B40 B8 ⓐ J2 Connect both wCK cables first before attaching it to body frame ID 00 ID 05 H U N O ...

Page 27: ...28 ID 14 ID 15 STEP 05 STEP 06 ID 11 ID 12 ⓐ ID 12 ⓑ Left B16 B12 ⓐ J6 ⓑ J4 Right B16 B12 ⓐ J6 ⓑ J4 ID 15 ⓐ ⓑ ⓐ ⓐ ...

Page 28: ...r Left Connect wCK cables as above before attaching leg cover Right STEP 08 B16 B40 B12 ⓐ J6 B16 B40 B12 ⓐ J6 ⓐ ID 02 ID 03 ID 07 ID 08 The pentagon shaped rotation axes of wCK ID01 02 03 should all face to same direction outwards The pentagon shaped rotation axes of wCK ID06 07 08 should all face to same direction outwards ⓐ H U N O ...

Page 29: ... 04 Right B5 B40 ID 09 Make sure that the front side of the shoe plate has a narrower width of its folded surface than rear side Make sure that the front side of the shoe plate has a narrower width of its folded surface than rear side ...

Page 30: ...t STEP 12 Left The adjustment of the connecting angle is critically important The adjustment of the connecting angle is critically important B8 B12 ⓐ J2 B8 B12 ⓐ J2 ID 03 ⓐ ID 04 ⓐ ⓐ ID 09 ID 08 ID 01 ID 02 ID 06 ID 07 ID 02 ID 03 ID 07 ID 08 H U N O ...

Page 31: ...32 STEP 13 STEP 14 Left Right B12 B6 ID 13 ID 10 ID 13 ID 10 ID 14 ID 06 ID 01 ID 06 ID 01 ID 00 ID 05 ID 15 ID 06 ID 01 ID 05 ID 00 ID 05 ID 00 ID 13 ID 10 ...

Page 32: ...33 Chapter 2 Assembling RoboBuilder STEP 15 Right STEP 16 Left B12 B12 ID 13 ID 10 ID 06 ID 11 ID 10 ID 11 ID 10 ID 11 ID 13 ID 10 ID 14 ID 13 ID 14 ID 14 ID 13 ID 01 H U N O ...

Page 33: ...34 STEP 17 STEP 18 B6 Left Arm Right Arm Head Left Arm Right Leg Left Leg ID 11 ID 14 ID 12 ID 11 Left Leg Right Leg Right Arm Head ...

Page 34: ...cables from both legs to the connectors on the control box before the con trol box is fully pushed down and secured All cables other than the sensor cable from the head can be plugged into any of the connectors STEP 20 Power ON Check PF1 Blue LED Check the basic posture If battery is not sufficiently charged connect the power adapter to run the robot H U N O ...

Page 35: ...pgraded HUNO is a modified platform of HUNO enhanced by adding two more degrees of freedom 2 more wCK module With its waist twisting freely the various motions that can be programmed are much more natural and human like ...

Page 36: ...37 Chapter 2 Assembling RoboBuilder H U N O ...

Page 37: ... name comes from the Dinosaur as it resembles a dinosaur with a tail The as sembly of DINO consists of 20 steps The required parts for each step and the related assembly instructions are provided here Completed DINO ...

Page 38: ... Cover 1 Foot Part 2 Hand Part 2 Head Part 1 Sensor Module wCK module Cable 16 Control Box 1 Shoe Plate 2 Leg Cover 2 The components within the product are subject to change without notice this may occur if the design of the product changes or is improved B Gold 3 B5 8 B16 16 B12 11 B8 9 Nut 56 B40 44 D I N O B6 7 ...

Page 39: ... STEP 01 02 03 04 01 STEP 05 02 STEP 06 07 08 09 10 11 03 STEP 15 07 STEP 16 08 STEP 12 04 STEP 13 05 STEP 14 06 All building instructions for DINO are exactly the same as the ones for HUNO except for the arms and the tail ...

Page 40: ...oBuilder ID MAP STEP 17 09 STEP 18 19 20 10 Front View Rear View The ID map of the wCK robot modules for DINO are as follows 13 11 12 14 15 09 04 06 05 07 08 10 01 00 02 03 10 11 12 14 15 04 09 01 00 02 03 13 06 05 07 08 D I N O ...

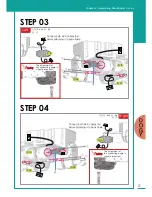
Page 41: ... ⓐ STEP 02 ID 13 Left Connect one wCK cable first as above before attaching it to body frame ⓐ ID 10 B40 B8 ⓐ J3 B40 B8 ⓐ J3 ID 10 ID 13 The adjustment of the connecting angle is critically important 8mm Bolt 40mm Bolt Joint 3 The adjustment of the connecting angle is critically important ...

Page 42: ...both wCK cables first before attaching it to body frame B40 B8 ⓐ J2 Connect both wCK cables first before attaching it to body frame ID 00 ID 05 ID 10 ID 13 ID 13 ID 10 The adjustment of the connecting angle is critically important D I N O The adjustment of the connecting angle is critically important ...

Page 43: ...ct wCK cables as above before attaching leg cover Left B16 B40 B12 ⓐ J6 ⓐ ID 02 ID 03 STEP 05 Left B16 ⓐ J7 ⓑ J4 ⓐ ⓑ Right B16 ⓐ J7 ⓑ J4 ⓐ ⓑ The pentagon shaped rotation axes of wCK ID01 02 03 should all face to same direction outwards ...

Page 44: ...ching leg cover Right STEP 07 B16 B40 B12 ⓐ J6 ID 07 ID 08 ⓐ STEP 08 Left B5 B40 ID 04 The pentagon shaped rotation axes of wCK ID06 07 08 should all face to same direction outwards Make sure that the front side of the shoe plate has a narrower width of its folded surface than rear side D I N O ...

Page 45: ...03 ⓐ ID 04 ⓐ ID 01 ID 02 ID 02 ID 03 STEP 09 Right B5 B40 ID 09 The adjustment of the connecting angle is critically important Make sure that the front side of the shoe plate has a narrower width of its folded surface than rear side ...

Page 46: ...g RoboBuilder Right STEP 11 B8 B12 ⓐ J2 ⓐ ID 09 ID 08 ID 06 ID 07 ID 07 ID 08 STEP 12 B8 B12 B16 ⓐ J2 ⓑⓒ J6 ⓓ J11 ID 12 ID 11 ID 14 ⓑ ID 14 ID 15 ⓑ ⓓ ⓐ The adjustment of the connecting angle is critically important ⓒ D I N O ...

Page 47: ...48 STEP 14 Left Right B12 ID 06 ID 01 ID 06 ID 01 ID 00 ID 05 ID 06 ID 01 ID 05 ID 00 ID 05 ID 00 ID 13 ID 10 STEP 13 B6 ID 13 ID 10 ID 13 ID 10 ...

Page 48: ...49 Chapter 2 Assembling RoboBuilder STEP 15 ID 13 ID 10 STEP 16 B6 Right Front Leg Head Left Front Leg Left Rear Leg Right Rear Leg D I N O ...

Page 49: ...50 STEP 18 STEP 17 B40 ID 01 ID 06 ID 11 ID 12 ID 02 ID 07 ...

Page 50: ...cables from both legs to the connectors on the control box before the con trol box is fully pushed down and secured All cables other than the sensor cable from the head can be plugged into any of the connectors STEP 20 Power ON Check PF1 Pink LED If battery is not sufficiently charged connect the power adapter to run the robot Check the basic posture D I N O ...

Page 51: ...52 DOGY DOGY s appearance resembles that of a dog The assembly of DOGY consists of 18 steps The required parts for each step and the related assembly instructions are provided here Completed DOGY ...

Page 52: ... B12 11 B8 9 Nut 32 B40 16 J11 4 J6 5 Body Frame 1 wCK module 16 Control Box 1 wCK module Cable 16 Sensor Module 1 J12 2 The components within the product are subject to change without notice this may occur if the design of the product changes or is improved B Gold 5 D O G Y ...

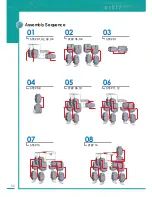
Page 53: ...54 Assembly Sequence STEP 01 02 03 04 01 STEP 05 06 02 STEP 07 03 STEP 08 04 STEP 09 10 05 STEP 11 12 06 STEP 13 07 STEP 14 08 ...

Page 54: ...oBuilder ID MAP STEP 15 09 STEP 16 17 18 10 Bottom View Back View The ID map of the wCK robot modules for DOGY are as follows 14 15 09 06 11 12 04 01 07 08 02 03 13 05 10 00 13 11 12 14 15 09 04 06 05 07 08 10 01 00 02 03 D O G Y ...

Page 55: ...STEP 02 Left ⓐ The adjustment of the connecting angle is critically important ID 05 B40 B8 ⓐ J2 B40 B8 ⓐ J2 ⓐ ID 00 Connect both wCK cables first before attaching it to body frame ID 05 ID 00 Connect both wCK cables first before attaching it to body frame 8mm Bolt 40mm Bolt Joint 2 ...

Page 56: ...nt of the connecting angle is critically important ⓐ ID 05 ID 13 ID 00 ⓐ ID 00 ID 10 ID 05 Connect both wCK cables first before attaching it to body frame ID 13 ID 10 Connect both wCK cables first before attaching it to body frame D O G Y The adjustment of the connecting angle is critically important ...

Page 57: ...58 Right STEP 05 B16 B12 ⓐ J6 ⓑ J11 Left B16 B12 ⓐ J6 ⓑ J11 Left STEP 06 B16 B12 ⓐ J6 ⓑ J11 Right B16 B12 ⓐ J6 ⓑ J11 ID 06 ID 09 ⓑ ID 01 ID 04 ID 14 ID 15 ID 11 ID 12 ⓐ ⓑ ⓐ ⓐ ⓑ ⓐ ⓑ ...

Page 58: ...stment of the connecting angle is critically important ⓐ ID 03 ID 02 For easy assembly insert two nuts into the nut holes of J10 using a screwdriver And then fasten the bolt with the nuts held with your finger ID 08 ID 07 ⓐ ⓑ D O G Y The adjustment of the con necting angle is critically important ...

Page 59: ...60 Left STEP 09 Right STEP 10 B12 B12 The adjustment of the connect ing angle is critically important ID 05 ID 06 ID 00 ID 01 The adjustment of the connect ing angle is critically important ...

Page 60: ...ing RoboBuilder STEP 11 STEP 12 Right B12 Left B12 ID 13 ID 14 ID 10 ID 11 ID 15 ID 12 The adjustment of the connect ing angle is critically important The adjustment of the connecting angle is critically important D O G Y ...

Page 61: ...gle is critically important With the control box half slid down insert the cables from both legs to the connectors on the control box before the control box fully pushed down and secured B6 ID 06 ID 09 ID 05 ID 04 ID 14 ID 12 ID 11 ID 15 ID 13 Right Front Leg Left Front Leg ...

Page 62: ...of the connect ing angle is critically important ID 03 ID 02 ID 03 ID 02 Head Right Front Leg Left Front Foot D O G Y After the head part is fixed to the body frame release the control box half way to insert the wCK cable from wCK module ID02 into the connector on the control box ...

Page 63: ...ght Rear Leg Left Rear Leg All cables other than the sensor cable from the head can be plugged into any of the connectors STEP 18 Check the basic posture Power ON Check PF1 Red LED If battery is not sufficiently charged connect the power adapter to run the robot ...

Page 64: ...This chapter explains how to install the software connect RoboBuilder with your PC create and modify motion program files and operate the fully assembled RoboBuilder Chapter 3 Operating RoboBuilder ...

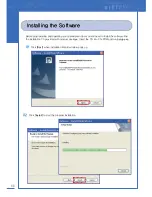
Page 65: ...your assembled robot you will need to install the software from the installation CD provided with product package Insert the CD into CD ROM and run Setup exe 02 Click Install to start the program installation 01 Click Next when Installation Wizard window pops up ...

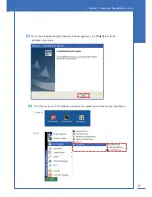
Page 66: ...ing RoboBuilder 04 The shortcut icons of the software programs are registered on Desktop and Start Menu 03 When the Installation Wizard Complete window appears click Finish to end the installation procedure Desktop Start ...

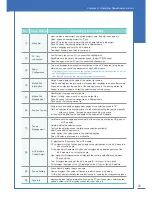
Page 67: ...Upgrade tool MotionBuilder is used to create and modify robot files transfer robot files to RoboBuilder and adjust the home posture RBC Upgrade tool is used to upgrade the firmware of the main control board inside the control box MotionBuilder The MotionBuilder screen layout is as below ...

Page 68: ...s saves the running motion file as a different name ㆍSave saves the running motion file Position Control ㆍRestore sets all modules displacement angles of the selected scene to 0 ㆍGet Pos captures the desired posture of a robot after adjusting the posture manually with user s hands Captured posture is saved as in a scene ㆍInit Pos sets the initial torque and angle of the selected wCK module Scene M...

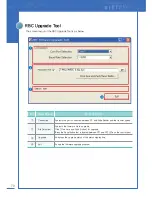
Page 69: ... between PC and RoboBuilder and the transfer speed File Selection It selects the firmware file to upgrade Click Click here and Push Button for upgrade Press the Reset button that is located between PF1 and PF2 LEDs on the control box Upgrade It displays the upgrade status of the status display line Exit It ends the firmware upgrade program ...

Page 70: ...utton Check the com port number assigned to the port into which the RS232 communication cable will be plugged 02 Select the Hardware tab in the System Registration Information window and click Device Manager 03 Select Port in the Device Manager window and check the serial port number assigned from PC COM1 COM2 etc When the PC has no serial port separately purchase and use a USB to Serial converter...

Page 71: ...obot is in the form of the configured platform Below is how to set and check the correct robot platform type on control box In case your robot is a non standard platform other than HUNO DINO and DOGY press PF2 button for 3 seconds until PF2 LED turns on orange HUNO PF1 turns on blue LED DINO PF1 turns on pink LED DOGY PF1 turns on red LED Press PF1 button for 3 seconds Press PF1 button for 3 secon...

Page 72: ... home posture Only applicable for HUNO PC Control Mode Turn on the power with PF2 button pressed and release the button after 2 seconds The control box is changed to PC control mode ㆍPF1 LED Blue LED turns off ㆍPF2 LED Orange LED turns off Platform Setting Press PF1 or PF2 button for 3 seconds Each time PF1 button pressed for 3 seconds the platform is changed in sequence HUNO DINO DOGY ㆍHUNO PF1 L...

Page 73: ...on number 16 Perform motion number 7 Perform motion number 17 Perform motion number 8 Perform motion number 18 Perform motion number 9 Perform motion number 19 Perform motion number 10 Perform motion number 20 ㆍ Do not use the remote control under a strong fluorescent lamp light The IR sensor unit inside the top cover of head may be affected by the fluorescent light ㆍ Maximum 5 remote controls can...

Page 74: ...n file is played in the control box A project file includes more than one motion file and is used to manage multiple motion files efficiently A motion file consists of more than one scene ㆍProject file It consists of multiple motion files that are created or edited by a user ㆍMotion file It consists of multiple scenes and executes a complete motion ㆍScene It is a smaller motion unit that constitut...

Page 75: ...latform type Then click OK 03 new project for HUNO is created and HUNO image shows up and the basic information of the wCK modules appear on the Robot Configuration area 01 Set ComPort and BaudRate and click OpenPort If the connection between PC and RoboBuilder is normal the button changed to ClosePort Do not be surprised because the robot can move suddenly at this moment ...

Page 76: ...otion file name and save path etc and click OK 06 The new scene is now registered and the total scene is changed to 1 05 Register the first scene in the created motion file Set the name of the scene the number of frames and Tr Time and click OK Tr Time Frame 20 50 recommended Do not set this value less than 20 ...

Page 77: ...s It displays the transition time of the corresponding scene Unit ms The control angle 1 means the physical angle 1 05 degree 07 When you press Test button the robot moves to the destination position of the selected scene and the Test button get changed to Return button In this state set the posture of the robot by adjusting the angles of wCK modules You can drag the red point in the jog buttons f...

Page 78: ...ds instructed below 1 Adjusting by changing D Pos value Select the scene to change and click Test When the button is changed to Return double click the D Pos value of the wCK module to change Type in the numeric D Pos value and press ENTER Click Return to save the changed value 2 Adjusting by changing Disp value Select the scene to change and click Test When the button is changed to Return double ...

Page 79: ...n programming is completed click Save All to save the project and motion file information 09 Click New Scene to add another scene Give the new scene a name the required number of frames and the Tr time Then click OK A new scene is added Repeat the process of adding scenes as shown above until you finish a complete motion file ...

Page 80: ...to ClosePort 02 Select Open on the menu bar Select the desired project in the Open Project window and click Open e g HunoBasic prj 03 The settings of the wCK modules appear in the Robot Configuration window At the same time the first motion file that is saved in the project opens In case of HunoBasic prj the HunoBasic_PunchLeft motion opens In order to modify a motion file that you downloaded from...

Page 81: ...osition of the corresponding scene and the wCK module angle appears in the Robot Configuration window Detailed control information is shown on the wCK Module Control Detail area in the middle of the screen 06 When the selected scene is double clicked the detail information of the scene will appear in a pop up window Change the scene name number of frames and Tr Time if needed ...

Page 82: ...t When the button is changed to Return double click the D Pos value of the wCK module to change Type in the numeric D Pos value and press ENTER Click Return to save the changed value 2 Adjusting by changing Disp value Select the scene to change and click Test When the button is changed to Return double click the Disp value of the wCK module to change Type in the numeric Disp value and press ENTER ...

Page 83: ...esired wCK modules freely The captured posture is saved as the destination position of the selected scene The destination position is automatically saved as the start position of the next scene 01 Select a scene to edit and click Test Robot moves to destination position of the scene and the Test button is changed to Return 02 Click Get Pos in the middle of screen A wCK module selection window appe...

Page 84: ...he selected modules are now free of Torque and freely movable Now the selected wCK modules are in Teaching Mode The unselected wCK modules are powered with torque and difficult to rotate which is set to help the robot stand still 05 When finished with manual posture adjusting click Capture to load in the change The Capture button returns to Get Pos buttion 04 Use your hands to freely adjust the de...

Page 85: ...hat a user has downloaded from the Internet 01 Set ComPort and BaudRate and click OpenPort If the connection between PC and RoboBuilder is normal the button changed to ClosePort 02 Select Open on the menu bar Select the desired project in the Open Project window and click Open e g HunoBasic prj ...

Page 86: ...n List menu and click Add to Project to select the file that you downloaded from Internet and saved in your hard disk Click Open to Edit button to open the motion file 04 Follow the steps of 05 08 of Modifying Existing Robot File section in page 82 83 ...

Page 87: ...hat you created with Motion Builder or downloaded from the Internet can be used The file transfer is done as per the instructions below 01 Set ComPort and BaudRate and click OpenPort If the connection between PC and RoboBuilder is normal the button changed to ClosePort 02 Click Download on the menu bar Select the robot file to transfer to control box and click Open ...

Page 88: ...g So the first file transferred is assigned to button 1 of remote control the second file transferred is assigned to button 2 and the third file to buttion 3 and so on So you have to plan and decide which robot file to be assigned to which button of remote control before you actually start the file transfer If the size of a certain robot file is too large the control box may not be able to save up...

Page 89: ...m motions by pressing the basic motion buttons or user defined motion buttons on the remote control 04 RoboBuilder performs best when the robot is located on a flat horizontal and hard floor A robot may lose balance fall down or show an awkward movement on a floor which is uneven or made from rough material such as carpet rug etc 05 The basic motions of the standard platform robots HUNO DINO DOGY ...

Page 90: ...ed So please use power adapter to operate the robot the first time The enclosed power supply is used not only for recharging the battery but also for supplying direct power to the robot So it can be used as an alternative to the battery and be used to operate the robot continuously This function is not supported when recharging battery How to Start Battery Charging Press the PF1 button and PF2 but...

Page 91: ...placement procedure is as follows 01 Remove the four bolts from the cover of control box 02 Replace the batteries after disconnecting the connector Battery Type 8 4V Ni MH 03 Close the cover of the control box and screw in the four bolts ...

Page 92: ...lem by adjusting the Home Posture The Home Posture adjustment is done as follows Using the Package Tray You can adjust the home posture by using the plastic tray provided with the product package 01 Prepare fully assembled HUNO and tray 02 Run MotionBuilder software and connect RoboBuilder with PC using PC cable Set Com port and BaudRate and click OpenPort If the connection between PC and RoboBuil...

Page 93: ...ll work 05 Click ZeroCaptureReady and use hands to make sure that HUNO is correctly inserted into the tray The front HUNO should be tightly touching the hollow surface of tray 03 Lay down HUNO into the tray as shown in the picture Turn on the control box as in PC Control Mode ...

Page 94: ...d to vertically press position 4 and use the other hand to press position 2 Press position 3 vertically with two hands Repeat step to press position 4 and position 2 together Correct Home Posture can be secured only when the front of the robot is tightly attached to the hollow surface of tray 06 If robot is laid correctly click ZeroCapture The current posture is copied in as one of the five sampli...

Page 95: ...5 of posture captures When the adjustment is completed a pop up window appears saying Complete Click OK 08 Click Save Zero Set to RBC to save the home posture and apply it to control box click OK 09 Remove HUNO from the tray and click ZeroPose to check if new home posture is correctly configured or not ...

Page 96: ...otionBuilder software and connect RoboBuilder with PC using PC cable Set Com port and BaudRate and click OpenPort If the connection between PC and RoboBuilder is normal the button will change to ClosePort When connection is ready select the ZERO Setting tab 02 Click Open on the menu bar to open a HUNO project Any HUNO project will work RS232 Cable ...

Page 97: ...hen you click ZeroControlReady the screen is changed to a mode where you can manually adjust the home posture 04 Adjust the home posture by using the jog buttons of wCK modules in the Robot Configuration area ...

Page 98: ...99 Chapter 3 Operating RoboBuilder 05 When adjustment is completed click StopZeroControl 06 Click Save Zero Set to RBC to save the home posture and apply it to control box ...

Page 99: ...in control box This button applies the changed home posture values to control box This button makes the robot take the corresponding home posture This button saves a copy the home posture file as a different name This button loads up any home posture file separately saved elsewhere ...

Page 100: ...lows 01 Run RBC Upgrade Tool software and turn on the control box 02 Connect control box with PC using RS 232 cable Set Com Port and Baud Rate 03 Select the firmware file to use for upgrade by clicking the folder icon click Open when firmware hex file is selected 04 Click Click here and Push Button to enter upgrade ready state ...

Page 101: ...ted control box is automatically reset Then a complete message appears Click OK The firmware upgrade procedure is finished Click Exit to terminate the program After upgrading firmware be sure to perform the following three steps Register remote control again Set robot s platform type again use PF1 or PF2 button Reset home posture Reset button ...

Page 102: ...This chapter explains how to solve problems that you may encounter in the process of building a robot programming a robot file or operating a robot platform Chapter 4 Troubleshooting ...

Page 103: ... each of wCK modules Cause Solution 01 Turn the joint slightly in the opposite direction first and try again to turn in the desired direction Solution 02 If you can t provide enough force use J5 Joint 5 to rotate the wCK module Much greater torque can be leveraged and it s easier to rotate the axis Solution 03 Connect the wCK module and sensor module to control box Turn on the control box and have...

Page 104: ...he remote control for 30 seconds which is designed to protect possible damage to product Cause STEP 01 Is battery charged enough When shipped from the factory the battery pack enclosed in control box is not charged So please use the power adapter to operate robot the first time The enclosed power supply is used not only for recharging battery but also for supplying direct power to the robot So it ...

Page 105: ...double check if wCK modules are all the correct ID numbers If not disassemble the required parts and correct the problem Troubleshooting If needed disassemble the required parts and correct the connection angle problem Refer to the video version building instructions as well as the material uploaded on homepage to help fix the problem Troubleshooting STEP 04 The connections of joints with wCK modu...

Page 106: ...orrect direction In some body parts if joint part is not inserted with the correct direction the robot may not operate properly The following building steps are where users frequently make mistakes HUNO Leg Part STEP07 08 DINO Leg Part STEP06 07 DOGY Leg Part STEP05 06 STEP 06 Are all cables connected If any of the 16 wCK module cables are not connected the robot won t operate properly If the robo...

Page 107: ... one or more wCK module cables are disconnected whilst the robot is performing a dynamic or forceful motion Check and make sure all 16 cables are tightly connected to control box The cables from the inside of shoulder parts ID10 ID13 of HUNO are especially prone to being pulled out occasionally Cause1 This problem may occur when that battery does not have enough charge Troubleshooting Please conne...

Page 108: ...109 Chapter 4 Troubleshooting MEMO ...

Page 109: ...110 MEMO ...

Page 110: ... Customer Support RBDS UG BB085V120 EN Homepage www RoboBuilder net E mail customer service robobuilder net Tel 82 2 3141 5101 5106 Fax 82 2 3141 5107 ...

Reviews: