83
Chapter 3. Operating RoboBuilder
07
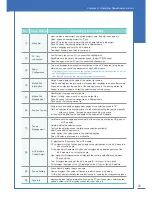
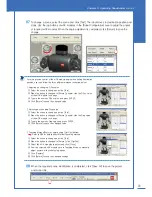
To change a scene, select the scene and click [Test]. The robot moves to destination position and
stops. Use the jog buttons of wCK modules in the [Robot Configuration] area to adjust the angles
of required wCK modules. When the angle adjustment is completed, click [Return] to save the
change.
08
When the required scene modification is completed, click [Save All] to save the project
and motion file.
For more precise control of the wCK module angle when setting destination
position, user can follow the three different methods instructed below:
1. Adjusting by changing D.Pos value
① Select the scene to change and click [Test].
② When the button is changed to [Return], double-click the D.Pos value
of the wCK module to change.
③ Type in the numeric D.Pos value and press ENTER.
④ Click [Return] to save the changed value.
2. Adjusting by changing Disp value
① Select the scene to change and click [Test].
② When the button is changed to [Return], double-click the Disp value
of the wCK module to change.
③ Type in the numeric Disp value and press ENTER.
④ Click [Return] to save the changed value.
3. Teaching Method(Posture Capture using [Get Pos] button)
① Select the scene to change and click [Test].
② When the button is changed to [Return], click [Get Pos].
③ Select the wCK modules to adjust and click [Close].
④ Now the selected wCK modules are in Teaching Mode so manually
adjust posture of the robot using hands.
⑤ Click [Capture].
⑥ Click [Return] to save the changed settings.
Refer to P84 for details about Motion-Teaching method
Summary of Contents for DIY Robot kit
Page 2: ......
Page 20: ...21 Chapter 2 Assembling RoboBuilder HUNO DINO ...
Page 36: ...37 Chapter 2 Assembling RoboBuilder H U N O ...
Page 49: ...50 STEP 18 STEP 17 B40 ID 01 ID 06 ID 11 ID 12 ID 02 ID 07 ...
Page 108: ...109 Chapter 4 Troubleshooting MEMO ...
Page 109: ...110 MEMO ...

