background image

24 


Appendix


Specifications


Structure


Overall dimensions


600 × 450 × 460 mm


Weight (with battery)


17.1 Kg


Performance


Maximum forward speed


3 m/s


Maximum translational speed


2 m/s


Gimbal’s pitch axis rotation 
range


-25° - 25°


Gimbal’s yaw axis rotation range


-90° - 90°


Projectile’s launch frequency


6 rounds/s


Projectile’s launch speed 
(muzzle)


25 m/s


Projectile load


300 rounds


Power System


Chassis power motor model


RoboMaster M3508 P19 Brushless DC Gear Motor


Gimbal power motor model


RoboMaster GM6020 Brushless DC Motor


Launch power motor model


RoboMaster  SNAIL 2305 Brushless DC Motor


Launch power motor ESC


RoboMaster


C615 Brushless DC Motor Speed Controller


Feeding power motor model


RoboMaster 

M

2006 P36 Brushless DC Gear Motor


Feeding power motor ESC


RoboMaster C610 Brushless DC Motor Speed Controller


Battery


Summary of Contents for AI Robot 2020 Standard Version

Page 1: ...RoboMaster AI Robot 2020 Standard Version User Manual V2 0 2020 2 0 ...

Page 2: ...e 4 I Introduction 5 II Hardware Modules and Their Methods of Use 5 III Software System 15 IV Intelligent Battery 16 4 1 Powering On Off 16 4 2 Checking Battery Level 16 4 3 Battery Charging 17 V Remote Controller Kit 18 VI Robot Activation and Control 20 Partial List of Components 26 Contact us 27 ...

Page 3: ...ed the manuals for all the accessories including the motor and ESC used in the RoboMaster 2020 AI robot into the compressed RoboMaster 2020 AI Robot Document Pack for the reference of users Users are advised to first perform checks using the RoboMaster AI Robot 2020 Standard Version Items List After that users may familiarize themselves with the entire process of use by referring to the RoboMaster...

Page 4: ...erforms an internal self check and can only be operated after the self check is completed 3 To move the AI robot at high speed operate it in a spacious unmanned area The robot must not collide with hard objects such as walls at full speed 4 Projectiles must not be launched at people After the projectile speed is adjusted the optimal testing environment is to launch it at a box with shock absorbing...

Page 5: ... flexibility and battle ability of the robot The robot s Launch Module is able to launch RoboMaster 17mm projectiles The robot s Referee System Module contains sensors that can detect the value of HP deduction suffered by the robot and the Referee System Module will automatically power off and simulate the robot s defeat when the robot s HP has been reduced to zero It can operate multiple robots o...

Page 6: ...6 ...

Page 7: ...tile Supply Module 5 Referee System Light Indicator Module LI01 6 Power Module 7 Referee System Main Controller Module MC02 8 Referee System Armor Module AM02 9 TB47S Battery 10 Referee System RFID Interaction Module FI02 11 Referee System Power Management Module PM01 12 RoboMaster Development Board Type C ...

Page 8: ...ement technology of Mecanum wheels which enables movements in multiple directions including forward traversing diagonal rotational movements and their combinations The Chassis Module powers four wheel drive using the RoboMaster M3508 P19 Brushless DC Gear Motor For the technical specifications of the motor and the ESC please see the RoboMaster M3508 P19 Brushless DC Gear Motor User Guide and RoboM...

Page 9: ...aw axis of the gimbal You can install the bracket based on the following mounting hole arrangement Mounting holes for the sensor holder are available on both the side above the armor plate and front of the chassis You can install the bracket based on the following mounting hole arrangement ...

Page 10: ...4 2 Axis Gimbal A 2 axis gimbal is installed between the robot s chassis and Launching Mechanism The robot moves around the pitch axis and the yaw axis Pitch axis motion range 25 mechanical limit of rotating angle Yaw axis motion range 90 mechanical limit of rotating angle The 2 axis gimbal uses mechanical limits to control the motion range as shown in the figure below ...

Page 11: ...of the Referee System Power Management Module The 2 Axis Gimbal Module is propelled by direct drive The driving motor is the RoboMaster GM6020 Brushless DC Motor and the ESC is integrated in the motor For the detailed technical specifications of the motor and ESC see the RoboMaster GM6020 Brushless DC Motor User Guide in the reference document pack 2 5 Projectile Supply Module The robot receives p...

Page 12: ...stemisanelectronicpenaltysystemusedforroboticcompetitionsthatintegratescomputation communication and control features The Referee System includes the onboard terminal installed on the robot as well as the server and client softwareinstalledonthePC TheonboardterminalincludestheMainController PowerManagement Armor SpeedMonitor and RFID Interaction Modules This system can detect the damage suffered b...

Page 13: ...wnload The Speed Monitor Module is subject to the relevant information in the DJI RoboMaster 2020 AI Challenge Referee System Specification Manual The server installation pack will be released later on RoboMaster s official website https www robomaster com en US resource download Check in regularly for updates 2 8 Hardware Circuit System The robot hardware circuit system uses standard CAN bus comm...

Page 14: ...14 Note The following configuration demonstrates the wiring diagram of the official test prototype ...

Page 15: ...ther functions For detailed technical information on the RoboMaster Development Board Type C please see the RoboMaster Development Board Type C User Guide in the reference document pack or visit https robomaster com to download the relevant documents III Software System Please download the relevant information on the robot s software system at the following address https github com RoboMaster Robo...

Page 16: ...he intelligent battery on or off short press the power switch once and then press and hold the power switch for more than two seconds When the battery is on the capacity indicator shows the current battery capacity When the battery is off the indicator is off 4 2 Checking Battery Level To view the current capacity short press the power switch once when the battery is off The capacity indicator dis...

Page 17: ...ty 4 When the capacity indicator turns off the battery is fully charged In this case disconnect the battery from the charger to finish charging Use the RoboMaster designated special charger as the standard charger The battery temperature becomes high after a period of use In this case you must wait for the battery to drop to room temperature before charging it The optimal charging temperature rang...

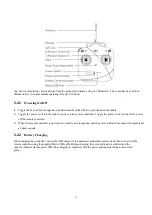
Page 18: ... the power button to cancel the LED indicator protection notifications and then unplug and plug the charger in again to resume charging If the charging temperature is abnormal wait for the charging temperature to return to normal and the battery will automatically resume charging without the need to unplug and plug in the charger again V Remote Controller Set 5 1 Description of Kit The kit include...

Page 19: ...ller Toggle the power switch to the left to power off the remote controller 3 When the remote controller is powered on it emits a warning tone and the power indicator becomes solid green and a buzzer sounds 5 2 2 Battery Charging When charging the controller connect the USB charger to the parameter adjustment port located at the lower end of the remote controller using the supplied Micro USB cable...

Page 20: ...r complete the following steps 1 Locate the linking hole on the right of the Development Board Type C on the chassis where the receiver linking button is located 2 Power on the robot and check that the receiver is on If no controller nearby has been powered on the LED indicator on the receiver is solid red 3 Power on the remote controller to be linked and bring it close to the receiver until the r...

Page 21: ...lose as possible and ensure that no other nearby remote controllers are on For the communications protocol between the DT7 Remote Controller and the DR16 Receiver please see the RoboMaster Robot Remote Controller Receiver User Manual in the reference document pack ...

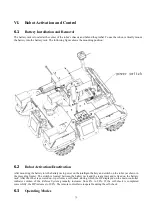
Page 22: ... into the battery rack power on the intelligent battery and switch on the robot as shown in the preceding figure The switch is located between the battery rack and the rear armor and is fixed on the battery rack After the robot is powered on it performs a self check during which the HP displayed on the main controller indicator column of the Referee System gradually increases from 0 to 90 If the s...

Page 23: ...s two user operating modes 1 Manual operating mode The robot is controlled manually using the remote controller Operation is easier and is immediately available after power on It is suitable for demonstration and debugging ...

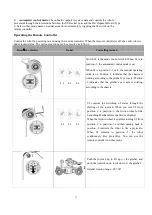
Page 24: ...is on When S1 is in position 1 or 2 the manual operating mode is on Position 1 indicates that the chassis is rotating according to the gimbal s yaw axis Position 2 indicates that the gimbal s yaw axis is rotating according to the chassis S2 controls the switching of states through the shifting of the joystick When you turn S2 from position 2 to position 1 the friction wheel of the Launching Mechan...

Page 25: ... remains stationary When the joystick is pushed up the robot moves forward when the joystick is pushed down the robot moves backward when the joystick is in the middle position the robot remains stationary When the joystick is pushed to the left the robot makes a parallel left shift when the joystick is pushed to the right the robot makes a parallel right shift when the joystick is in the middle p...

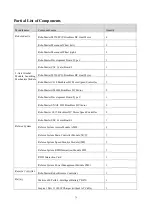
Page 26: ...tile s launch speed muzzle 25 m s Projectile load 300 rounds Power System Chassis power motor model RoboMaster M3508 P19 Brushless DC Gear Motor Gimbal power motor model RoboMaster GM6020 Brushless DC Motor Launch power motor model RoboMaster SNAIL 2305 Brushless DC Motor Launch power motor ESC RoboMaster C615 Brushless DC Motor Speed Controller Feeding power motor model RoboMaster M2006 P36 Brush...

Page 27: ...ommunication distance 1000 m Power supply Built in lithium battery Charging port Micro USB Battery Capacity 2000 mAh Charger Model Inspire 1 Part 13 180W Charger without AC cable Input 100 240 V 50 60 Hz Output 26 3 V Projectile Model RoboMaster 17mm Fluorescent Projectile Color Yellow green Size 17 mm Weight 3 2 0 1g ...

Page 28: ...oMaster GM6020 Brushless DC Motor 2 RoboMaster Development Board Type C 1 RoboMaster SNAIL 2305 Brushless DC Motor 2 RoboMaster C615 Brushless DC Motor Speed Controller 2 RoboMaster ESC Center Board 2 1 Referee System Referee System Armor Module AM02 4 Referee System Main Controller Module MC02 1 Referee System Speed Monitor Module SM01 1 Referee System RFID Interaction Module FI02 1 RFID Interact...

Page 29: ...Contact us RoboMaster s official website www robomaster com RoboMaster s official forum bbs robomaster com RoboMaster s official email robomaster dji com ...

Reviews: