35
EN
Screen
Setting
Description
Options
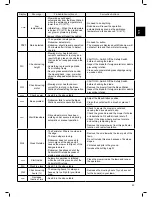
P012
Anti-Theft /
Disabling Device
Change PIN code
•
Allows changing of the Anti-Theft / Disabling Device PIN code.
•
Enter a new code and then re-enter the new code for confirmation.
0000
P013
Base Station
(Default =
ON
)
•
This option should be used in a Separated Zone which has a
Base Station
•
If you have defined more than one zone, then select the relevant
zone before changing the setting.
On/OFF
P014
Add Separated
Zone
•
Enables the addition of a Separated Zone.
•
L2 is displayed for Separated Zone A – press OK.
•
Scroll to set the area of the Separated Zone and press OK.
L2
100
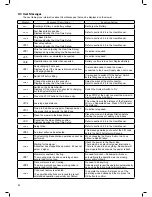
P015
Remove Zone
•
Enables the removal of a Separated Zone or a Sub-Zone.
•
Choose the Zone you want to remove and press OK.
L2/L3
A1/A2/A3/A4
P016
Sound
(Default =
ON
)
•
Use the Sound option to turn all non-safety sounds off.
On/OFF
P017
Mobile
Communication
System
(Default =
OFF
)
•
Enables remote communication with the mower using a GSM
Module Accessory, which can be purchased separately.
•
For more information, refer to Section 12 – Accessories.
On/OFF
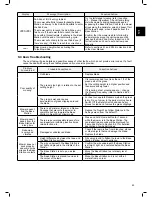
P018
Statistics (Default
=
OFF
)
•
This menu is displayed only if P018 is set to ‘On’.
•
Enables to send the operation statistics from the mower to the
manufacturer for diagnostics in case of problems.
On/OFF
P019
Bluetooth Remote
Control Pairing
•
Enables the pairing process between your Robomow and
an outdoor Bluetooth Remote Control that is available as an
accessory (Refer to Paragraph 12 Accessories).
P020
Last Termination
Event
•
Enables the Behavior View of the special display (may be required
by a Service Station)
P021
Program On/Off
(Default =
OFF
)
•
This menu enables or disables (pauses) Automatic Operation
either in the main zone (‘L1’), one of the Sub-Zones (‘A1/ A2/ A3/
A4’) or inthe entire lawn (‘All’).
•
When Program is set to Off in a particular zone, the mower will
skip the operation in that zone, but will continue to mow all the
other zones
All
L1
A1/A2/A3/A4
On/OFF
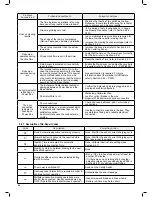
P022
Add Sub-Zone
•
Enables the addition of a Sub-Zone. Maximal number of Sub-
Zones may be different for each Robomow model.
•
A1/A2/A3/A4 (name of the first available sub-zone) is displayed
– press OK.
•
If the mower is not at the Base Station, then ‘U044’ (“Place the
mower in the Base Station”) is displayed. Place the mower in the
Base Station and press OK.
•
The mower will start moving towards the Sub-Zone. ‘U041’ (“Press
the STOP button at Sub-Zone entry.”) will be displayed.
•
Press ‘STOP’ button, when the mower is at any point beyond the
Narrow Pass and inside the Sub-Zone (Entry Point).
•
Scroll to set the area of the Sub-Zone and press OK.
•
Note! This process is not a part of the One-Time Setup (see
Section 5.2)
•
The area setting of a Sub-Zone can be later updated through the
‘Area’ menu of the Basic Settings (see Section 6.4.1)
•
The distance to Sub-Zone’s entry point can later be update
through menu P023
A1/A2/A3/A4
100
P023
Update Distance
To Sub-Zone
•
This menu is shown only if a Sub-Zone has been defined.
•
It allows to update the distance to Sub-Zone’s entry point.
•
Scroll to choose the required Sub-Zone (A1/A2/A3/A4) and press
OK to update the distance to the entry point.

