background image

36

Screen

Setting

Description

Options

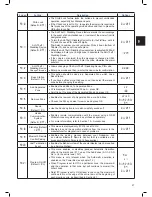
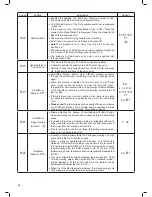
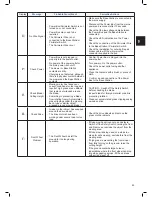
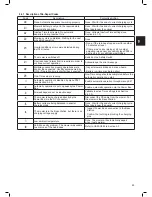
P003

Near Wire Follow 

(Default = 

ON

• 

When Robomow completes its operation, or when the ‘Home’ button 

instructs it to Go To Base, it drives itself to the Base Station.

• 

Robomow drives along the Perimeter Wire with a dynamic offset (not 

centered) to prevent wheel tracks along the same path. This return 

behavior can be turned off.

• 

This menu is not available for RC304 and MC400 models.

• 

For all other models, the Near Wire Follow feature can be enabled 

and configured for a Sub-Zone as well. 

On

/

OFF

P004

Max Near Wire 

Follow Distance

(Default = 

changed based on 

the lawn area)

• 

The  maximum  distance  Robomow  will  drive  from  the  wire  when 

returning to the Base Station. 

• 

The distance does not represent actual units of measurement.

• 

The  offset  Distance  values  range  from  1  to  12.  They  represent 

different distances from the wire.

• 

The higher the Distance setting, the smaller the probability of tracks 

along the perimeter.

• 

Perimeter Islands that are relatively close to the Perimeter Wire or 

narrow passages may prevent the mower to complete its drive to the 

Base Station with ‘Near Wire Follow’ mode. In such cases decrease 

the distance to allow the mower to complete the drive to the Base 

Station.

• 

This menu is not available for RC304 and MC400 models.

• 

For all other models, the Near Wire Follow feature can be enabled 

and configured for a Sub-Zone as well. 

1-12

P005

Min Near Wire 

Follow Distance

(Default = 

1

)

• 

The  minimum  distance  Robomow  will  drive  from  the  wire  when 

returning to the Base Station. 

• 

The larger the number, the bigger the distance the mower will drive 

from the wire while returns to the Base Station.

• 

This menu is not available for RC304 and MC400 models.

• 

For all other models, the Near Wire Follow feature can be enabled 

and configured for a Sub-Zone as well. 

1-5

P006

Near Wire Follow 

Test

• 

Enables to test the mower in the max ‘Near wire Follow Distance’ 

that is defined in menu P004. 

• 

If the mower is not able to complete the drive in ‘Near Wire’ mode 

smoothly, then it is recommended to reduce the max distance set in 

menu P004.  

• 

This menu is not available for RC304 and MC400 models.

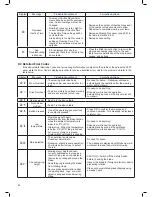
P007

Rain Sensor 

(Default = 

On

)

• 

The Rain Sensor feature halts operation on rainy or highly humid 

weather.

• 

This is recommended for the health of the lawn. However, mowing 

wet grass does not present any technical problem. 

Note! 

It may take a few minutes before Robomow detects rainy or 

humid conditions. This is done in order to avoid false-detections. As 

soon as the mower detects rain, it halts current mowing operation 

and starts searching for the Base Station. When the ‘Islands’ feature 

is set to On (see menu P002 above), the mower will execute a special 

method of searching for the Base Station. As a result it may take the 

mower more time (up to 20-30 minutes) to arrive to the Base Station.

On

/

OFF

P008

Rain Sensor 

Sensitivity 

(Default = 

25

)

• 

Robomow detects rain when the current reading value is below the 

set Sensitivity value and postpones operation.

• 

The higher the Sensitivity setting, the more sensitive Robomow is to 

rain detection.

0-30

P009

Edging 

On

/

Off


(Default = 

ON

)

• 

Edging is a special mode, in which Robomow follows the perimeter 

wire for complete and accurate mowing of the lawn edges.  

• 

In lawns where the edge is not maintained well and the mower fails 

to complete the drive along the edge of the lawn, it is recommended 

to set Edging to ‘Off’. 

• 

Setting Edging to ‘Off’ disables Edging mode in automatic departures 

from  the  station,  but  still  allows  edge-mowing  when  pressing  the 

‘Edge’ mode button on the operating panel.

On

/

OFF

Summary of Contents for MC1200

Page 1: ......

Page 2: ...Original Operating Instructions EN Robotic Mower RC304 RC308 RC312 MC400 MC800 MC1200 Operating Manual ...

Page 3: ...mow 29 5 1 Adjust the Cutting Height 29 5 2 One time Setup Step By Step 29 Chapter 6 Operation 32 6 1 Automatic Operation 32 6 2 Operating Panel 32 6 3 Manual Operation 33 6 4 Menu Options 34 6 5 Operation in a Non Base Zone 39 Chapter 7 Using the Power Box 40 7 1 Power Box Alerts 40 7 2 Turn the Buzzer On Off 40 7 3 Enable Disable the Automatic Operation 40 Chapter 8 Charging 41 8 1 Charging Duri...

Page 4: ...are manufactured by F Robotics Acquisitions Friendly Robotics Friendly Robotics 2015 A All rights reserved No part of this document may be photocopied reproduced electronically transmitted or translated without the prior written consent of Friendly Robotics Product product specifications and this document are subject to change without notice All other trademarks are property of their respective ow...

Page 5: ...the proper use of Robomow 2 Never allow people who are unfamiliar with these instructions or children to use Robomow 3 The user is responsible for accidents to other people or their property Preparation 1 Ensure the correct installation of the Perimeter Wire as instructed 2 Inspect Periodically the area where Robomow is used and remove all stones sticks wires and other foreign objects 3 Periodical...

Page 6: ...inal equipment and accessories It is not permitted to modify the original design of Robomow All modifications are made at your own risk 7 Maintenance Servicing Cleaning of Robomow should be according to manufacturer s instructions 8 Keep all nuts bolts and screws tight to be sure the machine is in safe working condition 9 Warning When there is a risk of a lightning storm disconnect the Perimeter W...

Page 7: ... detects interfering obstacles in its way during operation When the mower collides with an obstacle the mower will stop the rotation of the blade immediately will stop movement in that direction and reverse itself away from the obstacle 6 Emergency Stop Button Pressing the STOP button at any time during operation will stop the mower and the blade immediately 7 Safety Switch Switching off the Safet...

Page 8: ...Used for securing the Base Station to the ground 4 Operating Safety Manual 10 Extension Cable 15 meters 50 ft Low voltage cable 5 Wire Connectors Used for splicing wires as needed 11 Power Box The primary purpose of the Power Box is power supply for charging Robomow Used to deactivate halt the automatic operation mode and reactivate it as needed 6 Plot Connectors Used for connecting the Perimeter ...

Page 9: ...uctions are in the following chapters Robomow will do all the mowing for you for during the entire season Robomow is a robotic lawn mower powered by a rechargable battery It leaves its Base Station at scheduled mowing times Robomow mows the lawn and then drives back to the Base Station to be charged and ready for its next scheduled mowing As soon as Robomow departs for mowing the Base Station auto...

Page 10: ...n 6 4 2 for more information Availability The mowing width of Robomow 28cm 11 and the powerful cutting system help Robomow to finish the job very fast and leave your lawn free for the family to enjoy A Remote Control is available as an accessory and is used for driving Robomow to a separated zone if necessary It is also used for mowing small patches of lawn that cannot be reached in automatic oper...

Page 11: ...arcated areas 3 1 Lawn Types What does your lawn look like There are 3 basic types of lawns Some lawns are combinations of more than one type Your first task is to determine which type is yours o Main Zone Only Robomow will simply mow this lawn within its set boundaries o Main Zone Sub Zone s Robomow will mow the Main Zone and will move automatically to the Sub Zone s o Separated Zone Robomow will...

Page 12: ...3 1 3 Separated Zones Type Lawn Separated Zones type lawn consists of two or more zones that are not connected Robomow cannot drive between these zones If you answer yes to at least one of the following questions your lawn is of the Separated Zones type o Are parts of your lawn separated by fences sidewalks or other objects that Robomow cannot pass Or o Are parts of your lawn separated by a gravel...

Page 13: ... you will have to manually bring the mower several times to the Separated Zone in order to complete the mowing of the area 3 2 Select Base Station Location 3 2 1 Base Station Location Guidelines Do not place the Base Station within 3 meters 10 ft after a corner relevant for Internal Setup only section 3 2 2 The Base Station should be within 15m 50 ft distance from a power outlet 230V 120V If the l...

Page 14: ...ht in order to allow smooth entry of the mower to the Base Station Later you will have the opportunity to adjust the Base Station position to confirm smooth entry B Outside the lawn Can be set only through the Robomow App for specific models Choose a place outside the lawn where you want Robomow to dock and charge Confirm the path between the lawn and the outside area is smooth with no height diff...

Page 15: ...ating Perimeter Islands which are demarcated areas of the lawn where Robomow should not enter In the areas where obstacles are grouped closely together they should be demarcated by a single continuous Perimeter Island Obstacles that are vertical relatively rigid and higher than 15 cm 6 inches such as trees phone or power poles do not need Perimeter Island Robomow will turn when it collides with th...

Page 16: ...nce from the edge where the wire is to be placed In certain cases near bodies of water such as pools and ponds or great height differences such as cliffs it is required to maintain a greater distance from the Edge see Section 4 2 2 3 4 4 Interference with adjacent lawns In case there is another robotic mower from the same or different manufacturer working in an adjacent lawn you need to keep at le...

Page 17: ...ready for operation when the setup is completed The power of the mower is switched off when shipped from the factory Switch on the Safety Switch to power on the mower Connect the DC Cable coming from the Power Box to the Charging Socket at the rear side of Robomow Confirm the Battery LED on Robomow is blinking which is an indication of charging Leave Robomow connected to the Power Box while comple...

Page 18: ...ou carefully lay the Perimeter Wire as needed The next sections deal with such special cases 4 2 2 Laying the Perimeter Wire o The Perimeter Wire is secured to the ground by pegs supplied with Robomow Initially insert pegs every few meters and at corners At this early stage set a minimum number of pegs Later after testing the wire setup you will insert all necessary pegs o After uncoiling some wir...

Page 19: ... 20 inches or a public road the Perimeter Wire must be supplemented with a fence or alike The height must then be at least 15cm 6 inches This will prevent the mower from ending up outside the working area under any circumstances If such a barrier exists you may set the Perimeter Wire 28cm 11 inches from the barrier If there is no fence or the like then lay the Perimeter Wire at minimum distance of...

Page 20: ...ist o Robomow will recognize the single blocking wire around the Perimeter Island and will not enter this area Perimeter Wire Position 2 Wires under same peg Perimeter Wire Direction of setup Clockwise around obstacle Min distance between islands 1m 3 3ft Otherwise demarcate jointly as one island Perimiter Wire Position Perimiter Wire 2 Wires under same peg Direction of setup Clockwise around obst...

Page 21: ...tion needs to be done dual square installation 1 Define the entry to the Narrow Pass the point you want the mower to start driving towards the Sub Zone 2 50 cm 20 inches from the Narrow Pass entry set a Perimeter Island refer to 4 3 2 as shown in the picture above 3 Continue to lay the wire along the edge at a proper distance depending on the edge type until coming back to the Narrow Pass entry fr...

Page 22: ...ne 2 Set an Perimeter Island at the middle of the Narrow Pass refer to 4 3 2 as shown in the picture above and keep a distance of 10 cm 4 inches from the Perimeter Wire 3 The island dimensions should be 28 cm 11 along the side and as wide as needed when keeping 10 cm 4 inches from both sides 4 After completing the setup of the wire in the Sub Zone make sure you keep 10 cm 4 inches between the wire...

Page 23: ...ront yard set the area of the newly added Sub Zone to 600 and immediately reduce see section 6 4 1 the area of the Main Zone to 400m2 Thus we now have 40 probability for the mower to start from the Base Station to cover the back yard 60 probability to start from the Remote Starting point in favor of the front yard as demonstrated in the following drawing 4 4 Fastening Perimeter Wire to the Ground ...

Page 24: ...ire loop is completed and pegged to the ground complete the setup by attaching the beginning and the end of the Perimeter Wire to the Base Station Head o Peg the two Perimeter Wires down to the ground using the same peg leaving enough loose wire o Trim the end without the connector to make both of equal length and twist the two wires o Twist the two wires A proper twist of the wires is crucial for...

Page 25: ... the One Time Setup process see Section 5 2 you will be able to insert the remaining two stakes 4 7 Connecting the Power Box In order to find a proper location for the Power Box please refer to Section 3 3 For the Power Box installation instructions please refer to Section 4 1 2 Laying and Fastening Extension Cable Safety Avoid injury The Extension Cable from the Power Box to the Base Station shou...

Page 26: ... Extension Cable Connect the Power Box to a regular power outlet 230V 120V The Docking Indicator will light up if the mower is in the Base Station The Operating Indicator will light up if the mower is not in the Base Station Docking Indicator Automatic Operation Operating Indicator Wire Indicator ...

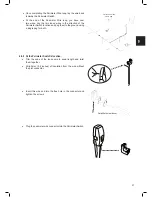
Page 27: ...tch placing options The Perimeter Switch connector is easily connected and disconnected It allows for quickly switching from one zone to another You may use the large stake attached to the back of the Perimeter Switch to easily insert it in and out of the ground You may mount the Perimeter Switch on a vertical surface such as a wall or deck railing Use the three marks on the back of the Perimeter ...

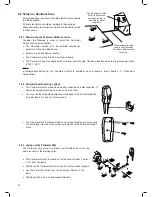
Page 28: ...d peg them to the ground using a single peg for both 4 8 4 At the Perimeter Switch s location Trim the ends of the loose wire to equal length and twist them together Strip 5mm 0 2 inches of insulation from the wire without the plot connector Insert this wire end into the free hole in the connector and tighten the screws Plug the perimeter wire connector into the Perimeter Switch 2 wires under the ...

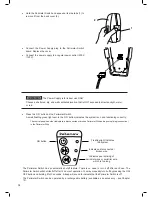
Page 29: ...r Wire and a poor splicing connection in the Perimeter Wire Flashing light indicates the system Indicates a disconnected broken Indicates poor splicing of perimeter wires or perimeter wire which is too long ON button ON button Flashing light indicates the system Indicates a disconnected broken wire Indicates poor splicing of perimiter wires or perimiter wire which is too long The Perimeter Switch ...

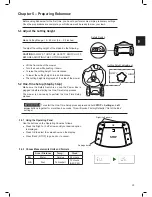
Page 30: ... Setup Step by Step Make sure the Safety Switch is on and the Power Box is plugged in before starting the One Time Setup process The mower is now ready to perform the One Time Setup process IMPORTANT To restart the One Time Setup process press and hold STOP Settings Left arrow buttons together for more than 4 seconds This will invoke Factory Defaults Out of the Box settings 5 2 1 Using the Operati...

Page 31: ...ing the Perimeter Wire and press OK to start the test Robomow drives towards the Base Station If the mower does not start the test then one of the following messages will be displayed E3 No Wire Signal Confirm that the Power Box is connected to the power outlet and that the Extension Cable is connected at both ends from the Power Box to the Base Station U029 Swap wires in plot connector The Perime...

Page 32: ...n Display current time After completing the Test Wire Position test the mower in Near Wire Follow mode to confirm it completes the drive near the wire smoothly without acquiring any adjacent wire or hitting any obstacle on its way to the Base Station If the mower fails to complete the Near Wire Follow smoothly to the Base Station then reduce the Near Wire Follow Distance Menu P004 and repeat the t...

Page 33: ... can be done using the Mowing Hours menu see Section 6 4 2 o Robomow usually performs several consecutive mowing operations until it completes a full mowing cycle required for the lawn After completing a mowing cycle Robomow will rest until the next cycle should begin The interval between mowing cycles is defined by the Mowing Frequency menu see Section 6 4 2 The default setting is to perform two ...

Page 34: ...shown choose the operation mode you want as provided in the table below Operation Mode Child Lock is Off Child Lock is On Mowing with Edge Mowing the edge of the entire lawn before starting to mow the inner area of a selected zone It is recommended to use this mode once or twice a week depending on how fast the grass is growing Press the Edge before mowing left arrow button once Press the Edge bef...

Page 35: ... the week and for specific hours for all days in the week Inactive Day s defines the day s when the mower will be inactive Default Sunday Inactive Hours define the hours when Robomow will not mow and stays in the Base Station Default 23 00 06 00 IMPORTANT It is required to go through the entire Inactive Days and Hours sequence in order to save the settings Pressing STOP before completing the whole...

Page 36: ...ntire mowing of your lawn twice a week The numbers in the menu represent the following values of mowing frequency 1 LOW one mowing cycle in a week 2 MEDIUM two mowing cycles in a week 3 HIGH equivalent to daily mowing The Mowing Frequency option is only available for zones where a base station is installed If you have defined at least one seprated zone with a base station see menus P013 and P014 t...

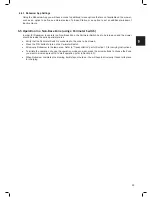
Page 37: ...04 and MC400 models For all other models the Near Wire Follow feature can be enabled and configured for a Sub Zone as well 1 5 P006 Near Wire Follow Test Enables to test the mower in the max Near wire Follow Distance that is defined in menu P004 If the mower is not able to complete the drive in Near Wire mode smoothly then it is recommended to reduce the max distance set in menu P004 This menu is ...

Page 38: ...eparated Zone L2 is displayed for Separated Zone A press OK Scroll to set the area of the Separated Zone and press OK L2 100 P015 Remove Zone Enables the removal of a Separated Zone or a Sub Zone Choose the Zone you want to remove and press OK L2 L3 A1 A2 A3 A4 P016 Sound Default ON Use the Sound option to turn all non safety sounds off On OFF P017 Mobile Communication System Default OFF Enables r...

Page 39: ...urns at lawn s edge If there is more than one zone defined then there is an option to enable this feature for a particular zone or for the entire lawn All Please note This feature may not be equally efficient on all lawns or on different sections of a particular lawn especially if a lawn area is small or has narrow areas big islands or slopes All L1 L2 L3 A1 A2 A3 A4 On OFF P025 SmartMow Edge Over...

Page 40: ... to be turned on and the mower should be inside the active perimeter area Verify that the Perimeter Switch is connected to the zone to be mowed Press the ON button to turn on the Perimeter Switch Drive carry Robomow to the lawn area Refer to Transportation part of Section 1 3 for carrying instructions To initiate the operation choose the operation mode you want press the arrow buttons to choose th...

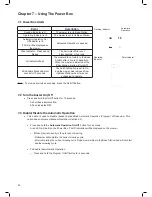
Page 41: ...operate Note To stop an alert when sounding press the On Off Button 7 2 Turn the Buzzer On Off Press and hold the On Off button for 10 seconds A short beep indicates On A flash indicates Off 7 3 Enable Disable the Automatic Operation This option is used to disable pause a predefined Automatic Operation Program of Robomow This option does not prevent Manual Operation Section 6 3 Press and hold the ...

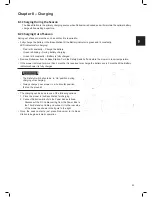
Page 42: ...Turn the Safety Switch off and store the mower in room temperature If the mower is stored for more than 3 months it is required to recharge the battery every 3 months till the Battery indicator shows it is fully charged IMPORTANT The Safety Switch should be in On position during charging or recharging Always charge your mower in a horizontal position flat on the ground The charging can be done in ...

Page 43: ...y from this particular location and restart operation Rectify the reason for it getting stuck Check the ground around the mower for ditches or non level ground Fill with dirt and level off Check if the drive wheels are free to rotate and nothing is blocking them Verify that the cutting height is not set too low for the grass condition increase the cutting height if needed E2 The mower is Outside T...

Page 44: ... a brush or piece of cloth Confirm a good connection of the Power Box to the Base Station E5 Check Blade Cutting Height Mowing motor has faced over current conditions for too long as a result of high grass or an obstacle that is stuck or wrapped around the blade Something is preventing a blade from rotating freely Accumulated grass clippings under the mowing deck rope or similar object wrapped aro...

Page 45: ...rheat The drive motors have been working under a severe load for too long No need to do anything Robomow will renew the operation automatically as soon as the drive motor will cool down 0012 No wire signal See E3 in the above table 0014 Front wheel problem See E7 in the above table 0015 Button pressed One of the operating panel buttons is constantly pressed Press OK to confirm the message and cont...

Page 46: ...evel off Check if the drive wheels are free to rotate and nothing is blocking them Move the mower away from this particular location and restart operation 0028 Cross Outside The Perimeter Wire is too close to the edge The lawn slope is too steep Robomow does not succeed to turn in place at the edge and it causes the mower to slip out of the designated area Robomow has slipped out of the Perimeter ...

Page 47: ...layed if the mower is connected to charging but the System Switch is Off Switch the System Switch to On U041 Press the STOP button at Sub Zone entry Press STOP at the point you want the mower to start mowing the Sub Zone U042 Learning edge distance The mower learns the distance of the Perimeter Wire in a Separated Zone Press STOP to learn the distance U043 Going to Sub Zone entry point Displayed w...

Page 48: ...ecommended to cut less than a 1 3 of the green part of the grass Set the cutting height to a higher position and then successively lower If it is during a fast growing season change the Mowing Frequency refer to Section 6 4 2 P001 The grass is wet and causes accumulation of grass clippings around the blade For best cut operate Robomow when the grass is dry Do no to mow in the early morning hours S...

Page 49: ...djust its sensitivity if required refer to Section 6 4 2 P007 p008 The Islands feature is set to On In this case the mower is searching for the base by moving around the lawn This special search method takes more time and may create an impression that the mower is still mowing while in fact it is already searching for the Base Station No special action is required For more information about the Is...

Page 50: ...xpected Usually accompanied by U018 Operation time is shorter than expected Inspect mower s blade and drive wheels Battery run time may be too short 09 One Time setup is running One Time setup should be completed before the automatic operation can start 11 Automatic operation is disabled by menu P021 see Section 6 4 2 Enable automatic operation through menu p021 12 Automatic operation is put on pa...

Page 51: ... 49 4 lb 23 1 kg 50 9 lb Cutting Width 28 cm 11 28 cm 11 28 cm 11 Cutting Height 15 60 mm 0 6 2 4 15 60 mm 0 6 2 4 15 60 mm 0 6 2 4 Mowing Power 200 Watts 200 Watts 200 Watts Mowing Motors DC Brush DC Brush DC Brushless Power Wheels Available Included Included GSM Module Available Available Included Noise Level High Power 67 6 dB measured Guaranteed 69 dB The noise at the operator s ears less than...

Page 52: ... your household trash The battery must be collected recycled or disposed of in an environmentally sound manner Return the old power pack to an approved battery recycler 11 3 Winter Storage and Service Robomow Clean Robomow before putting it away for the winter storage Follow the instruction for Out of Season Charging in Section 8 2 Store the mower in a dry area preferably at room temperature Base ...

Page 53: ...ace any damaged blade Replace the blade once a year between seasons CAUTION ALWAYS TURN THE SAFETY SWITCH OFF BEFORE SERVICING BLADE IMPORTANT After turning off the Safety Switch always reset the current day and time Failure to do so may result in non intentional operation of the Robomow IMPORTANT Sharpening is not allowed since it may create unbalance To remove the blade Insert the clamp side of ...

Page 54: ... are a satisfactory splice Soil moisture will cause such conductors to oxidize and will later lead to a broken circuit 11 7 Maintenance of the Base Station Area Keep the Base Station entrance and area clean of leaves sticks twigs or any other debris that usually accumulates in such areas NEVER spray water directly towards the Base Station Be careful when trimming around the Base Station with a pow...

Page 55: ... Station and Power Box Part No MRK7006A Used for enabling multiple mowing cycles in a Separated Zone Enabling multiple mowing cycles in a Separated Zone Bluetooth Remote Control Part No MRK7100A Used to Manually drive and mow anywhere Includes a Safety function to prevent accidental use Perimeter Switch Part No MRK5002C For zones that are not connected to the Base Station Batteries Pack for Perime...

Page 56: ...r lawn between 4 a m and 8 a m in the morning so water has time to soak into the soil before the heat of the sun causes evaporation Your lawn needs 1 to 1 1 2 3 4cm of water weekly Deep watering allows grass to develop a deep root system enabling the lawn to resist disease and drought Do not over water Too much water is not only wasteful but can also increase turf growth which requires more freque...

Page 57: ... associated with improper installation or use of the product Any product that has been opened repaired modified or altered by anyone other than a Friendly Robotics authorized repair facility Repairs necessary due to improper battery care and or improper charging process such as charging in wet conditions electrical supply irregularities or failure to properly prepare the mower or battery prior to ...

Page 58: ...57 EN ...

Reviews: