19
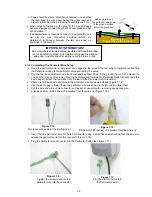
Wire position
Press GO to test
Press ‘
GO
’ to test
wire position
Wire position
Robomow collides
with obstacle, drives
back and stops
Adjust wire
then press GO
Adjust the wire and press ‘
GO
’ to
continue testing the wire position
Walk along the side of the
Robomow while it is following
the edge until completing one
lope of the perimeter without
striking any object (it will stay
in the Base Station).
Wire position
Press GO to test
Wire position
Press GO to test
Press ‘
GO
’ to test
wire position
Wire position
Wire position
Robomow collides
with obstacle, drives
back and stops
Adjust wire
then press GO
Adjust wire
then press GO
Adjust the wire and press ‘
GO
’ to
continue testing the wire position
Walk along the side of the
Robomow while it is following
the edge until completing one
lope of the perimeter without
striking any object (it will stay
in the Base Station).
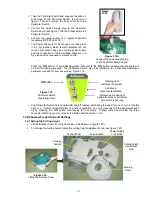
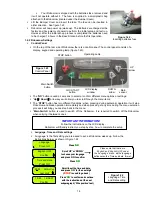
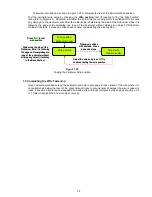
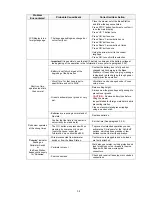
Follow the instructions, as shown in figure 1.25 to complete the test of the Perimeter Wire position:
Test the perimeter wire setup by choosing the ‘
Wire position’
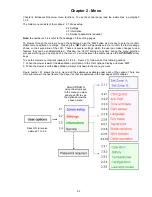
test (If required to find the ‘Wire position’
menu refer to Figure 2.1). Robomow will follow the wire, while the mowing motor is switched off to prevent
any damage to the perimeter wire after the initial setup; Walk along the side of the Robomow while it is
following the edge until completing one loop of the perimeter without striking any object; If Robomow
collides in obstacle, it stops and drives back to allow you adjusting the wire position.
1.5 Completing the Wire Fastening
Once complete, walk back along the perimeter and add in wire pegs to those areas of the wire where it is
not pulled down below the level of the grass tips and close to ground level. Wherever the wire is raised or
loose, it should be tightened and pegged down with extra wire pegs (distance between pegs should be 0.5
to 1 meter in straight line and more when curved).
Figure 1.25
Testing the Perimeter Wire position

