background image


Original Operating 

Instructions 


Robotic Mower 


Operating Manual 

2015 


WWW.ROBOMOW.COM 


Summary of Contents for RS 630

Page 1: ...Original Operating Instructions Robotic Mower Operating Manual 2015 WWW ROBOMOW COM ...

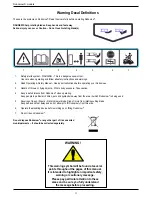
Page 2: ...y read and review all safety instructions warnings and cautions contained in this manual Failure to read and follow these instructions warnings and cautionary statements may result in severe injury or death to persons and pets or damage to personal property EU Declaration of Conformity Manufacturer F Robotics Acquisitions Ltd Hatzabar St Industrial Zone P O Box 1412 Pardesiya 42815 Israel The prod...

Page 3: ...ting Keep people in particular children pets and bystanders away from the area in which Robomow is being used 5 Severing of toes or fingers Rotary mower blade Risk of injury from rotating cutting blade Keep hands and feet away and do not attempt to lift Robomow from this area 6 Operate the disabling device before working on or lifting Robomow 7 Do not ride on Robomow Do not dispose Robomow or any ...

Page 4: ... machine to operate unattended if you know that there are pets children or people in the vicinity 15 Do not use Robomow for any purpose other than for which it is intended 16 Do not operate Robomow if any safety feature or device is damaged or inoperable 17 Never allow anyone to ride or sit on mower 18 Warning When there is a risk of a lightning storm disconnect the Perimeter Wire from the Base St...

Page 5: ...h the safe operation of the mower to operate it freely 2 Anti Theft Safety Guard The Anti Theft system provides the user a disabling function that will prevent anyone from using or driving the Robomow unless they have the valid code to enter You will be prompted to enter a four digit code of your choice to use as your personal security code 3 Lift Sensor In the event the mower is raised from its r...

Page 6: ... the Power Box and performing the One Time Setup Robomow will do all the mowing for you for the entire season Robomow mows You don t Robomow leaves its Base Station on the scheduled mowing time Robomow mows the lawn and then drives itself back to the Base Station to be charged and ready for its next scheduled mowing As soon as Robomow departs for mowing the Base Station automatically triggers a sp...

Page 7: ...e and proceed mowing as needed It will continue in mowing until completing the required mowing time for your lawn based on the area you have set When completing the mowing of the entire area Mowing Cycle Robomow will stay in the Base Station until the next Mowing Cycle will start Robomow completes two Mowing Cycles per week in order to keep your lawn healthy and good looking However if your lawn r...

Page 8: ...h 3 Pegs Used for securing the wire to the ground 8 RoboRuler Used for setting the distance of the Perimeter Wire from the lawn edge 13 Power Box Mount Used for fixing the Power Box to a wall including Screws and dowels 4 Wire Connectors Used for splicing wires as needed 9 Assembled Base Station Used by Robomow to dock and charge when it is not mowing 14 Template Used for installing a Narrow Pass ...

Page 9: ... 4 Operating Panel Under the Hood 1 Bumper Door 2 Mowing Height Indicator 3 Mowing Adjustment Knob 4 Safety Switch Base Station 1 Base Station Head Charging Adaptor 2 Base 3 Flippers x2 4 Stakes x6 Power Box 1 Docking Indicator 2 Program ON OFF button 3 Operating Indicator 4 Wire Indicator 1 2 3 4 1 3 2 4 4 3 2 1 1 2 4 3 ...

Page 10: ...se 16 One Time Setup Step By Step 16 After Setup is Complete 19 Chapter 4 Robomow Operation 20 Automatic Operation 20 Menu Structure 21 Lawn Options 21 Mower Options 28 Manual Operation 31 Chapter 5 Using the Power Box 32 Power Box Alerts 32 To Turn Buzzer On Off 32 To Disable the Automatic Operation 32 Chapter 6 Charging 33 Charging During the Season 33 Charging Out of Season 33 Chapter 7 Trouble...

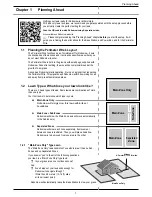
Page 11: ...his signal keeps Robomow within its working zones and away from preset demarcated areas 1 2 Lawn Types What does your lawn look like There are 3 basic types of lawns Some lawns are combinations of more than one type Your first task is to determine which type is yours Main Zone Only Robomow will simply mow this lawn within its set boundaries Main Zone Sub Zones Robomow will mow the Main Zone and wi...

Page 12: ...d Such additional areas are called Sub Zones You will instruct Robomow to drive through the Narrow Pass in order to get to a Sub Zone It will mow both the Main Zone and its Sub Zone s one zone at a time If your lawn does not match this description skip to the next Section 1 3 of this chapter Separate Zones In order to make sure Robomow drive into the Sub Zone and back we have to further examine th...

Page 13: ...m 16 ft wide set the lawn as Main Zone Only type See previous Section 1 2 1 Main Zone Only Continue reading next Section Separated Zones as your lawn may be a combination of more than one type 1 3 Separated Zones Type Lawn If your lawn does not fit any of these descriptions it is probably either a Main Zone Only or Main Zone Sub Zone type Skip to Section 1 4 Determine Base Station Location P A law...

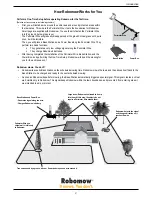
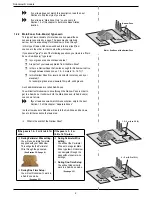
Page 14: ...mowing for you for the entire season Robomow leaves the Base Station on the day and time scheduled according to a predetermined program for your specific lawn and preferences It mows the lawn and it returns to the Base Station for recharging 1 4 1 Consider the following in order to choose the best location P Do not place the Base Station within 3 meters 10 ft after a corner P The Base Station shou...

Page 15: ...er for the gentlest and most silent operation you may prefer to create Perimeter Islands around all fixed objects in the working area P If areas where obstacles are grouped closely together they should be demarcated by a single continuous Perimeter Island 1 6 2 Slopes Perimeter Slope P The Perimeter Wire can be laid across a slope that slants less than 10 0 35 ft rise per 3 3 ft CAUTION If the Per...

Page 16: ... the edge where the wire is to be placed P In certain cases near bodies of water such as pools and ponds or great height differences such as cliffs it is required to maintain a greater distance from the Edge see Section 2 3 Robomow S Models Wall Edge 40cm 15 5 Lawn Edge 32cm 12 5 Narrow Pass 14cm 5 5 for RS models ...

Page 17: ...lan with its front facing Anti Clockwise on the perimeter Do not place the Base Station within 3 m 10 ft of a corner P Select the roll of wire with a green plot connector attached to the end The other rolls do not have a connector on the end P Pull the plot connector and some the wire connected to it out of the plastic covering Do not remove the wire spool from its covering The plastic covering is...

Page 18: ...le in all left turn corners when laying the wire along the perimeter It is not necessary to maintain 45º angle on right turn corners along the perimeter It is not necessary to maintain 45º angle along corners of an island inside the lawn example around a swimming pool P Continue laying the wire according to your plan Gradually pull the wire out of its dispenser and lay it loosely as you are moving...

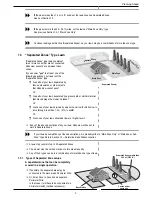
Page 19: ...jects are too close to the edge leave them out of the mowing area 2 2 2 Setting a Narrow Pass A pass connects two larger zones of the lawn This pass may be narrow but it is wide enough to let Robomow drive through it The pass has to be at least 1 2 m 4 ft wide to allow Robomow to drive through it Following the Perimeter Wire Robomow drives between the Main Zone and the Sub Zone But while mowing ea...

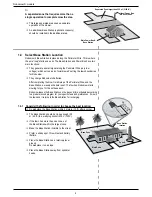
Page 20: ...nd of the Narrow Pass P There should be a 40 cm 1 3 ft distance between the Sub Zone Perimeter Wire and the pass exit P Turn the Template and lay it on the ground at the entrance to the Sub Zone The arrow points towards the Sub Zone Insert by hand half way in 7 pegs into the 7 holes numbered 1 7 P Lift the Template up so the pegs are left loosely stuck in the ground P Lay the Perimeter Wire throug...

Page 21: ...f the Separated Zone and the Main Zone 2 3 1 Setup for a Separated Zone that can be completely mowed in a single operation P If possible the separated area may be connected to the main area s Perimeter Wire No special accessories are needed P If the areas cannot be connected to the Perimeter Wire of the Main Zone The Separated Zone will have its own Perimeter Wire The Perimeter Wire will be connec...

Page 22: ...l keep the wire down below the grass level and prevent the wire from becoming a tripping hazard The wire and the pegs will soon become invisible under the growth of new grass P If additional wire is required in order to complete the setup connect it using the water proof wire connectors supplied with Robomow See Section 9 4 Splicing the Perimeter Wire Use only the wire connectors supplied with Rob...

Page 23: ...the ground It should never present a tripping hazard The power cord should cross over soft surfaces ONLY It should not cross over hard surfaces e g sidewalk driveway where it cannot be securely fastened 2 6 2 Base Station Assembly 2 6 3 Base Station Head and Base P Remove the Base Station Head from the Base Electric Shock Hazard Disconnect the Power Box from the plug socket before any approach to ...

Page 24: ...se Station C Slide it in place along the side channels Push forward until the Head clicks into place P Feed the 20 m 65 ft Extension Cable all the way to the Power Box 2 7 Placing The Base Station Place Base Station on the Perimeter Wire P Position the Base Station front facing a Anti Clockwise direction along the lawn s edge P Place the Base Station on the Perimeter Wire P Align the center markin...

Page 25: ...the metal bracket onto the vertical surface with the provided screws P Place the Power Box above the metal bracket and slide it into place along the vertical surface P Connect the DC Cable from the Power Box to the 20 m 65 ft Extension Cable 2 9 At the Power Box Location P Connect the Power Box to a regular plug socket 230 120 Volts AC The Docking Indicator 1 will light up if the Mower is in its B...

Page 26: ...older C from the mower P Place the fuse into the fuse holder The fuse can be inserted in either direction P Insert the fuse with holder back into the mower and screw until fully closed Robomow will now power up wake up The batteries are sufficiently charged to allow for performing the One Time Setup 3 3 One Time Setup Step By Step Once the fuse is inserted we are ready to perform the One Time Setu...

Page 27: ...s in plot connector The Perimeter Wire has been connected in the opposite direction Swap the wires at the plot connector 3 3 5 Peg Base P Insert the remaining 4 Stakes of the Base Station to secure it to the ground Robomow enters to the Base Station drives back waits in front of the Base Station and Peg Base is displayed If a Reposition Base Station message is displayed o Slightly move the Base St...

Page 28: ... Special Cases If an Adjust Wire message is displayed The mower stops and drives backward P Move the wire slightly inward P Press to repeat the Wire Test If at any point you wish to move the mower outward to enlarge the covered area press Stop The mower stops and display the message P Do not respond yet P Move the wire slightly outward P Place the mower in front of the changed Section of wire 3 3 ...

Page 29: ...ub Zone s P Choose the mark and repeat the Sub Zone procedure See Section 3 3 8 3 4 After Setup is Complete Once the wire setup is complete you can drive additional pegs at a distance of approximately 1 m 3 3 ft between them P Use additional pegs in areas where there are bumps or dips in the lawn If needed purchase extra pegs P Inspect the wire installation for tripping hazards From this point on ...

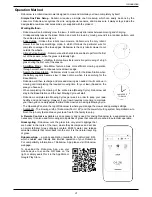
Page 30: ...may be changed see Section 4 3 1 P The required Mowing Time is automatically derived from the lawn Area setting Mowing Time may be adjusted using the Mowing Hours menu see Section 4 3 2 1 P Robomow mows the entire area twice a week by default This corresponds to a Medium Mowing Frequency which can be changed using the Mowing Frequency menu see Section 4 3 2 2 Note Robomow has the power to mow high...

Page 31: ...used to configure lawn and mowing parameters Mower Options is used to configure specific user preferences of Robomow 4 2 Menu Structure Section 4 3 1 Section 4 3 3 Section 4 3 5 Section 4 3 2 Section 4 3 4 Chapter 4 3 Section 4 4 1 Section 4 4 3 Section 4 4 5 Section 4 4 6 Section 4 4 2 Section 4 4 4 Chapter 4 4 Section 4 3 6 Section 4 3 7 Section 4 3 8 Scroll to get to Lawn Options Press Scroll t...

Page 32: ...urs you have set Inactive hours are the same for all days of the week If too many hours have been deactivated relative to your lawn size Check Inactive Time message will be displayed Mowing Hours Updated When the selected value was accepted Mowing Hours Limit If the selected Mowing Hours value is higher than the maximum allowed one for the lawn area Press to set or to re select Scroll to select In...

Page 33: ...r P High fertilization and favorable weather conditions may cause the grass to grows faster In such cases use the Mowing Frequency option to decrease the time between cycles P To change the Mowing Frequency follow these steps 4 3 3 Zones To Add Remove Edit Zone s Use the Zones option to add remove or edit preset zones Note Sub Zones are marked by numbers 1 2 3 and 4 Separated Zones are marked by l...

Page 34: ...Zone s Press to Remove Zone s Scroll to select the zone to be removed Press Select to remove or scroll to to exit Press Press to select By Distance Place Robomow in the Base Station Press Scroll to select the Area of the added Sub Zone Press Robomow will follow the Perimeter Wire Press STOP at Zone Entry when the mower is at least 5 m 16 ft inside the added Sub Zone Select to exit or scroll to to ...

Page 35: ... Robomow will follow the Perimeter Wire Scroll to select the Sub Zone you want to edit Press Scroll to enter the Updated Distance Press Scroll to select the Edit Press Scroll to select the new area size Press to update area Press to select Area Scroll to select the new area size Press to update Area Scroll to select Sub Zone Entry Press Press to select By Distance Press to Update Distance Place Ro...

Page 36: ...ress to allow Robomow to Learn the Distance If an additional Base Station has been added to a Separated Zone Base Station has to be set to Yes P To change the Base Station setting of a Separated Zone 4 3 4 Islands In rare cases you may notice that the mower circles a Perimeter Island unnecessarily while searching for the Base Station The Islands option helps overcome this situation To avoid such c...

Page 37: ...ular zone it may require the mower to cross the lawn and touch the perimeter wire several times to perform an initial calibration of the algorithm before it will start performing smooth turns at lawn s edge P Edge Overlap allows adjusting the degree of overlapping with lawn s edge when performing the smooth and continuous turns in SmartMow mode P Increasing this value will cause a higher overlappi...

Page 38: ...am On Off P This menu enables or disables pauses Automatic Operation either in the Main Zone one of the Sub Zones or in the entire lawn All Zones P When Program is set to Off in a particular zone the mower will skip the operation in that zone but will continue to mow all the other zones 4 4 Mower Options You may change several of Robomow s default settings Use the Mower Options menu to select thes...

Page 39: ...ny technical problem P To turn the Rain Sensor On or Off P To change the Sensitivity of the Rain Sensor P The current reading of the Rain Sensor is displayed P Robomow detects rain when the Reading value is below the set Sensitivity value P The higher the Sensitivity setting the more sensitive Robomow is to rain detection Press to select Anti Theft from the Mower Options menu Scroll to select On P...

Page 40: ...ess to select Time and Date from the Mower Options menu Press to select Set Time Scroll to set the Time Press to move to next digit Press to OK Scroll to select Time Format Press Scroll to select 12 HRS or 24 HRS Press Press to select Set Date Press to select Language from the Mower Options menu Scroll to set the Date Press to move to next digit Press to OK Scroll to select Date Format Press Scrol...

Page 41: ...hen Edge Mow operation mode is selected the mower will mow the edge of the entire lawn before starting to mow inside the selected zone Press to select LCD Contrast from the Mower Options menu Scroll to select desired contrast level Press Press to select Sound from the Mower Options menu Scroll to select On Off Press Scroll to choose the operation mode Edge Mow or Mow only Press Scroll to choose th...

Page 42: ...led to operate To turn alerts Off Press the On Off Button 5 2 To Turn Buzzer On Off P Press and hold the On Off Button for 10 seconds o A short beep indicates On o A flash indicates Off 5 3 To Disable the Automatic Operation This option is used to Disable the Automatic Operation of Robomow according to its predetermined settings Disabling the Automatic Operation does not prevent Manual Operation f...

Page 43: ...onths such as winter it is required to 1 Fully charge the mower in one of the two following ways In the Base Station Directly from the Power Box see below 2 Remove the fuse from Robomow and store it in the designated cavity under the bumper door see page VIII 3 Store the mower at temperature higher then 10ºC Note The Safety Switch should be in On position during charging If the mower is stored for...

Page 44: ...aling of the Base Station Head during out of season charging P Slide the Base Station Head pins into the front slot of Robomow P Charging will begin immediately and the LCD will display P When the Battery is fully charged Ready message will be displayed P Once the season starts just place Robomow in its Base Station to begin automatic operation as the season before IMPORTANT Always charge your mow...

Page 45: ...for your lawn area Current settings will not be changed Mowing Frequency is too high for current settings of Inactive Time The Inactive Time settings will be set to defaults Area setting is too high for current settings of Inactive Time The Inactive Time settings will be set to defaults Decrease the number of Inactive Days and or the number of Inactive Hours to allow Robomow to complete mowing you...

Page 46: ...position to enable automatic operation Key Pressed One of the operating panel buttons is constantly pressed Press to confirm the message and to continue operation This message is displayed to inform only Keys Locked Child Lock feature has been activated Press the button and then press the button Child Lock can be deactivated under the Settings menu Mow Overheat cooling The mowing motor has been wo...

Page 47: ... It caused the mower to turn in place without detecting wire or bumper Verify that the area is not too steep Work mainly in dry conditions Check if the Perimeter Wire is not too close to the edge remove if required Verify that the mowing deck is not set too low Sub Zone X Problem Sub Zone 1 2 3 4 entry problem The mower either fails to leave bypass the Base Station on its way to the Sub Zone or fa...

Page 48: ... Station Confirm the wire underneath the Base Station is straight tighten and centered below the Base Station Base Station is setup on a side slope Move the Base Station to a relatively level ground A base station is placed too close to the corner of the lawn Move the Base Station within 3 meters from a corner Mower doesn t depart from the Base Station for a long time There are several possible re...

Page 49: ...the blade before operating the Robomow Replace the blade LCD display is in a foreign language The language setting was changed or not correctly set Press the CANCEL DOWN buttons for more than 3 seconds This is a shortcut to the Language menu Change the language Mowing or charging times are shorter than usual This behavior is normal at low temperatures below 15 ºC 59 ºF No action is required 7 3 1 ...

Page 50: ... by the Power Box via the charging adaptor Disconnect the mower from the charging adapter see Section 6 2 Put the mower in the Base Station 15 Battery cells are being balanced in special charging mode None Wait for the end of current charging cycle May take longer than usual 16 The mower is in the Base Station but there is no charging voltage supply Inspect Power Box s connection to the Base Stati...

Page 51: ...B The noise in the operator s ears less than 70 dBA Mowing Width 56 cm Cutting Width 2 Blades of 28 cm 22 Mowing Height 20 80 mm 0 8 3 Mowing Motors DC Brushless Blade Motor RPM 4000 rpm ECO Mode 3300 rpm Batteries and Charging RS630 model 26V Lithium Iron Phosphate Battery LiFePO4 6Ah Charging Time Max 2 hours L W H H L W H H Anti Theft Code Write down your 4 digit Anti Theft code Return here if ...

Page 52: ... damaged or a broken blade Use only sharp blades P Inspect the underside of the mower once a month Clean if necessary P Carefully scrape the collected grass debris from under the mowing deck Most grass accumulation can be removed using a small wooden stick or similar object You may remove the blades to gain better access to the mowing chambers IMPORTANT Do not place the mower upside down Instead l...

Page 53: ...e end of the year replace the blades P To remove the blades Insert the clamp side of the Blade Removal Tool into the open slits beside the locking tabs on either side of the blade Turn the Blade Removal Tool slightly so that the clamp resides on top of the locking tabs on either side Squeeze the handle of the Blade Removal Tool The locking tabs on each side of blade will be pressed 1 Pull blade as...

Page 54: ...ken circuit 9 5 Maintenance of the Base Station Area P Keep the Base Station entrance and area clean of leaves sticks twigs or any other debris that usually accumulate in such areas P NEVER spray a water hose directly on the Base Station P Be careful when trimming around the Base Station with a powered weed trimmer as damage to the Extension Cable may occur P In the event of damage to any part of ...

Page 55: ...eted Perimeter Wire set up to the perimeter switch or Base Station Base Station and Power Box Used for enabling multiple mowing cycles in a Separated Zone Remote Control Used to Manually drive and mow anywhere Includes a Safety function to prevent accidental use Perimeter Switch For zones that are not connected to the Base Station Batteries Pack for Perimeter Switch Preferable for areas where elec...

Page 56: ... heat of the sun causes evaporation Your lawn needs 1 to 1 1 2 3 4cm of water weekly Deep watering allows grass to develop a deep root system enabling the lawn to resist disease and drought Do not over water Too much water is not only wasteful but can also increase turf growth which requires more frequent mowing Let the soil partially dry out between watering Water when the top two inches of soil ...

Page 57: ...product that has been opened repaired modified or altered by anyone other than a Friendly Robotics authorized repair facility Repairs necessary due to improper battery care and or improper charging process such as charging in wet conditions electrical supply irregularities or failure to properly prepare the mower or battery prior to any period of non use Repairs necessary due to water damage other...

Page 58: ...Robotic Mower Original Operating Instructions EN RS612 RS622 RS630 MS1000 MS1800 Operating Manual WWW ROBOMOW COM WWW ROBOMOW EU DOCXXXXA ...

Page 59: ... 7626669 DK 7025 2303 FR 0892 230 199 LU 0900 4300 4090 NL 0900 762 6669 NO 4000 7719 SE 0771 895 895 Max 0 35 p m Werktags von 9 12 und 13 16 Uhr 0 59 pro Minute aus dem deutschen Festnetz Die ersten zwei Minuten sind kostenfrei Die Mobilfunkkosten können abweichen 0 5 Min CHF 0 08 Min ab à partir de 6 Min CHF 1 40 Min ...

Reviews: