background image

7

EN

G

LI

SH

• VEGETABLE PREPARATION ATTACHMENT

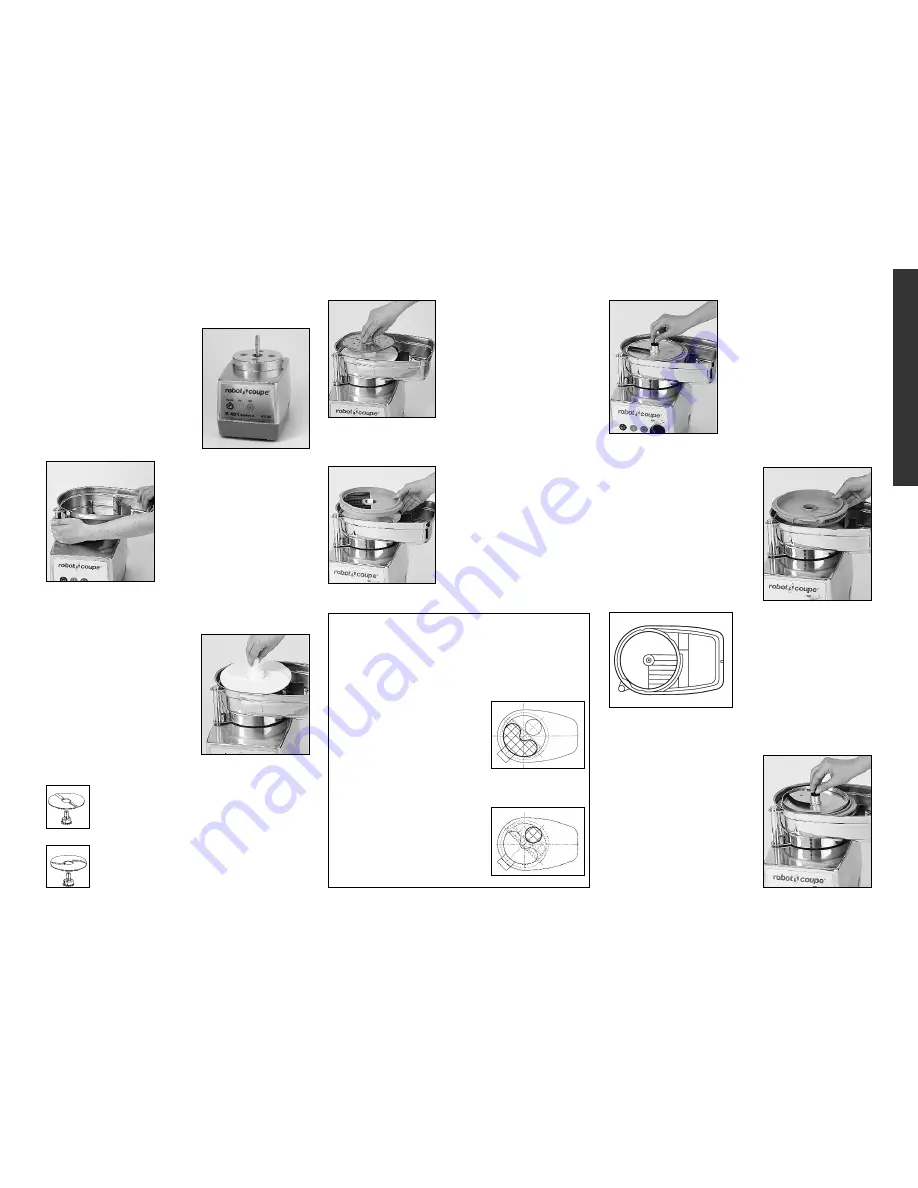
1) The vegetable prepara-
tion attachment consists of
two detachable parts : the
continuous feed attachment
and the continuous feed
lead.

Place the matching slicing
plate onto the discharge
plate. You may need to rotate
the plate a bit until it drops
into place on the discharge
plate. Tighten the plate-
securing knob by turning it
clockwise.

Only For the R 402 Series A and R 402 V. Series A
models:

If you have chosen the
dicing combination:

i.e. a

grid and a specific slicing
disc.

8 mm, 10 mm and 12 mm
discs only can be fitted with
a dicing grid.

Position the dicing grid in
the vegetable preparation
bowl.

4) Place the cutting plate
of your choice onto the
discharge plate. It may be
necessar y to rotate the
cutting plate until it engages
and drops fully onto the
discharge plate.

SIDE A

: Straight ejection ribs facing

upwards, for any vegetables or citrus fruit
which require careful handling (tomatoes,
mushrooms...).

SIDE B

: Cur ved ejection ribs facing

upwards in all other cases.

3) Place the white discharge
plate onto the motor shaft. It
should fall into place just off
the bottom of the continuous
feed attachment.
Depending on type of use
(Side A or B), the discharge
plate may be removed from
the hub and flipped over.

2) With the motor base
facing you, fit the conti-
nuous feed attachment onto
the motor base; the exit
chute should be on your
right.
Turn the attachment back to
the right (counterclockwise)
until it comes to a stop loc-

ked in place on the motor base tabs.

Next fit the appropriate
slicing disc and screw the
slicer on the motor shaft
with the butterfly nut.

• INSTALLING THE DICING GRID:

The grid must be positioned according to the fee-
ding hopper used.

Failure to do so, can lead to

jamming and motor damage.
• Position 1 :

Using the

large hopper.

In this case, the dicing grid
should be positioned so that its
blades are vertically aligned
with the hopper. (You must be
able to see the grid blades
when looking into the hopper.)

• Position 2 :

Using the

cylindrical hopper.

In this case, the grid must be

positioned so that the blades

are vertically aligned with the

tube. (You must be able to see

the grid blades when looking

into the tube.)

INSTALLING THE FRENCH FRY GRID :

Specially designed slicing
plates and matching grids
have been developed for
making French fries. Two
sizes are available: 8x8
and 10x10.

With the discharge plate
in place on the motor
shaft, place the French fry
grid into the continuous
feed attachment with the
vertical blades aligned
toward the discharge

chute.

If the grid is not in the correct position,

jamming and motor damage may occur.

Summary of Contents for R 401 Series A

Page 1: ...es A R 402 Series A R 402 V Series A Robot coupe USA Inc P O Box 16625 Jackson MS 39236 6625 264 South Perkins St Ridgeland MS 39157 e mail info robotcoupeusa com website www robotcoupeusa com Phone 1 800 824 1646 ...

Page 2: ...l the attachments are correctly positioned USE The machine must not be modified in any way from its original configuration Operating times of 5 minutes or longer can cause processed food to increase to temperatures above 125 F 52 C Do not open the feed lead attachment until the motor has come to a complete stop Never tamper with or defeat the purpose of the locking and safety systems Never put a h...

Page 3: ...anel ASSEMBLY Cutter bowl attachment Vegetable preparation attachment OPERATION Cutter bowl attachment Vegetable preparation attachment OPTIONS Coarse serrated blade Fine serrated blade CLEANING Motor base Attachments MAINTENANCE Motor seal Blade and cutting plates Bowl locking washer TECHNICAL SPECIFICATIONS Weight Dimensions Working height Noise level SAFETY TECHNICAL DATA Page 27 Exploded views...

Page 4: ... ALL ORIGINAL CONTAINERS AND PAC KING MATERIALS FOR CARRIER INSPECTION Neither ROBOT COUPE U S A INC nor its affiliated companies or any of its distributors directors agents employees or insurers will be liable for indirect damage losses or expenses linked to the appliance or the inability to use it The ROBOT COUPE U S A INC warranty is given expressly and in lieu of all other warranties expressed...

Page 5: ...at all the attachments are correctly positioned USE The machine must not be modified in any way from its original configuration Operating times of 5 minutes or longer can cause processed food to increase to temperatures above 125 F 52 C Do not open the feed lead attachment until the motor has come to a complete stop Never tamper with or defeat the purpose of the locking and safety systems Never pu...

Page 6: ... are all possible and most operations can be performed in 3 minutes or less A wide range of cutting plates is available for use with the vegetable preparation attachment Slicing grating and julienne operations can all be achieved with the vegetable preparation attachment Additionnal cuts are available on the R 402 Series A and the R 402 V Series A dicing and French fries The numerous functions wil...

Page 7: ...arge plate may be removed from the hub and flipped over 2 With the motor base facing you fit the conti nuous feed attachment onto the motor base the exit chute should be on your right Turn the attachment back to the right counterclockwise until it comes to a stop loc ked in place on the motor base tabs Next fit the appropriate slicing disc and screw the slicer on the motor shaft with the butterfly...

Page 8: ...ATTACHMENT Do not attempt to julienne or dice meats or cheeses Do not run frozen products with the vegetable preparation attachment The vegetable preparation attachment consists of two hoppers one large hopper for cutting vegetables such as cabbage celeriac etc a cylindrical hopper for long vegetables and high precision cutting For optimum cutting use this section as a guide HOW TO USE THE LARGE F...

Page 9: ...the motor base assembly must be done with care First unplug the unit A sponging with a cloth lightly dampened not dripping in a mild detergent is acceptable making sure the water is not permitted to penetrate the shaft seal or around the switches Clean around the shaft seal with a small brush taking care to remove all food Do not forget to clean the motor shaft Rinse the motor base first W A R N I...

Page 10: ... are fitted with magnetic safety devices W A R N I N G R E M E M B E R When you open the bowl lid the motor stops To restart the machine simply close the lid and press the green switch When you open the lever of the vegetable preparation attachment the motor stops When you close the lever the machine restarts To avoid splashing when running liquids in the bowl allow the blades to come to a complet...

Page 11: ...27 TECHNICAL DATA DATOS TECNICOS DONNÉES TECHNIQUES ...

Page 12: ...28 ...

Page 13: ...29 ...

Page 14: ...30 ...

Page 15: ...31 ...

Page 16: ...32 ...

Page 17: ...33 ...

Page 18: ...34 ...

Page 19: ...35 ...

Page 20: ...36 ...

Page 21: ...37 ...

Page 22: ...401 Series A R 402 Series A R 402V Series A USA Robot coupe USA Inc P O Box 16625 Jackson MS 39236 6625 264 South Perkins St Ridgeland MS 39157 e mail info robotcoupeusa com website www robotcoupeusa com Phone 1 800 824 1646 ...

Reviews: