background image

RECBOT 1.0  

 19

© Carnegie Mellon Robotics Academy  /  For use with VEX

®

 Robotics Systems

ROBOT

C

RECBOT BUILDING INSTRUCTIONS

8

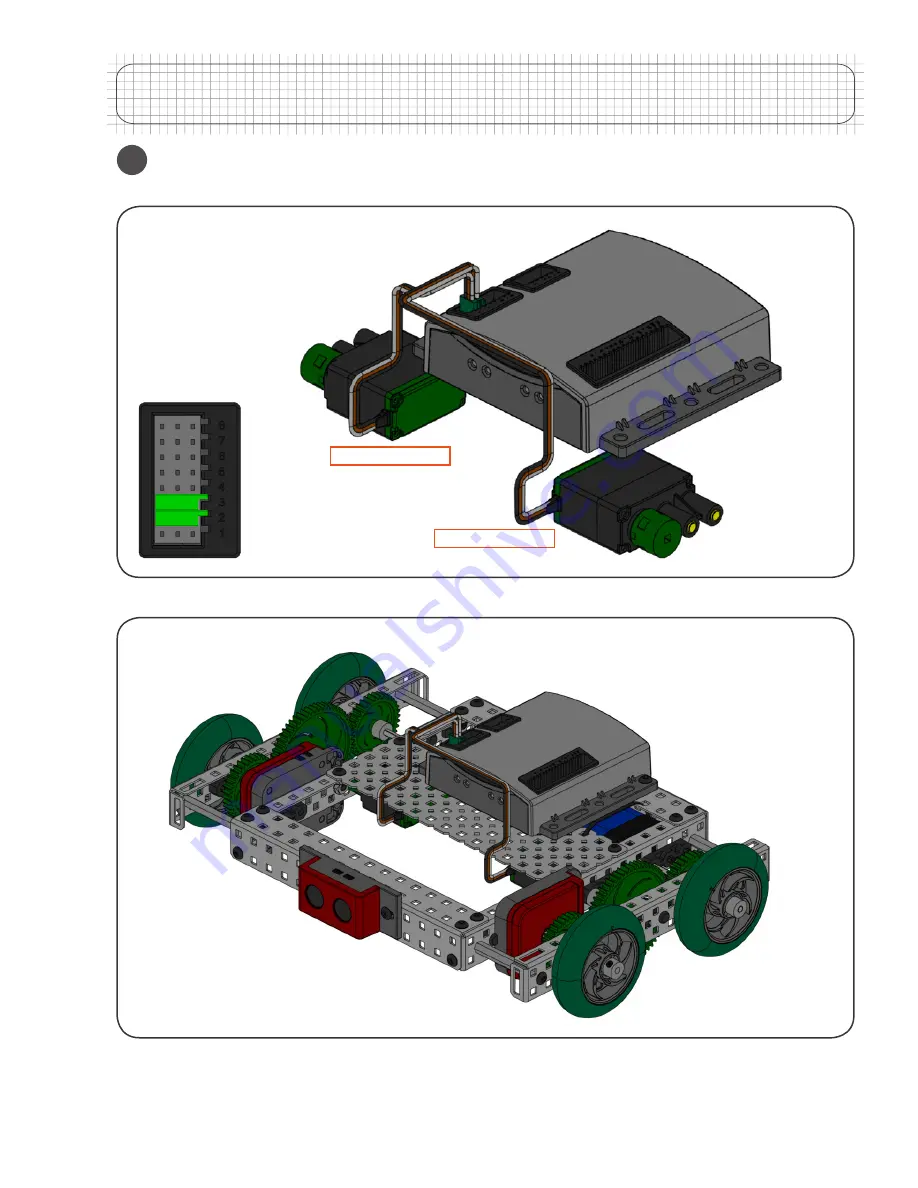
Wiring the Motors

MOTOR PORT 2

MOTOR PORT 3

Summary of Contents for RECBOT

Page 1: ...RECBOT 1 0 1 Carnegie Mellon Robotics Academy For use with VEX Robotics Systems ROBOTC RECBOT BUILDING INSTRUCTIONS RECBOT BUILDING INSTRUCTIONS USING THE VEX PIC...

Page 2: ...Standoff 2 Long 4 Standoff 1 Long 2 Gear 12 tooth 2 Gear 36 tooth 4 Gear 60 tooth 4 Chassis Rail 16 hole 4 Chassis Bumper 15 hole 2 C Channel 1x2x1x15 hole 2 C Channel 1x2x1x25 hole 1 Plate 5 x 15 hol...

Page 3: ...RECBOT 1 0 3 Carnegie Mellon Robotics Academy For use with VEX Robotics Systems ROBOTC RECBOT BUILDING INSTRUCTIONS Chassis Construction 2 x2 x4 x8 Building Tip Using Pop Rivets...

Page 4: ...RECBOT 1 0 4 Carnegie Mellon Robotics Academy For use with VEX Robotics Systems ROBOTC RECBOT BUILDING INSTRUCTIONS Chassis Construction continued 2 x4 x4 1 4 2...

Page 5: ...RECBOT 1 0 5 Carnegie Mellon Robotics Academy For use with VEX Robotics Systems ROBOTC RECBOT BUILDING INSTRUCTIONS 2 Chassis Construction continued x2 x4 x4 1 4...

Page 6: ...RECBOT 1 0 6 Carnegie Mellon Robotics Academy For use with VEX Robotics Systems ROBOTC RECBOT BUILDING INSTRUCTIONS 2 Chassis Construction continued x8 x8 1 4...

Page 7: ...RECBOT 1 0 7 Carnegie Mellon Robotics Academy For use with VEX Robotics Systems ROBOTC RECBOT BUILDING INSTRUCTIONS 3 Drivetrain Assembly x2 x2 x4 1 2 Motor Screws...

Page 8: ...RECBOT 1 0 8 Carnegie Mellon Robotics Academy For use with VEX Robotics Systems ROBOTC RECBOT BUILDING INSTRUCTIONS 3 Drivetrain Assembly continued x1 x4 x4 1 4...

Page 9: ...otics Systems ROBOTC RECBOT BUILDING INSTRUCTIONS 3 Drivetrain Assembly continued x2 x4 2 3 Building Tip Shaft Length The shafts depicted above are the minimum usable lengths Longer shafts if availabl...

Page 10: ...RECBOT 1 0 10 Carnegie Mellon Robotics Academy For use with VEX Robotics Systems ROBOTC RECBOT BUILDING INSTRUCTIONS 3 Drivetrain Assembly continued x2 x2 x2 3 8...

Page 11: ...RECBOT 1 0 11 Carnegie Mellon Robotics Academy For use with VEX Robotics Systems ROBOTC RECBOT BUILDING INSTRUCTIONS 3 Drivetrain Assembly continued x6 x2 x4 x8 Building Tip Using Shaft Collars 60 36...

Page 12: ...RECBOT 1 0 12 Carnegie Mellon Robotics Academy For use with VEX Robotics Systems ROBOTC RECBOT BUILDING INSTRUCTIONS 3 Drivetrain Assembly continued x2 x12...

Page 13: ...RECBOT 1 0 13 Carnegie Mellon Robotics Academy For use with VEX Robotics Systems ROBOTC RECBOT BUILDING INSTRUCTIONS 3 Drivetrain Assembly continued x4 1 4...

Page 14: ...RECBOT 1 0 14 Carnegie Mellon Robotics Academy For use with VEX Robotics Systems ROBOTC RECBOT BUILDING INSTRUCTIONS 3 Drivetrain Assembly continued x4 x4...

Page 15: ...RECBOT 1 0 15 Carnegie Mellon Robotics Academy For use with VEX Robotics Systems ROBOTC RECBOT BUILDING INSTRUCTIONS 4 Attaching the Ultrasonic Rangefinder x2 x1 x2 3 8...

Page 16: ...G INSTRUCTIONS 5 Attaching the Battery x4 x1 Building Tip Using Wire Ties Multiple wire ties can be connected end to end to create a longer strand Also keeping the wire ties slightly loose around the...

Page 17: ...RECBOT 1 0 17 Carnegie Mellon Robotics Academy For use with VEX Robotics Systems ROBOTC RECBOT BUILDING INSTRUCTIONS 6 Attaching the VEX Microcontroller x2 x1 x2 1 2...

Page 18: ...RECBOT 1 0 18 Carnegie Mellon Robotics Academy For use with VEX Robotics Systems ROBOTC RECBOT BUILDING INSTRUCTIONS 7 Wiring the Battery...

Page 19: ...RECBOT 1 0 19 Carnegie Mellon Robotics Academy For use with VEX Robotics Systems ROBOTC RECBOT BUILDING INSTRUCTIONS 8 Wiring the Motors MOTOR PORT 2 MOTOR PORT 3...

Page 20: ...ics Academy For use with VEX Robotics Systems ROBOTC RECBOT BUILDING INSTRUCTIONS 9 Wiring the Encoders Top wire to ANALOG DIGITAL PORT 3 Bottom wire to INTERRUPT PORT 3 Top wire to INTERRUPT PORT 5 B...

Page 21: ...OUTPUT to INTERRUPT PORT 1 Information Building Part I Complete The robot is equipped to perform autonomous tasks based on timing Encoder rotations and Ultrasonic Rangefinder feedback It s recommended...

Page 22: ...RECBOT 1 0 22 Carnegie Mellon Robotics Academy For use with VEX Robotics Systems ROBOTC RECBOT BUILDING INSTRUCTIONS Attaching the Limit Switch 11 x1 x2 x2 x2 3 8 1 4 1...

Page 23: ...RECBOT 1 0 23 Carnegie Mellon Robotics Academy For use with VEX Robotics Systems ROBOTC RECBOT BUILDING INSTRUCTIONS Wiring the Limit Switch 12 ANALOG DIGITAL PORT 1...

Page 24: ...RECBOT 1 0 24 Carnegie Mellon Robotics Academy For use with VEX Robotics Systems ROBOTC RECBOT BUILDING INSTRUCTIONS 13 Arm Construction x1 x2 x2 1 4 3...

Page 25: ...RECBOT 1 0 25 Carnegie Mellon Robotics Academy For use with VEX Robotics Systems ROBOTC RECBOT BUILDING INSTRUCTIONS Arm Construction continued 13 x4 x4...

Page 26: ...RECBOT 1 0 26 Carnegie Mellon Robotics Academy For use with VEX Robotics Systems ROBOTC RECBOT BUILDING INSTRUCTIONS Arm Construction continued 13 x2 x1 x2 1 4 3...

Page 27: ...RECBOT 1 0 27 Carnegie Mellon Robotics Academy For use with VEX Robotics Systems ROBOTC RECBOT BUILDING INSTRUCTIONS Arm Construction continued 13 x1 x1 x2 1 2 Motor Screws...

Page 28: ...RECBOT 1 0 28 Carnegie Mellon Robotics Academy For use with VEX Robotics Systems ROBOTC RECBOT BUILDING INSTRUCTIONS Arm Construction continued 13 x2 x2 x1 1 2...

Page 29: ...RECBOT 1 0 29 Carnegie Mellon Robotics Academy For use with VEX Robotics Systems ROBOTC RECBOT BUILDING INSTRUCTIONS Arm Construction continued 13 x2 A B C x 2...

Page 30: ...he following step involves cutting tools and permanent alterations to the materials in the VEX Kit Make sure you have permission before continuing ALL APPLICABLE SAFETY PROCEDURES MUST BE OBSERVED WHI...

Page 31: ...RECBOT 1 0 31 Carnegie Mellon Robotics Academy For use with VEX Robotics Systems ROBOTC RECBOT BUILDING INSTRUCTIONS Arm Construction continued 13 x1 x1 x2 x2 1 4...

Page 32: ...RECBOT 1 0 32 Carnegie Mellon Robotics Academy For use with VEX Robotics Systems ROBOTC RECBOT BUILDING INSTRUCTIONS Arm Construction continued 13 x1 x2 x2 1 4...

Page 33: ...RECBOT 1 0 33 Carnegie Mellon Robotics Academy For use with VEX Robotics Systems ROBOTC RECBOT BUILDING INSTRUCTIONS Arm Construction continued 13 x4 x4 x2 x4 1 2 60...

Page 34: ...RECBOT 1 0 34 Carnegie Mellon Robotics Academy For use with VEX Robotics Systems ROBOTC RECBOT BUILDING INSTRUCTIONS Arm Construction continued 13 x2 x2 x4 Alternate view on next page 3 12...

Page 35: ...RECBOT 1 0 35 Carnegie Mellon Robotics Academy For use with VEX Robotics Systems ROBOTC RECBOT BUILDING INSTRUCTIONS Arm Construction continued 13...

Page 36: ...RECBOT 1 0 36 Carnegie Mellon Robotics Academy For use with VEX Robotics Systems ROBOTC RECBOT BUILDING INSTRUCTIONS Arm Construction continued 13 x2 x2 x1 1 4...

Page 37: ...RECBOT 1 0 37 Carnegie Mellon Robotics Academy For use with VEX Robotics Systems ROBOTC RECBOT BUILDING INSTRUCTIONS Arm Construction continued 13 x4 1 4...

Page 38: ...RECBOT 1 0 38 Carnegie Mellon Robotics Academy For use with VEX Robotics Systems ROBOTC RECBOT BUILDING INSTRUCTIONS Wiring the Arm Motor 14 MOTOR PORT 6...

Page 39: ...NS Wiring the Potentiometer 15 ANALOG DIGITAL PORT 4 Information Building Part 2 Complete The robot is equipped to perform autonomous tasks that incorporate the arm Continue on through the optional in...

Page 40: ...RECBOT 1 0 40 Carnegie Mellon Robotics Academy For use with VEX Robotics Systems ROBOTC RECBOT BUILDING INSTRUCTIONS Optional Attaching the Receiver 16 x2 x2 x1 3 8...

Page 41: ...RECBOT 1 0 41 Carnegie Mellon Robotics Academy For use with VEX Robotics Systems ROBOTC RECBOT BUILDING INSTRUCTIONS x1 x1 x1 x1 Optional Attaching the Receiver 16 3 8...

Page 42: ...RECBOT 1 0 42 Carnegie Mellon Robotics Academy For use with VEX Robotics Systems ROBOTC RECBOT BUILDING INSTRUCTIONS Optional Wiring the Receiver 17 Rx 1...

Reviews: