background image

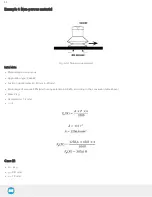
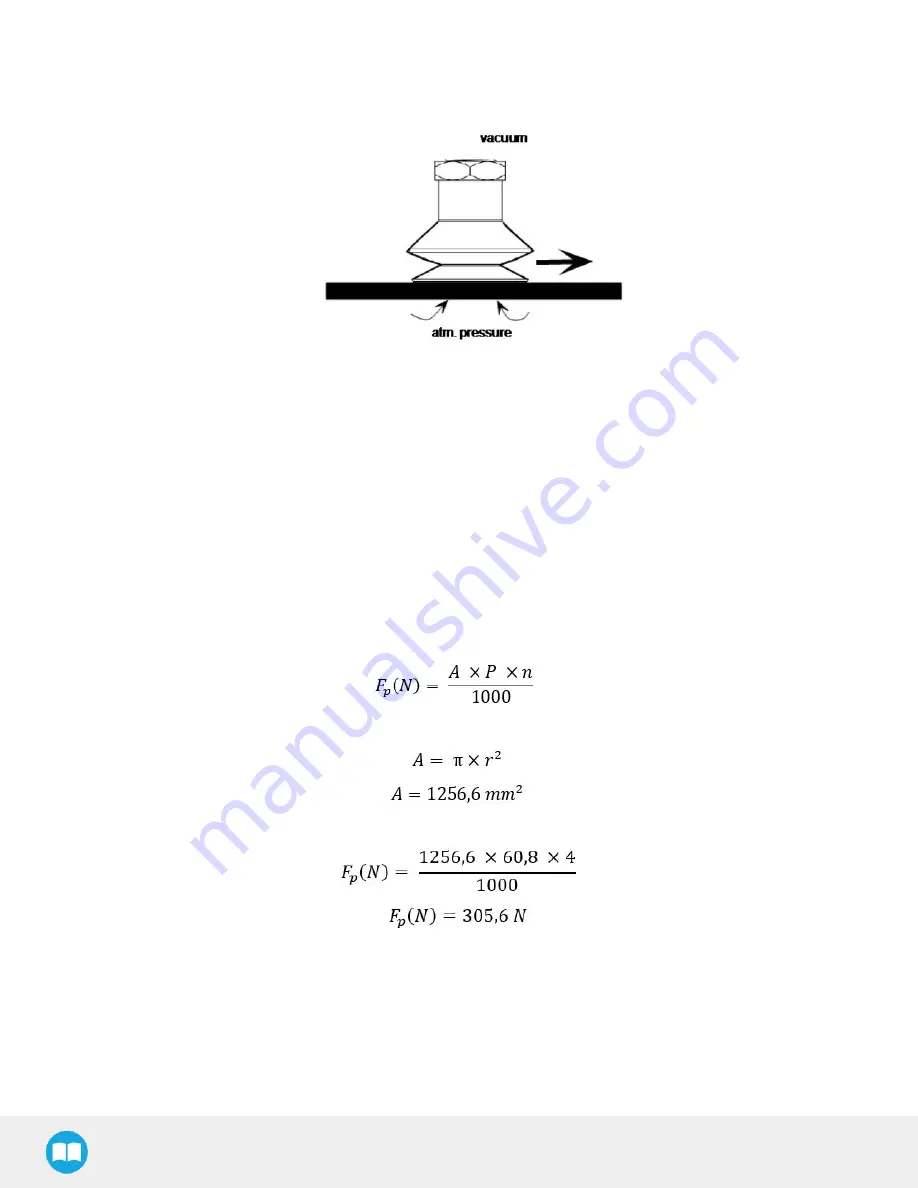
Example 1: Non-porous material

Fig. 6-10: Non-porous material

Initial data:

l

Material type: non-porous

l

Application type: Case #2

l

Suction cup diameter (d): 40 mm (r=20 mm)

l

Percentage of vacuum: 60% (which is equivalent to 60.8 kPa, according to the conversion table above)

l

Mass: 2 kg

l

Acceleration: 1.2 m/s

2

l

n = 4

Case #2

l

m = 2 kg

l

g = 9.81 m/s

2

l

a = 1.2 m/s

2

84

Summary of Contents for AirPick

Page 1: ...Robotiq AirPick Vacuum Gripper for Omron TM Series Robots Instruction Manual robotiq com leanrobotics org Original Notice 2021 Robotiq Inc...

Page 2: ...e Gripper with the Robotiq User Interface RUI 30 4 Software 34 4 1 Overview 34 4 2 Vacuum Gripper register mapping 36 4 3 Robot output registers functionalities 36 4 4 Robot input registers status 40...

Page 3: ...9 Troubleshooting 98 9 1 Vacuum Gripper verification 98 10 Warranty 99 11 Harmonized Standards Declarations and Certificates 101 11 1 Original EC declaration of incorporation 101 11 2 Applied standard...

Page 4: ...Functionalities l Update of section 3 1 Scope of Delivery l Update of section 6 2 Mechanical Specifications l Update of section 6 2 2 Center of Mass and Tool Center Point l Update of section 8 Spare P...

Page 5: ...without prior written consent from Robotiq Under copyright law copying includes translation into another language or format Information provided by Robotiq in this document is believed to be accurate...

Page 6: ...st not be considered as appropriate to the operation of the Gripper Each feature is detailed in the appropriate section Info The following manual uses the metric system Unless specified all dimensions...

Page 7: ...1 2 Suction cup system Info Please refer to the Installation section for more information on how to integrate the Suction Cup System to AirPick Info Please refer to the Scope of Delivery section subs...

Page 8: ...be attached to the AirPick Vacuum Gripper The bracket normally holds two or four suction cups corresponding to the four ports of the manifold Any unused manifold port should be blocked with a mating...

Page 9: ...to the Spare Parts Kits and Accessories section for a list of the available couplings The AirPick Gripper boasts an embedded object detection feature which uses indirect sensing measurements The syst...

Page 10: ...nstallation l Control l Maintenance l Inspection l Calibration l Programming l Decommissioning This manual covers the various components of the Robotiq Vacuum Gripper and the general operations regard...

Page 11: ...robot l Do not install or operate a Gripper that is damaged or lacking parts l Never supply the Gripper with an alternating current source l Make sure all cord sets are always secured at both ends Gr...

Page 12: ...ntly dangerous to the operator Warning Depending on the supply sources when an emergency stop e Stop button is pressed the following consequences may occur The robot owner has the responsibility to do...

Page 13: ...ince and or federal laws regulation and directives regarding automation safety and general machine safety The unit should be used exclusively within the range of its technical data Any other use of th...

Page 14: ...l conditions l Do not operate the Vacuum Gripper or even turn on the power supply before the device is firmly anchored and the machine area is cleared Make sure that the air supply is secured 3 1 Scop...

Page 15: ...enerator with one 1 suction cup 40 mm 1 5 bellows o One 1 suction cup system for 4 suction cups one 1 manifold one 1 bracket one 1 tubing four 4 air nodes o Eight 8 standard suction cups two different...

Page 16: ...bots Four 4 cups VAC OMRON AIRPICK KIT4 W l 1 x Robotiq AirPick Gripper l 1 x I O Coupling Kit IO CPL OMRON KIT l 1 x I O Coupling l 1 x screw kit to install on the robot l 1 x Micro USB to USB cable...

Page 17: ...l 4 mm hex key to mount the Vacuum Gripper onto its coupling 3 2 2 Suction cup system The following tool is required to install the Suction cup system on the Vacuum Gripper l 4 mm hex key to assemble...

Page 18: ...e is depressurized When the line is pressurized the safety clip must be at all times installed on the inlet port To protect against whipping hazard the air supply tubing must be securely attached to t...

Page 19: ...he robot arm using a cable routing system Fig 3 1 Installing the Vacuum Gripper onto the robot wrist Installation with the OMRON Wrist Connection Kit General presentation Nomenclature of the I O Coupl...

Page 20: ...ing When changing the Vacuum Gripper it is important to follow the steps in order 1 Unplug the I O Coupling cable 2 Remove the Gripper with the 4mm hex key 3 Install the new Vacuum Gripper with the re...

Page 21: ...t or liquid infiltration Firmware Update 1 Connect the Vacuum Gripper to your computer via the I O Coupling using the USB cable 2 Run the Robotiq User Interface RUI to update the firmware You can now...

Page 22: ...with the pertaining air nodes using the provided plastic tubing Info To facilitate the assembly of the Robotiq Wrist Camera and the AirPick on the suction cup system make sure to place the tubing as s...

Page 23: ...o Use dry and filtered air only Follow standard ISO 8573 1 class 3 4 3 We recommend using a local pressure regulator with a filter and air dryer 3 4 3 Suction cup system Manifold and mounting bracket...

Page 24: ...ether you are using a standard or custom option air nodes should be used to connect the suction cups and the air tubing and to prevent air leakage as much as possible Air nodes are easy to assemble as...

Page 25: ...Fig 3 7 Mounting air nodes suction cups air bolts air nuts on the bracket 25...

Page 26: ...t interface The Gripper interfaces with its coupling via a 10 spring pin connector located on its outer surface Fig 3 8 Pinout of the AirPick cable to wrist coupling Info The coupling used in the figu...

Page 27: ...Fig 3 9 Robotiq Vacuum Gripper with pigtail cable and device cable wiring scheme 27...

Page 28: ...le clamp The figure below illustrates the Vacuum Gripper pigtail connector from the coupling GRP CPL 062 or AGC CPL XXX 002 the device cable on the robot side CBL COM 2065 10 HF and their associated p...

Page 29: ...ipper Connect the white green and bare wires to the Robotiq RS485 to RS232 signal converter ACC ADT RS232 RS485 as shown in the figure below Fig 3 12 Gripper cable to RS485 RS232 converter Also connec...

Page 30: ...6 Testing the Gripper with the Robotiq User Interface RUI Once installed and properly secured your Robotiq Vacuum Gripper should be tested with the Robotiq User Interface test software using the prov...

Page 31: ...ion incorporated under the laws of Quebec having its registered office at 500 966 chemin Olivier L vis Qu bec Canada G7A 2N1 which specializes into the conception advanced man ufacturing and sale of r...

Page 32: ...hers in whole or in part without the prior written consent of the Licensor The End User may not or allow others to modify or pre pare directive works copy except for normal backups for recovery purpos...

Page 33: ...titutes the entire understanding and agreement between the Licensor and the End User and replaces any prior agreement relating to the same subject matter 2 This Agreement shall be governed and constru...

Page 34: ...n automatic timeout delay 4 1 1 Control using registers The Vacuum Gripper has an internal memory that is shared with the robot controller One part of the memory is for robot output Gripper functional...

Page 35: ...Fig 4 1 Vacuum Gripper control logic overview 35...

Page 36: ...ERVED FAULT STATUS Byte 3 MAX RELATIVE PRESSURE LEVEL REQUEST MAX RELATIVE PRESSURE LEVEL REQUEST ECHO Byte 4 GRIP TIMEOUT RELEASE DELAY ACTUAL RELATIVE PRESSURE Byte 5 MINIMUM RELATIVE PRESSURE LEVEL...

Page 37: ...the desired vacuum parameters l 0b0 Stop the vacuum generator valves are in position to hold the workpiece l 0b1 Follow the requested vacuum parameters in real time When timeout is reached rGTO must...

Page 38: ...ous grip Vacuum generator always ON l 0x16 0d22 Grip to 78 of vacuum Maximum device vacuum l 0x5A 0d90 Grip to 10 of vacuum Minimum device vacuum Automatic mode l 0x64 0d100 Send a grip command l 0x64...

Page 39: ...t This register is used to set the appropriate minimum acceptable vacuum pressure on the workpiece When the minimum vacuum level is reached the object flag gOBJ will be set Once the object is detected...

Page 40: ...e gMOD bits are the echo of the rMOD bits in the ACTION REQUEST register gGTO Regulate echo The gGTO bit is the echo of the rGTO bit in the ACTION REQUEST register Valid only if the vacuum pressure is...

Page 41: ...The gFLT bits indicates priority minor or major fault codes that are useful for troubleshooting l No fault o 0x0 No fault l Priority faults 0x0 gFLT 0x7 o 0x5 Action delayed o 0x3 Very porous material...

Page 42: ...s Register MAXIMUM VACUUM PRESSURE LEVEL REQUEST ECHO Address Byte 3 Bits 7 6 5 4 3 2 1 0 Symbols gPR gPR Vacuum Pressure request echo This register is the echo of the MAXIMUM VACUUM PRESSURE LEVEL RE...

Page 43: ...hen gripping an object in the automatic mode the Vacuum Gripper will 1 Try to reach the maximum possible vacuum level for a maximum period of 2 seconds 2 Directly activate the continuous mode if the m...

Page 44: ...ached the object flag will be set to gOBJ 0b01 If the desired maximum vacuum level is reached the object flag will be set to gOBJ 0b10 3 Vacuum generator will keep the vacuum level in between min and...

Page 45: ...cuum level dropped under the minimum level for more than 0 1 second When releasing an object in the manual mode the Vacuum Gripper will 1 Open the release valve 2 Object drop flag will be set when the...

Page 46: ...ion When a very porous material is detected or when the suction wears out the Vacuum Gripper will detect it and react according to the gripper mode When this condition occurs it is important to find t...

Page 47: ...an object When no object is detected after the timeout value the timeout flag will be set gFLT 0x6 To retry the same grip command the regulate bit needs to be re asserted rGTO 0b0 then rGTO 0b1 If new...

Page 48: ...he reader is also invited to download one of many free Modbus master such as the CAS Modbus Scanner from Chipkin Automation Systems available at http www store chipkin com products tools cas modbus sc...

Page 49: ...ripper 4 7 2 Read input registers FC04 The function code 04 FC04 is used to request the status of the Vacuum Gripper s analog input register Examples of use of these data are the Vacuum Gripper status...

Page 50: ...ctionalities of the Vacuum Gripper robot output It can be used to set registers one at a time Examples of use of these data are action request maximum vacuum level minimum vacuum level etc Example of...

Page 51: ...of setting multiple registers FC16 This message request sets the maximum relative pressure level the grip timeout and minimum relative pressure Request is 09 10 03 E9 00 02 04 00 19 0A 23 95 A3 Bits D...

Page 52: ...reading and writing multiple registers FC23 This message reads registers 0x07D0 2000 and 0x07D1 2001 which contains Vacuum Gripper Status Object Detection Fault Status and Position Request Echo It als...

Page 53: ...O Coupling The I O Coupling detection of the Vacuum Gripper has to be confirmed led blue before doing the sequence otherwise it will not be valid l Doing the sequence once the I O coupling is activat...

Page 54: ...ly one time before using the presets PresetX l To use the preset X and move the Vacuum Grip pers All the presets come with three 3 exit nodes 1 Detected The Vacuum Gripper has detected the object befo...

Page 55: ...ting Started 1 Power ON the robot 2 Tap the triple bar icon in the upper left corner of the screen 3 Click on the Login icon in the navigation pane on the left 4 Enter your login credentials and click...

Page 56: ...AirPick Instruction Manual 5 Click on Get Control 6 Click on the triple bar icon in the upper left corner of the screen and select Project 56...

Page 57: ...7 Click on the New Project icon in the upper left corner of the screen 57...

Page 58: ...AirPick Instruction Manual 8 Enter a name for your program and click on the OK button 9 58...

Page 59: ...l GRIPPER_ROBOTIQ_VAC_V003_SELECTID Component Select the slave ID of the gripper when using a dual gripper setup Installation 1 Download the TM Plug Play Software Package from the Robotiq Support webs...

Page 60: ...AirPick Instruction Manual 7 Click the Import button 8 Click on TMComponent in the Robot List window and click on OK 60...

Page 61: ...9 Click on the Component button of the Import navigation pane 10 Select the Components you want to import and click on the Import button 61...

Page 62: ...AirPick Instruction Manual 11 Tap the triple bar icon and select Setting to display the Robot Setting window 12 Click on the Component icon 62...

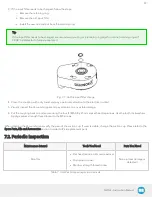
Page 63: ...equired Components in the Components list by ticking the radio button beside each of them 14 A Component that is enabled displays a green radio button once the Components are enabled click on the Save...

Page 64: ...locate the Gripper components in the navigation pane Gripper Button The user can assign Gripper Components to the Gripper button and use the latter to open and close the fingers of the Robotiq Gripper...

Page 65: ...2 Click on Gripper Button 3 In the Gripper Button window tick the Using Customized Component radio button and select the Component you want to assign to either one of the Gripper actions 65...

Page 66: ...AirPick Instruction Manual 4 In the pop up window select or change the Component you wish to assign to the Gripper action button and click OK 66...

Page 67: ...con Component Node 1 Drag and drop the SET Component icon after a program Gateway to place a SET program node VAC_V003_SET1 2 Tap the SET node to highlight it and click on the pencil to edit the setti...

Page 68: ...mode bool False Set to true to use the Advanced mode of the gripper var_release_ shutoff_time int 1000 AirPick Time during which the gripper pushes air to release the part var_release_ wait_for_ objec...

Page 69: ...the gripper 3 Error When a gripper error occurs 1 Drag and drop the GRIP Component icon after a program Gateway to place a GRIP program node VAC_V003_GRIP1 2 Tap the GRIP node to highlight it and cli...

Page 70: ...odbus communication when using a dual gripper setup Component Icon Component Node Info Use the Robotiq User Interface to change the Modbus Slave ID Address of the second Vacuum Gripper when using a du...

Page 71: ...2 Change the Slave ID of the Vacuum Gripper by typing in the corresponding box 3 Click on the Apply button 4 Perform a power cycle 24 V while the USB device remains connected 71...

Page 72: ...com to get the latest installer of the Robotiq User Interface along with appropriate documentation To consult the Robotiq User Interface Manual go to support robotiq com select Browse by product Vacuu...

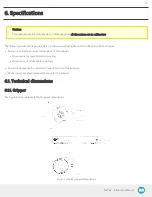
Page 73: ...on 6 1 lists the technical dimensions of the Gripper l Dimensions for custom blank coupling l Dimensions of all available couplings l Section 6 2 presents the mechanical specifications of the Gripper...

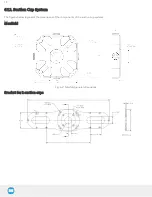
Page 74: ...6 1 2 Suction Cup System The figures below represent the dimensions of the components of the suction cup systems Manifold Fig 6 2 Manifold general dimensions Bracket for 2 suction cups 74...

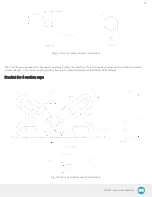
Page 75: ...represents an hexagonal opening to allow the insertion of a 4 mm hex key to screw and unscrew the captive screws directly on the robot coupling which allow you to easily install and uninstall the Air...

Page 76: ...Fig 6 5 Minimum and maximum arrangement possibilities of the air nodes position 76...

Page 77: ...AirPick Instruction Manual 6 1 3 Air nodes Fig 6 6 Air nodes dimensions 77...

Page 78: ...g Below are the dimensions of the blank coupling AGC CPL BLANK 002 refer to the Spare Parts Kits and Accessories section available to create a custom bolt pattern Blue section can be fully customized...

Page 79: ...upling GRP CPL 062 and GRP ES CPL 062 refer to the Spare Parts Kits and Accessories section is compatible with l 50 mm pitch circle diameter l 4 M6 1 0 low head socket cap screw clearance l 1 M6 dowel...

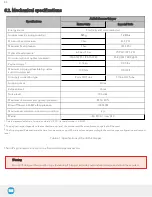
Page 80: ...time 3 10 ms Noise level 70 5 dBa Maximum Vacuum level at optimal pressure 1 85 80 Blow off flow at 0 65 MPa feed pressure 130 SLPM Maximum acceleration in operating condition 2 g Media ISO 8573 1 cla...

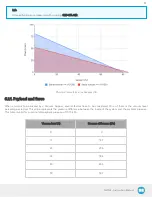
Page 81: ...ked by a Vacuum Gripper several factors have to be considered One of them is the vacuum level percentage selected This value represents the pressure difference between the inside of the system and the...

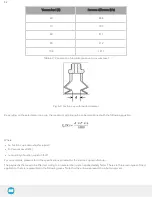
Page 82: ...h the following equation Where l A Suction cups internal surface mm2 l P Vacuum Level kPa l n Quantity of suction cups to lift off For more details please refer to the specifications provided by the s...

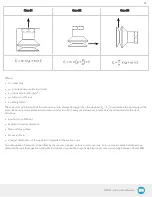
Page 83: ...a minimum security factor of 2 in every case However a factor 4 is recommended for the next situations l Low friction coefficient l Important robot acceleration l Non uniform surface l Porous surface...

Page 84: ...aterial type non porous l Application type Case 2 l Suction cup diameter d 40 mm r 20 mm l Percentage of vacuum 60 which is equivalent to 60 8 kPa according to the conversion table above l Mass 2 kg l...

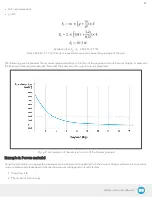
Page 85: ...Vacuum Gripper is used with the Robotiq brackets and accessories Note that the optimal suction cup choice is represented Fig 6 11 Acceleration of the robot in function of the Vacuum payload Example 2...

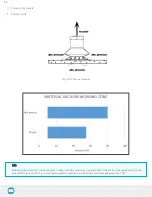
Page 86: ...g 6 12 Porous material Info Robotiq recommends to do some tests to determine the maximum grip strength of the suction cup depending on the selected material to lift It is not recommended to operate th...

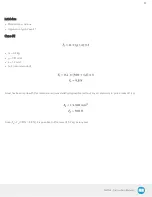
Page 87: ...type Case 1 Case 1 l m 0 2 Kg l g 9 81 m s2 l a 1 2 m s2 l S 4 recommended A test has been made with this material and it was statistically possible without any acceleration to pick a mass of 1 kg Si...

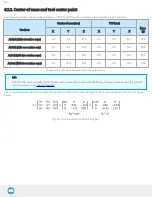
Page 88: ...580 AirPick with two suction cups 0 3 5 1 40 3 0 0 0 0 127 7 955 AirPick With four suction cups 0 2 14 0 45 6 0 0 0 0 127 7 1100 Table 6 4 Center of mass and tool center point matrix Info For TCP and...

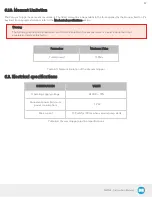
Page 89: ...lowing limits must be respected at all time Calculation of maximum moment should include the robot acceleration and a safety factor Parameters Maximum Value Total moment 150 Nm Table 6 5 Moment limita...

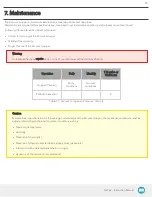
Page 90: ...pper will be done by Robotiq Operation Daily Monthly 1 M cycles or 1000 hours Gripper Cleaning Dirty conditions Normal conditions Periodic Inspection X Table 7 1 Vacuum Gripper maintenance intervals C...

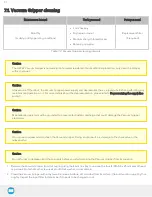
Page 91: ...please refer to Depressurizing the supply line section Caution Maintenance operator must be grounded to prevent electrostatic discharge that could damage the Vacuum Gripper electronics Caution Do not...

Page 92: ...ly inspect the Vacuum Gripper and pay attention to any visible damage 6 Put the coupling back on and secure using the four 4 M5 0 8 x 25 mm socket head cap screws Use the tooth lock washers Apply medi...

Page 93: ...on the Vacuum Gripper chassis If wear is present and may affect the Vacuum Gripper contact support robotiq com 3 Put the Vacuum Gripper back in place according to the instructions from the Vacuum Grip...

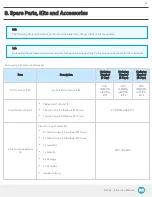
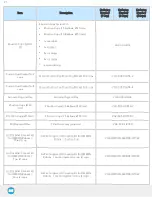
Page 94: ...Ordering Number 2 Cups Ordering Number 4 Cups Kit for Omron TM AirPick Kit for Omron TM VAC OMRON AIRPICK KIT1 VAC OMRON AIRPICK KIT2 VAC OMRON AIRPICK KIT4 Small Suction Cup Kit l 1 Adapter G1 4 to G...

Page 95: ...y Air node Plug and Play VAC SCS NODE 2 Suction Cups 40 mm 2 Suction Cups 1 5 Bellows 40 mm VAC SCS CUP40 2 2 Suction Cups 55mm 2 Suction Cups 1 5 Bellows 55 mm VAC SCS CUP55 2 Replacement filter Filt...

Page 96: ...xing pin with screws for 2 F Gripper fixation and 1 m pigtail cable AGC CPL 066 002 60 4 5 1D5 coupling Coupling for 60 mm PCD1 with 4 M5 thread and 1 5 mm indexing pin with screws for 2 F Gripper fix...

Page 97: ...g Number 1 Cup Ordering Number 2 Cups Ordering Number 4 Cups Adapter plate to 80 6M8 2D82D8 Wrist adapter plate for use with AGC CPL 064 002 Interface to 80 mm PCD1 with 6 M8 screws and 2 M8 indexing...

Page 98: ...not able to attain the desired vacuum level or if a diminution of the vacuum level occurs verify l The suction cups status l That the air path is clean and not obstructed including the manifold l If...

Page 99: ...ation during the warranty period and found to meet all published specifications Robotiq will charge standard verification fees The unit is considered defective when at least one of the following condi...

Page 100: ...ature causes external to the Vacuum Gripper or other factors beyond Robotiq s control It also excludes all consumable parts such as suction cups and their normal wear Robotiq reserves the right to mak...

Page 101: ...11 Harmonized Standards Declarations and Certificates 11 1 Original EC declaration of incorporation AirPick Instruction Manual...

Page 102: ...rs installation safety measure and normal usage must be respected The following standards have been applied ISO 12100 2010 Safety of machinery General principles for design Risk assessment and risk re...

Page 103: ...AirPick Instruction Manual 12 Appendix Fig 12 1 Pneumatic schema of the AirPick Vacuum Gripper...

Page 104: ...2788 Outside US and Canada Technical support and engineering option 3 Sales option 2 Head office Robotiq 966 chemin Olivier Suite 500 St Nicolas Qu bec G7A 2N1 Canada Where automation Pros come to sh...

Reviews: