background image


DYNAMIXEL 

AX-12 

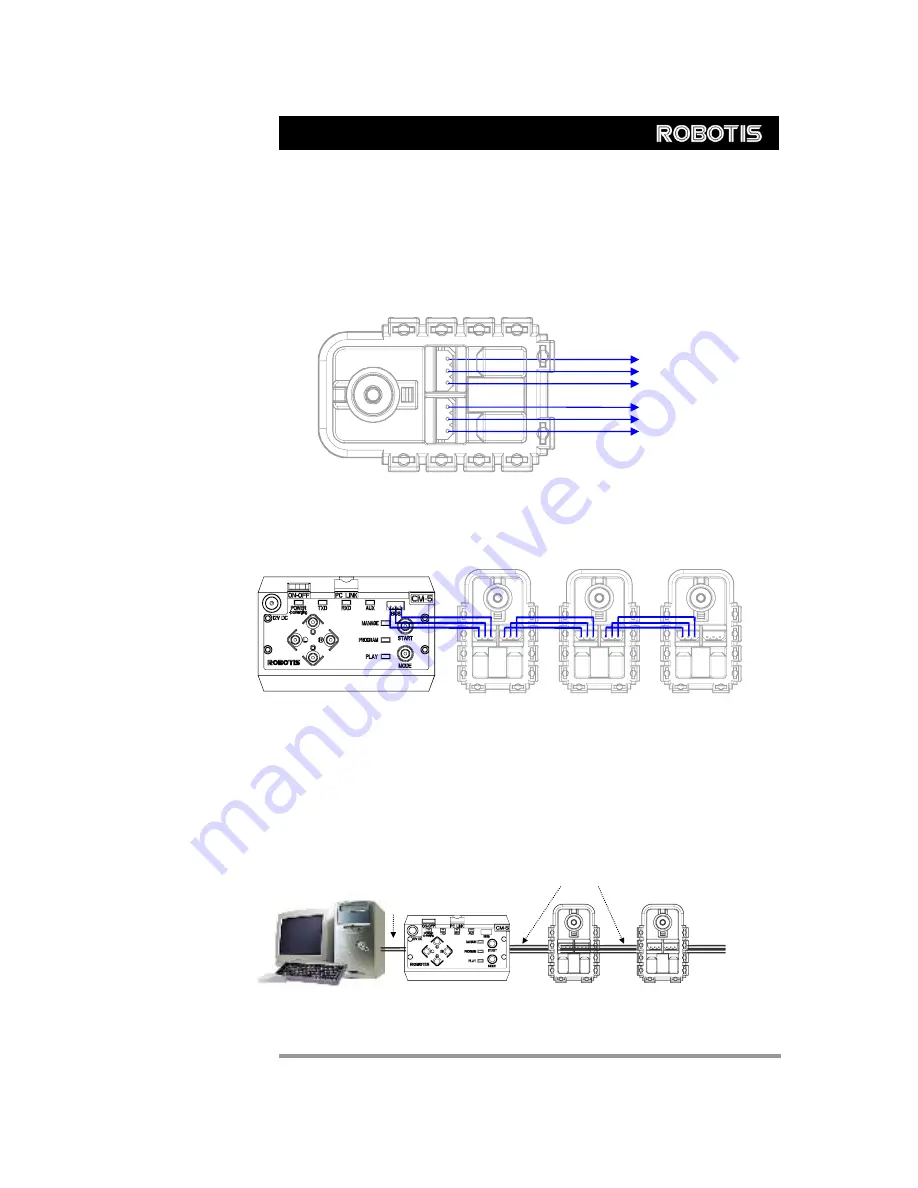
2-3. Dynamixel Wiring   


Pin Assignment 

The connector pin assignments are as the following. The two connectors on the 

Dynamixel are connected pin to pin, thus the AX-12 can be operated with only one 

connector attached. 


PIN2: VDD 

PIN1: GND 

PIN3: Data 


PIN1: GND 


PIN2: VDD 
PIN3: Data 


Wiring 

Connect the AX-2 actuators pin to pin as shown below. Many AX-12 actuators can be 

controlled with a single bus in this manner. 


Control Box “CM-5”


Main Controller


To operate the Dynamixel actuators, the main controller must support TTL level half duplex 

UART. A proprietary controller can be used, but the use of the Dynamixel controller CM-5 

is recommended. 


PC LINK 


A PC can be used to control the Dynamixel via the CM-5 controller. 


PC Dynamixels 

CM-5

RS232 

Level 

TTL 

Level 


6

Summary of Contents for dynamixel AX-12

Page 1: ...User s Manual 2006 06 14 A Dynamixel X 12 Closer to Real ...

Page 2: ...sembly Page 5 2 3 Dynamixel Wiring Page 6 3 Communication Protocol 3 1 Communication Overview Page 9 3 2 Instruction Packet Page 10 3 3 Status Packet Page 10 3 4 Control Table Page 12 4 Instruction Set and Examples 4 1 WRITE_DATA Page 19 4 2 READ_DATA Page 20 4 3 REG WRITE and ACTION Page 20 4 4 PING Page 21 4 5 RESET Page 22 4 6 SYNCWRITE Page 23 5 Example Page 24 Appendix Page 30 1 ...

Page 3: ...justed and specified in controlling position Feedback Feedback for angular position angular velocity and load torque are available Alarm System The Dynamixel series robot actuator can alert the user when parameters deviate from user defined ranges e g internal temperature torque voltage etc and can also handle the problem automatically e g torque off Communication Wiring is easy with daisy chain c...

Page 4: ...le 300 Endless Turn Voltage 7V 10V Recommended voltage 9 6V Max Current 900mA Operate Temperature 5 85 Command Signal Digital Packet Protocol Type Half duplex Asynchronous Serial Communication 8bit 1stop No Parity Link Physical TTL Level Multi Drop daisy chain type Connector ID 254 ID 0 253 Communication Speed 7343bps 1 Mbps Feedback Position Temperature Load Input Voltage etc Material Engineering...

Page 5: ... The OF 12SH hinge frame can be installed on the AX 12 as the following Exploded view Assembled OF 12S Installation The OF 12S side mount frame can be installed on the AX 12 as the following The OF 12S can be mounted on any of the three faces left right or under side of the AX 12 body as needed Horn2Body Body2Body Exploded view Assembled Assembled Exploded view 4 ...

Page 6: ...ssemble the connectors as shown below Attach the wires to the terminals using the correct crimping tool If you do not have access to a crimping tool solder the terminals to the wires to ensure that they do not become loose during operation 5 ...

Page 7: ... Data Wiring Connect the AX 2 actuators pin to pin as shown below Many AX 12 actuators can be controlled with a single bus in this manner Control Box CM 5 Main Controller To operate the Dynamixel actuators the main controller must support TTL level half duplex UART A proprietary controller can be used but the use of the Dynamixel controller CM 5 is recommended PC LINK A PC can be used to control t...

Page 8: ...lex type The recommended circuit diagram for this is shown below The power is supplied to the Dynamixel actuator from the main controller through Pin 1 and Pin 2 of the Molex3P connector The circuit shown above is presented only to explain the use of half duplex UART The CM 5 controller already has the above circuitry built in thus the Dynamixel actuators can be directly connected to it The direct...

Page 9: ...hen controlling the Dynamixel actuators Main Controller Multi Drop Link Caution Please ensure that the pin assignments are correct when connecting the Dynamixel actuators Check the current consumption when powering on The current consumption of a single Dynamixel actuator unit in standby mode should be no larger than 50mA Connection Status Verification When power is applied to the Dynamixel actuat...

Page 10: ... an instruction packet with the ID set to N only the Dynamixel unit with this ID value will return its respective status packet and perform the required instruction Unique ID If multiple Dynamixel units have the same ID value multiple packets sent simultaneously collide resulting in communication problems Thus it is imperative that no Dynamixel units share the same ID in a network node Protocol Th...

Page 11: ...on the network Thus packets sent with a broadcasting ID will not return any status packets LENGTH The length of the packet where its value is Number of parameters N 2 INSTRUCTION The instruction for the Dynamixel actuator to perform PARAMETER0 N Used if there is additional information needed to be sent other than the instruction itself CHECK SUM The computation method for the Check Sum is as the f...

Page 12: ...it 4 Checksum Error Set to 1 if the checksum of the instruction packet is incorrect Bit 3 Range Error Set to 1 if the instruction sent is out of the defined range Bit 2 Overheating Error Set to 1 if the internal temperature of the Dynamixel unit is above the operating temperature range as defined in the control table Bit 1 Angle Limit Error Set as 1 if the Goal Position is set outside of the range...

Page 13: ... Down Calibration L RD 21 0X15 Down Calibration H RD 22 0X16 Up Calibration L RD 23 0X17 Up Calibration H RD 24 0X18 Torque Enable RD W R 0 0x00 25 0X19 LED RD W R 0 0x00 26 0X1A CW Compliance Margin RD W R 0 0x00 27 0X1B CCW Compliance Margin RD W R 0 0x00 28 0X1C CW Compliance Slope RD W R 32 0x20 29 0X1D CCW Compliance Slope RD W R 32 0x20 30 0X1E Goal Position L RD W R Addr36 value 31 0X1F Goa...

Page 14: ... of data stored in each of the addresses in the control table Address 0x00 0x01 Model Number For AX 12 this value is 0X000C 12 Address 0x02 Firmware Version Address 0x03 ID The unique ID number assigned to each Dynamixel actuators for identifying them Different IDs are required for each Dynamixel actuators that are on the same network Address 0x04 Baud Rate Determines the communication speed The c...

Page 15: ...s operating voltage If the present voltage Address 42 is out of the specified range a Voltage Range Error Bit Bit 0 of the Status Packet will return the value 1 and an alarm will be set by Address 17 18 The values are 10 times the actual voltage value For example if the Address 12 value is 80 then the lower voltage limit is set to 8V Address 0x0E 0x0F 0x22 0x23 Max Torque The maximum torque output...

Page 16: ... returning to a normal condition from an error state the LED stops blinking after 2 seconds Address 0X12 Alarm Shutdown If the corresponding Bit is set to a 1 the Dynamixel actuator s torque will be turned off when an error occurs Bit Function Bit 7 0 Bit 6 If set to 1 torque off when an Instruction Error occurs Bit 5 If set to 1 torque off when an Overload Error occurs Bit 4 If set to 1 torque of...

Page 17: ...g shocks at the output shaft The following graph shows how each compliance value length of A B C D is defined by the Position Error and applied torque X axis Position Error CCW Y axis Output Torque CCW CW Goal Position B A E E C D CW A CCW Compliance Slope Address0x1D B CCW Compliance Margin Address0x1B C CW Compliance Margin Address0x1A D CW Compliance Slope Address0x1C E Punch Address0x30 31 Add...

Page 18: ...ss 0x2A Present Voltage The voltage currently applied to the Dynamixel actuator The value is 10 times the actual voltage For example 10V is represented as 100 0x64 Address 0x2B Present Temperature The internal temperature of the Dynamixel actuator in Degrees Celsius Address 0x2C Registered Instruction Set to 1 when an instruction is assigned by the REG_WRITE command Set to 0 after it completes the...

Page 19: ...X06 CW Angle Limit 2 0 1023 0x3ff 8 0X08 CCW Angle Limit 2 0 1023 0x3ff 11 0X0B the Highest Limit Temperature 1 0 150 0x96 12 0X0C the Lowest Limit Voltage 1 50 0x32 250 0xfa 13 0X0D the Highest Limit Voltage 1 50 0x32 250 0xfa 14 0X0E Max Torque 2 0 1023 0x3ff 16 0X10 Status Return Level 1 0 2 17 0X11 Alarm LED 1 0 127 0x7f 18 0X12 Alarm Shutdown 1 0 127 0x7f 19 0X13 Reserved 1 0 1 24 0X18 Torque...

Page 20: ...ET Changes the control table values of the Dynamixel actuator to the Factory Default Value settings 0x06 0 SYNC W RITE Used for controlling many Dynamixel actuators at the same time 0x83 4 4 1 WRITE_DATA Function To write data into the control table of the Dynamixel actuator Length N 3 N is the number of data to be written Instruction 0X03 Parameter1 Starting address of the location where the data...

Page 21: ...e read Example 2 Reading the internal temperature of the Dynamixel actuator with an ID of 1 Read 1 byte from address 0x2B of the control table Instruction Packet 0XFF 0XFF 0X01 0X04 0X02 0X2B 0X01 0XCC ID LENGTH INSTRUCTION PARAMETERS CHECKSUM The returned Status Packet will be as the following Status Packet 0XFF 0XFF 0X01 0X03 0X00 0X20 0XDB ID LENGTH ERROR PARAMETER1 CHECKSUM The data read is 0x...

Page 22: ... 3 2 ACTION Function Triggers the action registered by the REG_WRITE instruction Length 0X02 Instruction 0X05 Parameter NONE The ACTION instruction is useful when multiple Dynamixel actuators need to move simultaneously When controlling multiple Dynamixel actuator units slight time delays can occur between the 1st and last units to receive an instruction The Dynamixel actuator handles this problem...

Page 23: ...ess 16 is 0 a Status Packet is always returned by the PING instruction 4 5 RESET Function Changes the control table values of the Dynamixel actuator to the Factory Default Value settings Length 0X02 Instruction 0X06 Parameter NONE Example 4 Resetting the Dynamixel actuator with an ID of 0 Instruction Packet 0XFF 0XFF 0X00 0X02 0X06 0XF7 ID LENGTH INSTRUCTION CHECKSUM The returned Status Packet is ...

Page 24: ...the 1st Dynamixel actuator Data for the 1st Dynamixel actuator Parameter L 3 The Lth data for the 1st Dynamixel actuator Parameter L 4 The ID of the 2nd Dynamixel actuator Parameter L 5 The 1st data for the 2nd Dynamixel actuator Data for the 2nd Dynamixel actuator Parameter L 6 The 2nd data for the 2nd Dynamixel actuator Parameter 2L 4 The Lth data for the 2nd Dynamixel actuator Example 5 Setting...

Page 25: ... Firmware Version 0x08 Example 7 Changing the ID to 0 for a Dynamixel actuator with an ID of 1 Instruction Packet Instruction WRITE_DATA Address 0x03 DATA 0x00 Communication Dynamixel FF FF 01 04 03 03 00 F4 LEN 008 Dynamixel FF FF 01 02 00 FC LEN 006 Status Packet Result NO ERROR Example 8 Changing the Baud Rate of a Dynamixel actuator to 1M bps Instruction Packet Instruction WRITE_DATA Address 0...

Page 26: ... Communication Dynamixel FF FF 00 05 03 08 FF 01 EF LEN 009 Dynamixel FF FF 00 02 00 FD LEN 006 Status Packet Result NO ERROR Example 11 Resetting the upper limit for the operating temperature to 80 C for a Dynamixel actuator with an ID of 0 Instruction Packet Instruction WRITE_DATA Address 0x0B DATA 0x50 Communication Dynamixel FF FF 00 04 03 0B 50 9D LEN 008 Dynamixel FF FF 00 02 00 FD LEN 006 S...

Page 27: ...struction Packet Instruction WRITE_DATA Address 0x10 DATA 0x00 Communication Dynamixel FF FF 00 04 03 10 00 E8 LEN 008 Dynamixel FF FF 00 02 00 FD LEN 006 Status Packet Result NO ERROR The Status Packet is not returned starting with the following instruction Example 15 Set the Alarm to blink the LED and Shutdown Torque off the actuator when the operating temperature goes over the set limit Since t...

Page 28: ...Angle Error CW Goal Position CW CCW Even if the position deviates a little from the goal position in the CW direction a large amount of torque is generated in the CCW direction to compensate for this However since inertia must be considered a realistic implementation differs from this approach Considering this the given conditions can be represented by the following graph CW Goal Position Output T...

Page 29: ... D3 LEN 011 Dynamixel FF FF 00 02 00 FD LEN 006 Status Packet Result NO ERROR Example 19 Position the output of a Dynamixel actuator with an ID of 0 to 0 and Position the output of a Dynamixel actuator with an ID of 1 to 300 and initiate the movement at the same time If the WRITE_DATA is used the movement of the two actuators cannot be initiate at the same time thus the REG_WRITE and ACTION instru...

Page 30: ...esult NO ERROR Once locked the only way to unlock it is to remove the power If an attempt is made to access any locked data an error is returned Dynamixel FF FF 00 05 03 30 40 00 87 LEN 009 Dynamixel FF FF 00 02 08 F5 LEN 006 Range Error Example 21 Set the minimum power Punch to 0x40 for a Dynamixel actuator with an ID of 0 Instruction Packet Instruction WRITE_DATA Address 0x30 DATA 0x40 0x00 Comm...

Page 31: ...uSec and can be changed via the Control Table at Address 5 The Main Controller needs to change the Direction Port to input mode during the Return Delay Time after sending an instruction packet Tx Rx Direction For Half Duplex UART the transmission ending timing is important to change the direction to receiving mode The bit definitions within the register that indicates UART_STATUS are as the follow...

Page 32: ... LINE 11 DIRECTION_PORT RX_DIRECTION Direction change to RXD LINE 12 EnableInterrupt enable interrupt again Please note the important lines between LINE 8 and LINE 12 Line 8 is necessary since an interrupt here may cause a delay longer than the return delay time and corruption to the front of the status packet may occur Byte to Byte Time The delay time between bytes when sending an instruction pac...

Page 33: ...P_LOCK 47 define P_PUNCH_L 48 define P_PUNCH_H 49 Instruction define INST_PING 0x01 define INST_READ 0x02 define INST_WRITE 0x03 define INST_REG_WRITE 0x04 define INST_ACTION 0x05 define INST_RESET 0x06 define INST_DIGITAL_RESET 0x07 define INST_SYSTEM_READ 0x0C define INST_SYSTEM_WRITE 0x0D define INST_SYNC_WRITE 0x83 define INST_SYNC_REG_WRITE 0x84 define CLEAR_BUFFER gbRxBufferReadPointer gbRxB...

Page 34: ...Length RxPacket DEFAULT_RETURN_PACKET_SIZE TxDString r n TxD PrintBuffer gbpTxBuffer bTxPacketLength TxDString r n RxD PrintBuffer gbpRxBuffer bRxPacketLength TxDString r n n Example 5 Read Control Table Any Key to Continue RxD8 gbpParameter 0 0 Reading Address gbpParameter 1 49 Read Length bTxPacketLength TxPacket bID INST_READ 2 bRxPacketLength RxPacket DEFAULT_RETURN_PACKET_SIZE gbpParameter 1 ...

Page 35: ... bCount while CHECK_TXD0_FINISH Wait until TXD Shift register empty RS485_RXD return bPacketLength RxPacket read data from buffer RxPacket need a Parameter Total length of Return Packet RxPacket return Length of Return Packet byte RxPacket byte bRxPacketLength define RX_TIMEOUT_COUNT2 3000L define RX_TIMEOUT_COUNT1 RX_TIMEOUT_COUNT2 10L unsigned long ulCounter byte bCount bLength bChecksum byte bT...

Page 36: ...itialize byte bPort byte bBaudrate byte bInterrupt else if bPrinted TxD8 byte lTmp 0 if bPort SERIAL_PORT0 lLong long lTmp lDigit lDigit lDigit 10 UBRR0H 0 UBRR0L bBaudrate UCSR0A 0x02 UCSR0B 0x18 lTmp byte lLong lDigit if bInterrupt RX_INTERRUPT sbi UCSR0B 7 RxD interrupt enable if lTmp TxD8 byte lTmp 0 UCSR0C 0x06 UDR0 0xFF sbi UCSR0A 6 SET_TXD0_FINISH Note set 1 then 0 is read else if bPort SER...

Page 37: ...r Old Part Number Male 22 03 5045 5267 03 Female 50 37 5043 5264 03 Temperature range 40 C to 105 C Contact Insertion Force max 14 7N 3 30 lb Contact Retention Force min 14 7N 3 30 lb www molex com or www molex co jp for more detail information Female Connector Male Connector Pin No 1 36 ...

Page 38: ... AX 12 control box Able to control 30 AX 12 actuators 6 push buttons 5 for selection 1 for reset Optional installable wireless devices available Battery compartment AA x 8 with recharging capability when connected to an external SMPS CM 5 37 ...

Reviews: