background image


Kobuki Turtlebot II. User’s Manual 


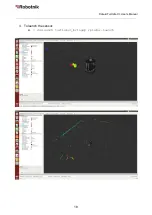
And select in Fixed Frame for example: camera_depth_frame 


In order to see a point cloud, we have to add a pointcloud2 and select as topic: 
camera_depth_registered_points 


31 


Summary of Contents for Kobuki Turtlebot 2

Page 1: ...Kobuki Turtlebot II User s Manual TURTLEBOT II User s Manual Robotnik Automation S L L Kinetic v1 1 ...

Page 2: ... 1 Default User Password 4 2 Installing from Robotnik s USB Installer 4 3 ROS package installation 4 4 Upgrading the firmware 4 5 Additional components 4 5 1 RPLIDAR 4 5 2 Hokuyo URG04LX 4 5 3 WidowX Arm 4 5 4 PhantomX Reactor Arm 4 5 5 Hokuyo UST10LX 4 6 Additional WiFi router 5 First steps 5 1 Launching Kobuki 5 2 Testing the hardware 5 3 Launching the RGBD camera 5 3 Controlling the Kobuki robo...

Page 3: ...ater than 5 cm Threshold Climbing climbs thresholds of 12 mm or lower Rug Climbing climbs rugs of 12 mm or lower Expected Operating Time 3 7 hours small large battery Expected Charging Time 1 5 2 6 hours small large battery Docking can perform docking within a 2mx5m area in front of the docking station 1 2 Hardware Specification PC Connection usb or via RX TX pins on the parallel port Motor Overlo...

Page 4: ... Input 100 240V AC 50 60Hz 1 5A max Output 19V DC 3 16A Netbook recharging connector only enabled when robot is recharging 19V 2 1A DC Docking IR Receiver left centre right 1 3 Software Specification Kobuki drivers for ROS and non ROS in C Kobuki and Turtlebot simulator Gazebo Kobuki and Turtlebot apps 4 ...

Page 5: ...nents list 2 1 Basic components Kobuki base Mobile base Kobuki Hardware It s the hardware mounted over the base It includes 16 Poles 3 Disks 2 Dummy pipes Battery The 4S1P battery 2200 mAh It provides 3 hours of operational time Kinect cable 5 ...

Page 6: ...tlebot 2 is intended to use a 3D sensor in order to navigate autonomously and map By default the Kinect sensor is provided with the robot but any other sensor can be attached Docking station Battery charger intended to carry out an autonomous battery charge Large battery The 4S2P battery 4400 mAh It provides 7 hours of operational time Netbook Netbook installed and configured to control the robot ...

Page 7: ...Kobuki Turtlebot II User s Manual Turtlebot s USB stick USB stick that contains all the manuals and a recovery image of the provided netbook 7 ...

Page 8: ...lly supporting the kinect 12V 5A Molex PN 5566 02B2 for high powered accessories e g robotic arm 19V 2A Molex PN 3928 9048 for recharging netbooks WARNING This pin out can differ from the Turtlebot 1 Please be careful when connecting accessories WARNING Please verify the pinout or the provided connector before connecting any external device Cable Note if you click on the preceding links for the po...

Page 9: ...1 x 4S2P Lithium Ion battery optional longer life Default 4S1P Battery Pack By default Kobuki comes with a 4S1P battery pack that is stored underneath robot behind a cover at the middle of the base Optional 4s2p Battery Pack For longer life the 4S2P pack can be used You cannot use 4S1P and 4S2P packs at the same time Remove the 4S1P battery from the base compartment Optional 2x4s2p Battery Pack in...

Page 10: ...Kobuki Turtlebot II User s Manual 10 ...

Page 11: ...Kobuki Turtlebot II User s Manual Plug the 4S2P battery into the connector 11 ...

Page 12: ...Kobuki Turtlebot II User s Manual 12 ...

Page 13: ...so an accessory for those who d like to offline charge the robot a pseudo continuous operation mode Just directly connect For both online offline charging it should take approximately 2 hours to recharge the 4s1p battery fully and over 3 hours for the 4s2p one 13 ...

Page 14: ...ided netbook or pc 4 3 ROS package installation In this section will be described the ROS package installation from scratch For further information about this process or about ROS please refer to www ros org These packages are supported for Kinetic current version version Install ROS bases Install ROS in Ubuntu 16 04 Trusty sudo sh c echo deb http packages ros org ros ubuntu lsb_release sc main et...

Page 15: ...srun kobuki_ftdi create_udev_rules sudo udevadm trigger For the Astra cameras It is possible to copy or following the installation instructions at https github com tfoote ros_astra_camera cd etc udev rules d Create a new file as sudo sudo gedit 56 orbbec rules Copy the following lines SUBSYSTEM usb ATTR idProduct 0400 ATTR idVendor 2bc5 MODE 0666 OWNER root GROUP video SUBSYSTEM usb ATTR idProduct...

Page 16: ...GROUP video SUBSYSTEM usb ATTR idProduct 0409 ATTR idVendor 2bc5 MODE 0666 OWNER root GROUP video SUBSYSTEM usb ATTR idProduct 040a ATTR idVendor 2bc5 MODE 0666 OWNER root GROUP video Restart the udev system service sudo service udev reload sudo service udev restart Unplug the camera and plug it again Keyboard Teleoperation If you followed the instruction well with no error pop up you should be ab...

Page 17: ...dditional configuration efforts 1 Create a catkin workspace 2 Installation of Robotnik alternative Turtlebot repository a https github com RobotnikAutomation turtlebot b Clone the repository into the workspace catkin_ws src and compile it c Add the following into the bashrc i source catkin_ws devel setup bash 3 Other dependencies to install a https github com RobotnikAutomation widowx_arm b https ...

Page 18: ...Kobuki Turtlebot II User s Manual 3 To launch the sensor a roslaunch turtlebot_bringup rplidar launch 18 ...

Page 19: ... the bashrc and reload it Configuration with the sensor on the top plate export TURTLEBOT_TOP_PLATE_DEVICE urg04lx export TURTLEBOT_3D_SENSOR no3d Configuration with the sensor on the middle plate export TURTLEBOT_TOP_PLATE_DEVICE notop export TURTLEBOT_3D_SENSOR urg04lx 1 To launch the sensor a roslaunch turtlebot_bringup minimal launch b roslaunch turtlebot_bringup hokuyo_urg04lx launch 19 ...

Page 20: ...Kobuki Turtlebot II User s Manual 20 ...

Page 21: ...ROUP dialout SYMLINK ttyUSB_WIDOWX Run the following commands to restart the udev daemon sudo restart udev udevadm trigger See Appendix 1 Setting up Arbotix board to configure the Arbotix Then start the arm controller with roslaunch widowx_arm_controller widowx_arm_controller launch In the widowx_arm_controller launch are specified two nodes The first node is the arbotix_driver node and the second...

Page 22: ...Kobuki Turtlebot II User s Manual 4 5 4 PhantomX Reactor Arm Dependencies 22 ...

Page 23: ...YMLINK ttyUSB_REACTOR Run the following commands to restart the udev daemon sudo restart udev udevadm trigger See Appendix 1 Setting up Arbotix board to configure the Arbotix Then start the arm controller with roslaunch turtlebot_bringup arbotix_phantomx_reactor_arm_wrist launch SUMMARY PARAMETERS arbotix joints arm_1_joint id 1 arbotix joints arm_1_joint max_speed 75 0 arbotix joints arm_2_1_join...

Page 24: ...sher state_publisher rviz rviz rviz ROS_MASTER_URI http robotnik GE70 11311 core service rosout found process arbotix 1 started with pid 16444 process phantomx_reactor_controller 2 started with pid 16445 process robot_state_publisher 3 started with pid 16446 process rviz 4 started with pid 16447 INFO WallTime 1496152050 354436 Started ArbotiX connection on port dev ttyUSB0 INFO WallTime 1496152050...

Page 25: ...85904275 0 010226538585904275 velocity 0 042620525427073536 0 0 0 0 0 0 0 0 0 0 0 0 0 0 effort Run the rqt_publisher tool to set the position of the joints rosrun rqt_publisher rqt_publisher 4 5 5 Hokuyo UST10LX Dependencies ros kinetic urg node Set the user permissions sudo usermod a G dialout turtlebot To launch the sensor roslaunch turtlebot_bringup hokuyo_ust10lx launch 4 6 Additional WiFi rou...

Page 26: ...Kobuki Turtlebot II User s Manual IP 192 168 0 1 User Pass admin R0b0tn1K SSID pass R0b0tn1K 26 ...

Page 27: ...er roslaunch kobuki_keyop keyop launch This launch file starts the control of the robot using the keyboard keys roslaunch kobuki_node kobuki_state_publisher launch This launch file starts a node that publish the TF transformation using the robot s urdf file 5 2 Testing the hardware The kobuki_testsuite package provides a bunch of scripts to thoroughly test specific kobuki hardware components Testi...

Page 28: ...obuki Turtlebot II User s Manual Testing the gyro rosrun kobuki_testsuite test_gyro py Testing the LEDs rosrun kobuki_testsuite test_led_array py Testing sounds rosrun kobuki_testsuite test_sounds py 28 ...

Page 29: ... It is recommended to connect the Kinect s USB into a USB 2 0 slot Open a terminal and launch the openni node roslaunch openni_launch openni launch or roslaunch astra_launch astra launch Or roslaunch turtlebot_bringup 3dsensor launch 3dsensor astra Testing the kinect with rviz rosrun rviz rviz Press Add Button and add a Camera 29 ...

Page 30: ...Kobuki Turtlebot II User s Manual It is necessary to select a topic for example camera rgb image_color 30 ...

Page 31: ...obuki Turtlebot II User s Manual And select in Fixed Frame for example camera_depth_frame In order to see a point cloud we have to add a pointcloud2 and select as topic camera_depth_registered_points 31 ...

Page 32: ...rom turtlebot_teleop_joystick cmd_vel to mobile_base commands velocity Start kobuki node roslaunch kobuki_node minimal launch screen In order to pair the joystick Obviously it s necessary a bluetooth dongle with the joystick connected with usb cable You will see something similar to Current Bluetooth master 00 22 b0 d0 5a 09 Setting master bd_addr to 00 22 b0 d0 5a 09 Press Ctrl D now so that you ...

Page 33: ...kobuki should move now 5 3 2 PS4 gamepad It s necessary to make some changes in the launch file this assumes that you are modifying the launch file from the original ps3_teleop launch instead of the one used for PS3 In opt ros kinetic share turtlebot_teleop launch ps3_teleop launch change the following lines from param name axis_deadman value 10 param name axis_angular value 0 to param name axis_d...

Page 34: ...uetooth on the computer being disabled by default Perform the following to enable it sudo chmod x usr sbin bluetoothd sudo service bluetooth restart You can also pair your system with the gamepad also wirelessly via Bluetooth directly on the Linux graphical user interface First put the controller into pairing mode by pressing and holding the Share and PS buttons at the same time press the Share bu...

Page 35: ...e under responsibility of the client Here you find the instructions to make a custom cable to power your netbook through the Kobuki base 6 1 Materials Heat shrink tube 2mm and 4mm Scissors Soldering iron Solder Heat gun 6 2 Instructions Cut the cables as seen in the image Male connector goes with Netbook plug Female connector goes with DC adapter 35 ...

Page 36: ...th Pass the heat shrink tubes first the big one and match cables as indicated Then solder the cables and heat the shrink tubes Repeat this with the other cable Test both cables NOTE Cable colours could be different depending on the netbook model Please check the polarity 36 ...

Page 37: ...om https github com trossenrobotics arbotix archive master zip wget https github com trossenrobotics arbotix archive master zip 3 Extract to Documents Arduino 4 Open arduino a Cd Downloads arduino 1 0 6 b arduino 5 Open Arduino IDE and change folder to Documents Arduino arbotixmaster a File Preferences Sketchbook Location b Tools Board Arbotix c Tools Serial Port dev ttyUSBX d File Sketchbook Arbo...

Reviews: