Normal operation
Installation, use and maintenance manual – GAHP-AR
35
6
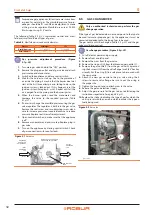
Should the burner fail to light, or flame is not detected during
the first trial for ignition, the gas valve and ignition transformer
are de-energized and the ignition control box begins an inter-
purge delay before another ignition attempt. The control will
attempt two additional ignition trials (total of 3 ignition trials)
before going into lockout. Upon lockout, the gas valve will de-
energize immediately and the pre-mixer blower will turn off.
The thermostat (“W” terminal), air pressure switch and burner
flame are constantly monitored to assure proper system opera-
tion. When the call for flame has ended (24 V removed from “W”
terminal on ignition control), the gas valve is de-energized im-
mediately. The ignition control then senses loss of flame and de-
energizes the pre-mixer blower.
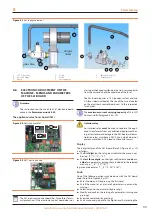
To reset the flame controller lockout, refer to the procedure giv-
5.7
MODIFYING SETTINGS
Modify settings via the DDC
If the device is connected to the DDC control, refer to the
relevant manual to modify settings.
If any information (menu, menu entries, parameters
and/or values, etc.) is visualized on the display in flashing
mode, it means that this information couldn’t be entered.
When information is not available, the display visualizes
.
How to raise/lower the water temperature setpoint
The water temperature setpoint establishes the outlet tempera-
ture to the system (water output from the appliance), or inlet
from the system (water input in the appliance). The temperature
is pre-set by the AT upon first start-up.
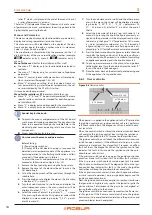
If the appliance is not connected to a DDC control, to
raise/lower the water temperature setpoint with the S61
board, proceed as follows:
1.
Access menu 3 under parameter 161 or 075 (= hot or
chilled water temperature setpoint) by rotating and
pressing the knob; "3.161" must be displayed in heating
mode or "3.075" in cooling mode (procedure Paragraph
5.6
2.
Display the parameter value by pressing the knob; the
previously set value is displayed (from 37.4 to 140 °F); to
reconfirm the pre-existing value press the knob again,
otherwise go to step 3.
3.
Turn the knob to modify the value, increasing or decreas-
ing it, and press it to set the new value.
4.
Exit menu 3, and from the menu list, by selecting and
pressing letter "E" twice, and go back to the normal dis-
play of detected temperature data.
Do not modify complex settings
Specific technical and system knowledge is required for
complex settings. Contact an AT.
6
NORMAL OPERATION
This section is for the end user.
6.1
WARNINGS
General warnings
Prior to using the appliance carefully read the warnings
in Chapter III.1
p. 4, providing important information
on regulations and on safety.
First start-up by AT
First start-up may exclusively be carried out by a Robur
AT (Chapter 5
Never power the appliance off while it is running
NEVER power the appliance off while it is running (ex-
cept in the event of danger, Chapter III.1
p. 4), since
the appliance or system might be damaged.
6.2
SWITCH ON AND OFF
Routine switching on/off
The appliance may exclusively be switched on/off by
means of the suitably provided control device (DDC or
external request).
Do not switch on/off with the power supply switch
Do not switch the appliance on/off with the power sup-
ply switch. This may be harmful and dangerous for the
appliance and for the system.
Checks before switching on
Before switching on the appliance, ensue that:
gas valve open
appliance electrical power supply (main switch (GS) ON)
DDC power supply (if any)
water circuit ready
How to switch on/off
The appliance may be turned on/off, in heating or cooling mode
by seasonal heating/cooling switching, to alternatively produce
hot water or chilled water, according to climate control needs.
▶
If the appliance is controlled by a DDC, refer to the relevant
manual.
▶
If the appliance is controlled by an external request (e.g.
thermostat, timer, switch, ... with NO voltage-free contact),
the appliance is switched on/off by the ON/OFF positions of
the external control device, with heating/cooling seasonal
change through winter/summer switching (contacts R =
common, W = winter, Y = summer, board S61, see Paragraph
p. 26).
Switch on
Select the operating mode required (cooling or heating) using
the summer/winter selector switch, if the desired mode is not
already selected.
Summary of Contents for GAHP-AR
Page 43: ......


