background image


RESTRICTED SLEW ZONE MONITORING 

MAN-1111 Rev H 

©Copyright 2015 LSI-Robway Pty Ltd 

Page 135 


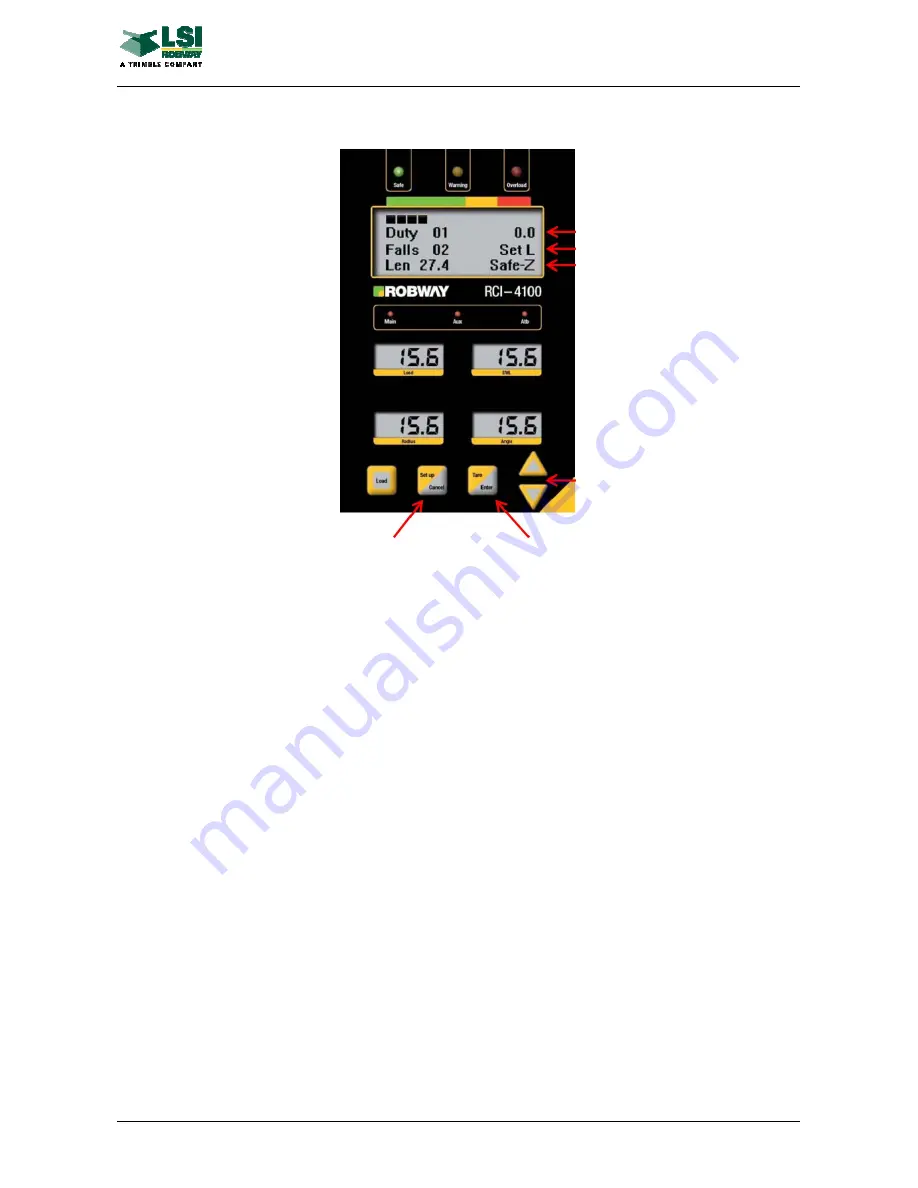
Checking Slew Angle 

Slew angle is shown relative to the reset position (0 degree). Turning the superstructure to 
the right (clockwise) increases the angle while turning it to the left (anti-clockwise) decreases 
it. The full range is 0 to 360 degrees. The operator can see the current slew angle and RSZ 
status of the machine by pressing the UP or DOWN arrow key for about 5 seconds while in 
normal RCI mode. The alphanumeric screen will switch to RSZ view mode showing the 
current slew angle and RSZ status. 


Permanent and Temporary Zones 

Two independent sets of zones are maintained. The permanent zone set can only be 
accessed by authorised personnel who are equipped with the "over-ride" key. The temporary 
set can be accessed and edited by the operator freely. The system will monitor both sets 
continuously and will work out combined safety restrictions. 


Press SETUP/CANCEL key to 
return to RCI mode. 

After selecting a menu item, press 
the ENTER key to accept and 
confirm the selection, or press the 
CANCEL key to abort changes to 
current selection. 


Boom Slew Angle 
Menu Items 
RSZ Status 
(Safe, Rest, No-Go) 

Use the UP or DOWN arrow 
key to select a menu item 
(Set L, Set R, Lo Ang, Hi Ang, 
Delete, ClrAll, Split, Unite L, 
Unite R) 

Summary of Contents for RCI-4100

Page 1: ...32 West Thebarton Road Thebarton South Australia 5031 Phone 61 0 8 8238 3500 Fax 61 0 8 8352 1684 www lsirobway com au RCI 4100 Tension Based System Operation and Installation SINGLE TWIN WINCH STRUT BOOM CRANE MAN 1111 Rev H ...

Page 2: ......

Page 3: ...dous area 22 2 3 12 Cabling Instructions 23 2 3 13 Earthing 24 2 4 SWITCH INPUTS 24 2 5 RELAY OUTPUTS 24 2 5 1 MOTION CUT OUTPUT RL 1 24 2 6 INSTALLING SLEW RING COMPONENTS 25 2 6 1 Restricted Slew Zone Encoder 25 2 6 2 Proximity Switch For optional Restricted Slew Zone feature 26 2 7 INSTALLING WINCH COMPONENTS 27 2 7 1 Hook Height Winch Encoder 27 3 OPERATING INSTRUCTIONS 29 3 1 APPLYING POWER T...

Page 4: ...14 SET TIME 44 6 15 DOWNLOAD LOGGER CONTENTS TO PC OR SD CARD 44 6 16 ERASE LOGGER CONTENTS 45 6 17 ALTER CALIBRATION DATA 45 6 18 CLEAR ALL CALIBRATION DATA USE EXTREME CAUTION 46 6 19 MAIN WINCH SLACK ROPE THRESHOLD 46 6 20 AUX WINCH SLACK ROPE THRESHOLD 46 6 21 USER VARIABLES SWL ALARMS MOTION CUT 46 6 22 USER VARIABLES CRANE GEOMETRY 46 6 23 USER VARIABLES DATA LOGGING SETUP PARAMETERS 46 6 24...

Page 5: ...or Codes 63 8 2 PROBLEMS WITH DIGITAL INPUTS DIGITAL OUTPUTS AND RELAY OUTPUTS 64 8 2 1 Description of Digital Inputs Digital Outputs and Relay Outputs 64 8 2 2 What are the inputs and outputs on this crane 64 8 2 3 Troubleshooting Digital Inputs 65 8 2 4 Troubleshooting Digital Outputs 66 Troubleshooting Relay Outputs 67 8 3 SENSOR REPLACEMENT 68 8 4 FUSE REPLACEMENT 69 9 INSPECTION 71 9 1 PRE IN...

Page 6: ......

Page 7: ...DIX L Tilt Sensing Option 157 APPENDIX M Hook Height DISRCI4100 Display Option 163 APPENDIX N System Drawings 169 APPENDIX O Hook Height and Winch Speed RCI1550 Display Option 181 ATTACHMENTS RCI System Configuration Documents VERSION HISTORY Version Issue Date Description A not issued Initial draft B 25Oct11 Minor formatting changes C 17Feb12 Sect 4 4 1 FLASHING changed to ON LED trip point thres...

Page 8: ......

Page 9: ... that all operational instructions and warnings are understood and complied with Proper system operation requires the operator to select the proper crane setup and working configuration WARNING THE RCI 4100IS SYSTEM IS INTENDED FOR USE IN A GROUP IIB ZONE 1 EXPLOSIVE GAS ATMOSPHERE WARNING THE RCI 4100 SYSTEM IS A CRANE DEVICE WHICH WARNS THE OPERATOR OF IMPENDING OVERLOAD CONDITIONS AND OVER HOIS...

Page 10: ...FEATURE IS PROVIDED AS AN AID TO SAFER CRANE OPERATION IN CERTAIN SITUATIONS SUCH AS CRANE SETUP THE CRANE OPERATOR MAY NEED TO OVER RIDE THE MOTION LIMITERS AT THESE TIMES THE SYSTEM CAN NO LONGER WARN OF OVERLOAD AND THE CRANE MUST ONLY BE USED IN STRICT ACCORDANCE TO THE CRANE MANUFACTURER S SETUP AND OPERATION PROCEDURES PROPER SYSTEM OPERATION REQUIRES THE OPERATOR TO CORRECTLY PROGRAM THE LS...

Page 11: ...ibration and fault finding tools Tare facility Unit s conversion imperial metric facility 1 3 Hazardous Area The RCI 4100IS system is intended for use in a Group IIB explosive gas atmospheres with specific zones indicated on the relevant GA Drawing refer RCI System Configuration Documents in Attachments and is comprised of the following sub systems see appendices for individual certifications and ...

Page 12: ...n or labour costs other than those directly acceptable by LSI Robway and consumed at LSI Robway premises shall not be part of the warranty claim and shall be at the originator s expense Associated re installation costs shall be at the originator s expense Replaced or repaired items by LSI Robway are warranted for the remainder of the warranty period of the originally supplied goods as if they were...

Page 13: ...TALLATION STANDARDS IN ONE DOCUMENT INFORMATION CONTAINED HEREIN MUST BE CONSIDERED ADVISORY ONLY 2 1 Setting up the Crane CAUTION PRIOR TO PERFORMING ANY INSTALLATION A CERTIFIED OPERATOR MUST LOWER THE CRANE BOOM TO A SAFE AND CONVENIENT POSITION 2 2 Power Supply The RCI 4100 can be powered by a 10 5 VDC to 36 VDC supply The selected power supply may be permanently connected however for convenie...

Page 14: ...nometer inside is adjusted as described in section 7 4 3 Verifying Operation of Sensors The boom angle sensor is shipped with the inclinometer correctly mounted for right hand mounting If the angle sensor is fitted on the left hand side the internal inclinometer will need to be rotated for correct operation Refer to Section 7 4 3 Verifying Operation of Sensors Route the cable carefully around the ...

Page 15: ...is adapter plate assembly must be specially fabricated and supplied by the customer to suit the dimensions of the lug and socket at the dead end termination point It should also provide for the existing wedge socket and pin to be re used LSI Robway also recommends that the adapter plate assembly be proof load tested by a certification body prior to installing it on the crane Alternatively on reque...

Page 16: ...he cable is not pinched or stretched as the boom moves through its full luffing arc see also Cabling Sensors Section 2 3 6 Ensure the resultant hoist rope down force on to the load pin does not exceed the Load pin capacity The down force is relative to the hoist rope deflected angle over the load sensing sheave Calculation is Down Force sin deflected angle x line pull tonnes Example 1 5mt Load pin...

Page 17: ... turns Have an assistant prevent the reel from turning and unwind sufficient cable to reach the cable anchor while boom or travel is at minimum Tie off cable to cable anchor securely Extend boom or travel machine slowly to the full extent of travel Before reaching the limit of travel feed off cable from the reel by hand to ensure that the reel will not bind up before full travel is reached Check t...

Page 18: ...PLICABLE Check that the switch works correctly as the boom luffs throughout its working range For twin winch cranes an additional switch can be added and mounted at the rooster aux winch head sheave NOTE Cut chain to required length suitable for the winch line speed and application A thread locking device should be applied to all shackles in the ATB assemblies Fix the ATB cable s through the junct...

Page 19: ... 3 6 Cabling Sensors Intrinsicaly safe Load pin and Compression cell cabling must be LSI Robway supplied BLUE 4 core screened cable which indicates an intrinsically safe circuit Blue jacketed cable must not be used for non I S circuits Boom Angle Sensor cable must be LSI Robway supplied 4 core steel wire armoured cable not blue UV shield socking may be fitted Sensor cables should be fixed firmly t...

Page 20: ...NNECTION MUST BE ENSURED BETWEEN THE DISPLAY ENCLOSURE AND THE CONTROL UNIT ENCLOSURE VIA THE GROUNDED CRANE CHASSIS Figure 5 Ex ib display unit and typical installation inside the cabin 2 3 8 Hazardous Area Control Unit if not Safe Area The Hazardous Area Control Unit has Ex ia and Ex ib interfaces housed in an Ex d flameproof enclosure for Zone 1 and Zone 2 applications The Control Unit is certi...

Page 21: ...THAT AN EQUIPOTENTIAL CONNECTION MUST BE ENSURED BETWEEN THE DISPLAY ENCLOSURE AND THE CONTROL UNIT ENCLOSURE VIA THE GROUNDED CRANE CHASSIS Figure 6 Typical installation of Ex d control unit inside the operator s cabin 2 3 9 Setting DIP Switches for Cable Length The hazardous area control unit has a display barrier BAREX4120 which the display is connected to This has a PCB with three DIP switches...

Page 22: ...lock located above the relays on the mounting plate inside the Control Unit CAUTION DO NOT BRING THE SCREEN CONNECTION THROUGH THE GLAND ON I S CABLES ONLY SCREEN CAPTURE GLANDS SHOULD BE USED Refer to APPENDIX G Cable Gland Installation Instructions 2 3 11 Safe Area Control Unit if not hazardous area The Safe Area Control Unit enclosure is made of stainless steel with a hinged lid and is designed...

Page 23: ...upplied by LSI Robway is used for all intrinsically safe circuits only Always trap the shield of all cables in the Ex d glands of the controller Intrinsically safe circuit cable shield must only be connected to ground at the controller end and terminated within the gland Do not allow cable screens to continue inside the controller enclosure In the enclosure do not ground the shield of screened cab...

Page 24: ...nal block The safety relays have voltage free contact rated to 5A and are only used to energise the coils of external high power SLAVE relays such as motion cut slack rope detect output boom up motion cut minimum radius limit etc Please refer RCI System Configuration Documents in Attachments s for the list of relay outputs programmed in the software to suit the specific application Refer to the do...

Page 25: ...tly gear driven from the slew ring gear The Encoder is used to convert the number of pulses counted during slewing left or right into slew direction and slew angle values The Slew Encoder body is supplied with a standard steel plate with four mounting holes To ensure accurate operation of the encoder drive gear extra plates brackets not supplied must be fabricated on site to connect the encoder bo...

Page 26: ...nt the plate at a suitable location on the revolving upperstructure preferably so that the switch moves and rotates with the upperstructure see typical installation below LSI Robway recommends that this switch be located so that it corresponds with the rest position of the crane so that the slew system is reset on every crane start up The target plate must be mounted at a suitable location on the ...

Page 27: ... winch gear The Encoder is used to convert the number of pulses counted during hoisting up or down into winch direction and winch height values The Slew Encoder body is supplied with a standard steel plate with four mounting holes To ensure accurate operation of the encoder drive gear extra plates brackets not supplied must be fabricated on site to connect the encoder body Figure 10 Winch encoder ...

Page 28: ......

Page 29: ...in how to operate the RCI 4100 and make best use of its capabilities 3 1 Applying power to the RCI 4100 As soon as power is applied to the RCI 4100 its display and other indicators should light up and the RCI 4100 should go through its self test operation 3 2 Turning Off the RCI 4100 The RCI 4100 will stop working as soon as the power is removed from it ...

Page 30: ...ctions SWL Bargraph Duty or Sea state Falls Boom Length Local Time Units Over ride Indication Tare Indication and Error Codes Boom Angle Display Degrees Actual Load for Winch Selected Tonnes or Klbs Working Radius Display Metres or Feet Setup Cancel Button Winch Select Button Main or Aux Tare Enter Button UP DOWN Buttons for Changing Duty and Falls and for use in Calibration Mode LED Indicator Lam...

Page 31: ...omes on at the second trip point which is typically set at 100 SWL The audible alarm will sound continuously The RED LED will remain on when the third trip point is reached which is typically set at 110 SWL and the audible alarm will sound continuously Crane motion limiting controls are also activated at this stage if fitted Please review function code settings for exact thresholds The other lines...

Page 32: ...essed the displayed load reverts to the total load While in TARE mode the tared load will be stored in the system memory and will still be part of the total load calculation of the system The DUTY and FALLs are operator settable functions Prior to crane operation the operator must ensure that the correct DUTY and FALLS are selected to match the actual crane configuration operation and actual parts...

Page 33: ...WINCH and ATB LED INDICATORS There are three LED indicators at the centre of the display as follows MAIN Illuminated when Main Winch is selected Selection can be done by pressing the LOAD button on the lower left hand side of the display Pressing the LOAD button will toggle between Main Winch and Aux Winch Aux Illuminated when Aux Winch is selected Selection can be done by pressing the LOAD button...

Page 34: ...keys are used for going through the list of Function Codes and for incrementing decrementing numerical values when calibrating setting up a function 3 5 Restricted Slew Zone Monitoring Optional Feature Restricted Slew Zone Monitoring is an optional feature that can be integrated into the RCI 4100 system if required This option can provide two forms of Restricted Slew Zone Monitoring Built in slew ...

Page 35: ...sing option is an optional feature that can be integrated into the RCI 4100 system if required This option provides a tilt indication and can also be configured to supply alarms at pre determined points and or switch load charts at pre determined points If this option is supplied please refer APPENDIX L Tilt Sensing Option for usage information and details 3 10 Hook Height Optional Feature Hook he...

Page 36: ......

Page 37: ...edure is as follows Turn the power off Open the controller and place the SD card preferably with no files into the SD card holder on the RCI 4100 controller unit board see Figure 11 Turn the over ride key switch ON and access Calibration Mode Go to the Download Data Log function code and press the ENTER key The default setting on the screen is RS232 To download to the SD Card use the up down arrow...

Page 38: ...OPERATION AND INSTALLATION RCI 4100 SYSTEM MAN 1111 Rev H Copyright 2015 LSI Robway Pty Ltd Page 38 ...

Page 39: ...T prompt the user to clear calibration data A recalibration will NOT be required If the Software Version Number is the SAME as the one in the CPU then the system will NOT upload data from the SD card In some cases where changes are made on the crane software with the SAME Software Version Number the changes can still be uploaded but will first require clearing existing data from the controller PCB...

Page 40: ...m is now required Refer to Section 7 Calibration for the calibration procedure Please contact LSI Robway for further details and assistance on the dummy software CAUTION CHANGING THE SOFTWARE WILL CHANGE THE OPERATION OF THE RCI 4100 AND IT IS MOST IMPORTANT THAT THE CORRECT SOFTWARE CORRESPONDING TO THE CRANE IS USED ON EACH CRANE THE PERSON CHANGING THE SOFTWARE IS RESPONSIBLE FOR VERIFYING ALL ...

Page 41: ...ised 6 2 2 Calibrate Light Main Load This function is used to calibrate the Light Main Load 6 2 3 Calibrate Heavy Main Load This function is used to calibrate the Heavy Main Load 6 3 Aux Load 6 3 1 View Calibrated Aux Load The calibrated Aux Winch load can be verified on normal operating mode operator s screen This function is used to view the aux calibrated load while still in calibration mode Th...

Page 42: ...ts or raw data of the Aux Load transducer aux load sensor Please also Section 7 4 3 Verifying Operation of Sensors for details Function Codes View Calibrated Transducer 2 Calibrate Low End of Transducer 2 and Calibrate High End of Transducer 2 are only used on Load Moment Based systems only and are not applicable for this crane 6 8 OFFSET and GAIN adjustment Software provides a facility to vary se...

Page 43: ...rent types of load sensors and they can have different levels of output For example a load pin has 1mV V output and tension plate cells generally have 2mV V output The maximum differential input strain gauge type through Intrinsically Safe Barriers used on RCI 4100IS is limited to maximum of 2 5mV V Example A 1mV V 5T load pin with 5V sensor excitation will have a 5mV differential output when load...

Page 44: ... View Mode This function code can be used to view the load charts programmed in the software It is not part of the calibration or set up procedures It is mainly used by LSI Robway for software checking 6 11 View Digital Inputs This function code is used to view the state i e open or closed of the eight digital switch inputs The inputs are used for wiring slew limit switches or proximity switches e...

Page 45: ...due to replacement of parts and or sensors these data can be restored into the system simply by keying in the values without the need to luff the boom or lift test loads View and Copy Calibration Data Access function code Alter Calibration Data by selecting it in calibration mode and pressing the ENTER key The screen will then show An1 Angle channel on the screen This is the default sensor that co...

Page 46: ... specific application Please see also Section 7 4 14 Testing the Slack Rope Function for details 6 20 Aux Winch Slack Rope Threshold This function code is used to set the required load limit or threshold of the aux winch for activating a digital output in the RCI Control Unit This function may be used to control the crane s main hoist by activating hoist up when the load on the block is equal to o...

Page 47: ... or Imperial Factory default setting is Metric displayed in function codes as SI 6 29 Time Delay for Motion Cut Return This function code sets the motion cut return time to avoid the motion cut output changing state rapidly under some conditions Default setting is 5 0 seconds 6 30 Slew Encoder if applicable The following variables are provided to ensure accurate counting of the slew encoder to pro...

Page 48: ...locations LD1D Load One Down and LD1U Load One Up Auxiliary load is stored in LD2D and LD2U Two calibrations are required for each winch light load is calibrated as the load is being winched up then repeated using the same function code and weight as the load is being winched down This procedure is repeated with a heavy load These procedures are repeated for the auxiliary if required Note that all...

Page 49: ...ment refer RCI System Configuration Documents in Attachments drawing is being used Ensure all duties refer RCI System Configuration Documents in Attachments match crane load charts Make sure that the correct duty number crane configuration sea state and falls parts of line are selected Insert the over ride key into the RCI 4100 Display and turn it on make sure that the over ride indicator O R is s...

Page 50: ...O for factory default settings Check each setting and change if required Review all SWL parameters against actual requirements and change if required refer to APPENDIX O for factory default settings Review the data logger recording points against actual requirements and change if required refer to APPENDIX O for factory default settings Check each setting and change if required Calibrate low and h...

Page 51: ...ICATOR THEREFORE THE VALUES OF THE USER VARIABLES MUST BE CHECKED AND CORRECTED IF NECESSARY BEFORE PROCEEDING WITH FURTHER CALIBRATION OR OPERATION 7 4 4 Verifying Operation of Sensors NOTE Before you start calibrating the RCI 4100 you must make sure that the sensors are working correctly and their signals are reaching the RCI 4100 The RCI 4100 sees the crane and its surroundings through sensors ...

Page 52: ...screw hole Insert the grub screw into the hole and tighten Tip raw counts should be approximately 2000 when boom is at 45 deg If the sensors check out then you can continue with the calibration procedure If any problems are found refer to Section 8 Troubleshooting or seek help from your nearest LSI Robway representative 7 4 5 Calibrating Boom Angle Step 1 Calibrating Low Boom Angle a Safely luff t...

Page 53: ...d value i e calculated heavy load above f Press ENTER to accept value Step 3 Verify that the Main Load Calibration a Use the VIEW CALIBRATED MAIN LOAD function code 7 4 7 Calibrating Load on the AUX Winch without Friction Compensation Step 1 Calibrating Light Aux Load a Safely lift a light known test load The load should be heavy enough to produce approximately 10 of the maximum aux winch line pul...

Page 54: ...uce approximately 70 of the maximum main winch line pull whilst staying within current SWL b The total weight of any lifting gear or tackle under the hook block such as slings lifting frames etc must be added to the weight of the heavy test load c Enter calibration mode if not already activated and select Calibrate Heavy Main Load d Use the UP DOWN keys to ramp the display to the required value i ...

Page 55: ...s luffed down Load Angle correction is accessible when calibrating through use of four calibration function codes as follows refer RCI System Configuration Documents in Attachments Low Angle for Load Correction Applies to both Main and Aux winch High Angle for Load correction Applies to both Main and Aux winch Load Angle Correction Factor for Main Winch Load Angle Correction Factor for Aux Winch T...

Page 56: ...If the direction is incorrect access function code F xx and change the value 1 0 or 1 0 Slew the crane as the slew proximity switch target passes the target slew position should reset to the 0 0 If this is not the case the proximity switch or the proximity switch target should be re aligned see Section 2 6 2 Check that displayed slew position is accurate If the position is not correct access funct...

Page 57: ...ibration Checks After completing the calibration check all functions of the RCI 4100 including Displayed radius for accuracy Lift some test weights on main and aux winches to ensure accuracy Test all digital inputs Test all digital outputs before connection to crane Test all relay outputs before connection to crane Check slew position and that the slew reset is working if applicable Set restricted...

Page 58: ......

Page 59: ...ave the calibration alone Too many times a re calibration has been attempted in order to rectify a problem before the real cause of the problem has been correctly identified This leads to added confusion as the perspective is generally moved from the real fault to calibration problems We have often received a message indicating that our display has not accepted the calibration data Most times this...

Page 60: ...sible Causes 8 1 1 Problems That Produce Error Codes Error code 101 This indicates that the signal from the angle sensor is too low or too high This should be confirmed by viewing the UNCALIBRATED ANGLE INPUT and noting that the value shown in the LOAD display is less than 50 or higher than 4050 Possible causes Angle sensor incorrectly mounted This is especially critical for the Electronic Angle S...

Page 61: ...because most other errors will place the display into an overload condition This being the case you need to check what other errors are present and correct them first Once these have been addressed the E240 error generally takes care of itself The exception is of course when the equipment has been put into a genuine overload situation which has not been caused by any external faults Possible cause...

Page 62: ... load the chart or limit is exceeded 00 00 08 00 00 310 Crane has been positioned in a non lifting area 00 00 10 00 00 320 Duty Winch has not been calibrated 00 00 20 00 00 340 Reserved 00 00 40 00 00 380 Reserved 00 00 80 00 00 401 Problem reading flash image 00 00 00 01 00 402 Tower out of valid angles 00 00 00 02 00 404 No chart for active slew tower zone 00 00 00 04 00 408 Chart Type not suppo...

Page 63: ...ithout the actual load being altered or of course there was an error in a load channel while you were calibrating In other words you forgot to lift the heavy load It happens often In this situation the display is confused because the calibration data is telling it that the signal it is seeing represents both the low load value and the high load value simultaneously Correct the calibration This can...

Page 64: ... solenoids This relay provides NO and NC contacts Digital outputs can be used for a wide range of uses Examples are but not limited to External audible alarm Boom up or down motion cut Minimum radius motion cut CW CCW slew motion cut LSI Robway uses a Fail Safe philosophy so digital outputs are normally configured to limit crane movements or reduce SWL unless energised Relay Outputs Relay outputs ...

Page 65: ...ed on this crane To confirm that a digital input is being switched open the RCI 4100 controller and check that the applicable digital input LED on the controller PCB is illuminated Figure 16 shows location of digital input LEDs Figure 16 RCI 4100 Controller PCB showing location of Digital Input DI LEDs If the LED is not illuminated Trace wiring back through the applicable DIN rail or IS barrier or...

Page 66: ...s not illuminated the output is not energised If the applicable LED is illuminated the output is energised If the applicable LED indicates that the digital output is in the incorrect state confirm that the RCI 4100 operating conditions are correct check applicable digital inputs displayed radius angle main and aux load If the LED is illuminated but the crane relay solenoid is not operating trace w...

Page 67: ...00 Controller PCB showing location of Relay Outputs RL Connectors Relay LED indications If the applicable relay status indicates that the relay is in the incorrect state confirm that the RCI 4100 operating conditions are correct check applicable digital inputs displayed radius angle main and aux load If the applicable relay status is correct but the crane relay solenoid is not operating trace wiri...

Page 68: ...libration procedure should be completed Angle sensor The boom angle should be checked at a low and a high angle against a calibrated angle meter If the displayed boom angle is not within regulatory site operator or owner acceptable accuracy then angle calibration procedure should be completed Ensure that maximum and minimum angles are accurate so as not to unnecessarily cause maximum or minimum an...

Page 69: ...ller PCB showing location of Fuses Fuse Specifications Current Voltage Rating Size Type Purpose F1 500mA 250V Fast blow 5 x 20mm Glass Cartridge 24VDC Digital Output Supply F2 500mA 250V Fast blow 5 x 20mm Glass Cartridge 24V Excitation Supply F3 3 15A 240V Slow blow 5 x 20mm Glass Cartridge Main Power In F4 500mA 250V Fast blow 5 x 20mm Glass Cartridge 24V Auxiliary Supply F5 500mA 250V Fast blow...

Page 70: ......

Page 71: ...em there are two cable types specified these being SWA for the Power and Motion control signals relays and instrumentation cable for all other applications When the cable is supplied as part of the system use the appropriate cable parameters supplied in the Electrical Parameters section When the cable is not supplied as part of the system but is obtained from a third party by the installer custome...

Page 72: ...LSI Robway these justifications must be supplied by those responsible for such modifications LSI Robway takes no responsibility for modifications done to the system that have not been authorised by LSI Robway in written form 9 1 11 Details of any previous inspections This generally will not be applicable but is included for the sake of completeness 9 1 12 Check the gas group requirements 9 2 Post ...

Page 73: ... this interval can be increased If the interval is increased beyond two 2 years then Visual Inspections must be performed at intermediate intervals as defined on Section 9 3 3 below Periodic Inspections should be performed in accordance with the Periodic column Section 9 4 Inspection and Test Schedule 9 3 3 Visual Inspection from Floor Level Where the Periodic Inspection interval exceeds two 2 yea...

Page 74: ...ically Safe circuits in any junction boxes or similar A A A 10 Cabling is installed in accordance with the documentation A N N 11 Cable screens are earthed in accordance with the documentation This may be difficult when the screens are designed to be terminated within the cable glands A S N 12 Earthing is according to the documentation A A A 13 Earth continuity is satisfactory A N A 14 Electrical ...

Page 75: ...nce Maintenance Checklist Pre maintenance Necessary documents are available All records have been examined Test gear is available and is satisfactory for use in hazardous areas Permission to enter or work has been granted The area is safe to enter Any precautions necessary have been taken Maintenance All reconnections have been made Equipment is functional Malfunctions have been reported Installat...

Page 76: ...being Applications where the Control Unit is located in a safe area and contained within an enclosure other than a flameproof enclosure Power supply for the Control Unit and The motion control solenoids or relays If any work is required to be done on the above items other than measurements power must be removed from the Control Unit Measurements made on the IS circuits in the Control Unit must onl...

Page 77: ...sing Hinged Lid LOM 02 ATEX 3060 U Class 1 Zone 1 and Zone 2 II 2 G EEx d II B T4 to T6 IEC 60079 BKI 07 0018 Class 1 Zone 1 Ex ib IIB T4 Al Si Aluminium copper free alloy grey powder coated finish Sensors Refer to the Declaration of Conformity Display 5 Liquid Crystal Display LCD Windows Top 4x16 alphanumeric LCD multifunction display Centre 2 4 digit LCD Load SWL display Bottom 2 4 digit LCD Rad...

Page 78: ...put Excitation 4 or 12 volts DC Analogue Outputs Number of Outputs 2 special request Safe Area Application Load Constant Tension Gross Over Moment Protection Anti 2 Blocking Input 2 channels Switch input with open and short circuit detection Digital Inputs 8 channels Option for Ex ia Zone 1 interface or safe area Configurable State e g proximity switch Quadrature e g slew Accumulator e g event cou...

Page 79: ...slew angle encoders etc Frequency wind speed winch speed etc Serial Communications RS 232 Safe area Ex ib Zone 1 Optional Data log download Configuration upload download Program upload download 9600 baud factory configured RS485 Safe area Ex ib Zone 1 Optional 9600 baud factory configured Processor Speed 25 Mips System Memory Data Memory 128 Kbyte of non volatile FRAM calibration setup 8 Mbyte FLA...

Page 80: ...15 VA Physical Display Unit 260 mm H x 150 mm W x 60 mm D Weight approx 3 kgs Control Unit Hinged lid 371 mm x 371mm x 233mm depth Weight approx 18 kgs Environmental Display Operating Temperature 20 C to 60 C Dust and Water Ingress IP65 Control Unit with Ex d Housing Operating Temperature 20 C to 60 C Dust and Water Ingress IP65 EMC 61000 6 4 61000 6 2 RoHS Compliant Yes RoHS Compliant Yes ...

Page 81: ...NSTALLATION INSTRUCTIONS RCI 4100 DISPLAY AND ISOLATING BARRIER SYSTEM MAN 1111 Rev H Copyright 2015 LSI Robway Pty Ltd Page 81 APPENDIX A Safety and Installation Instructions Model 4120 RCI 4100IS Display Barrier ...

Page 82: ......

Page 83: ...OLATING BARRIER SYSTEM MAN 1111 Rev H Copyright 2015 LSI Robway Pty Ltd Page 83 Safety and Installation Instructions Model 4120 RCI 4100 Display Barrier LSI Robway Pty Limited 32 West Thebarton Road Thebarton SA 5031 Australia 61 8 8238 3500 www lsiRobway com au ...

Page 84: ... isolated Intrinsically Safe IS apparatus to be installed on a standard EN50022 T35 DIN rail located in a safe area non hazardous location The Model 4120 Barrier may be installed in a Hazardous Area ONLY if enclosed in an appropriately approved and or certified explosion proof housing conforming to applicable standards The 4100 Display and Display Barrier cannot be repaired by the end user thus an...

Page 85: ... Display and Barrier may function satisfactorily the 4100 Display and Barrier system is not warranted for operation with longer cable than supplied Consult factory if longer cable runs are desired If the 4100 display cable is to be shortened and re attached at the display end the cable conductors must be stripped and terminated in an identical manner as originally supplied Generally speaking the c...

Page 86: ...here should be a nominal 6 volts across the power output terminals The LCD backlights should come on and the Alarm will sound continuously There will not be any data displayed if there is no data system connected to the Model 4120 Barrier If a data system is connected and functioning normally then data will be displayed according to the data system manual If these conditions are not observed promp...

Page 87: ...SAFETY AND INSTALLATION INSTRUCTIONS RCI 4100 DISPLAY AND ISOLATING BARRIER SYSTEM MAN 1111 Rev H Copyright 2015 LSI Robway Pty Ltd Page 87 INSTALLATION CONTROL DRAWING ...

Page 88: ......

Page 89: ...meters Ui 8 VDC Ii 3 A Ci 7 7 µF Li 15 µH includes mated cable LED Indicators Safe Working Load Green Approach to Overload Yellow Overload Red Main Hook in Use Red Aux Hook in Use Red ATB Condition Red LCD Indicators Alphanumeric 4 x 16 characters 7 Segment Numeric 4 Power Supply Voltage 6 VDC nominal Current 30 milliamps Physical Dimensions excluding mount 60 x 150 x 280mm h x w x d Weight exclud...

Page 90: ...o 2 81 A Po 1 81 W Ci Negligible Li Negligible I S Parameters Load Group IIB Capacitance 268 µF maximum values Inductance 0 018 mH OR L R Ratio 28 4 µH Ω I S Parameters Load Group IIA Capacitance 1000 µF maximum values Inductance 0 036 mH OR L R Ratio 56 7 µH Ω Indicators Status LED Green OK Input Power Supply Voltage 20 to 30 VDC Current no load 30 milliamps Current with 4100 Display 90 milliamps...

Page 91: ...t and have been designed and manufactured according to the following standards IEC 61000 6 4 2001 EMC Emission Standard for Industrial Environments IEC 61000 6 2 2001 EMC Immunity Standard for Industrial Environments IEC 60079 0 Electrical apparatus for explosive gas atmospheres Part 0 General Requirements IEC 60079 11 Explosive atmospheres Part 11 Equipment protection by intrinsic safety i ISO 90...

Page 92: ......

Page 93: ...DECLARATION OF CONFORMITY RCI 4100 SYSTEM MAN 1111 Rev H Copyright 2015 LSI Robway Pty Ltd Page 93 APPENDIX B Declaration of Conformity RCI 4100IS Hazardous Area Rated Capacity Indicator System ...

Page 94: ......

Page 95: ...DECLARATION OF CONFORMITY RCI 4100 SYSTEM MAN 1111 Rev H Copyright 2015 LSI Robway Pty Ltd Page 95 ...

Page 96: ...DECLARATION OF CONFORMITY RCI 4100 SYSTEM MAN 1111 Rev H Copyright 2015 LSI Robway Pty Ltd Page 96 ...

Page 97: ...DECLARATION OF CONFORMITY RCI 4100 SYSTEM MAN 1111 Rev H Copyright 2015 LSI Robway Pty Ltd Page 97 ...

Page 98: ...DECLARATION OF CONFORMITY RCI 4100 SYSTEM MAN 1111 Rev H Copyright 2015 LSI Robway Pty Ltd Page 98 ...

Page 99: ...DECLARATION OF CONFORMITY RCI 4100 SYSTEM MAN 1111 Rev H Copyright 2015 LSI Robway Pty Ltd Page 99 ...

Page 100: ......

Page 101: ...ATEX CERTIFICATE 4100 DISPLAY AND DISPLAY BARRIER MAN 1111 Rev H Copyright 2015 LSI Robway Pty Ltd Page 101 APPENDIX C ATEX EC Type Examination Certificate ...

Page 102: ......

Page 103: ...ATEX CERTIFICATE 4100 DISPLAY AND DISPLAY BARRIER MAN 1111 Rev H Copyright 2015 LSI Robway Pty Ltd Page 103 ...

Page 104: ......

Page 105: ...IECEX CERTIFICATE RCI 4100IS DISPLAY MAN 1111 Rev H Copyright 2015 LSI Robway Pty Ltd Page 105 APPENDIX D IECEX Certificate of Conformity Display Module Type RCI 4100IS ...

Page 106: ......

Page 107: ...IECEX CERTIFICATE RCI 4100IS DISPLAY MAN 1111 Rev H Copyright 2015 LSI Robway Pty Ltd Page 107 ...

Page 108: ......

Page 109: ...IECEX CERTIFICATE MODEL 4120 POWER SUPPLY AND I2C BARRIER MAN 1111 Rev H Copyright 2015 LSI Robway Pty Ltd Page 109 APPENDIX E IECEX Certificate of Conformity Model 4120 Power Supply and I2C Barrier ...

Page 110: ......

Page 111: ...IECEX CERTIFICATE MODEL 4120 POWER SUPPLY AND I2C BARRIER MAN 1111 Rev H Copyright 2015 LSI Robway Pty Ltd Page 111 ...

Page 112: ......

Page 113: ...DATA LOGGING DESCRIPTION MAN 1111 Rev H Copyright 2015 LSI Robway Pty Ltd Page 113 APPENDIX F Data Logging ...

Page 114: ......

Page 115: ... That is when the logs are full and another log is performed the oldest log in the logger will be over written Each record stores the following data Log Number Sequential number starting at 1 Start Date Date log started dd mm yyyy Start Time Time log started hh mm ss Finish Date Date log finished dd mm yyyy Finish Time Time log finished hh mm ss Peak Load Maximum Peak load recorded during log cycl...

Page 116: ...h control how the actual logging of loads operates These three Function Codes are summarised in the following table Stable Load Time time during which load must stay stable in order to log Stable Load Variation load must stay within this variation to be considered stable Reset Time load must stay below the Low Load Counter threshold for this time before the log cycle ends The first two Function co...

Page 117: ...mains within a small variation range set by user through F Code Stable Load Variation for a certain period of time also an F Code Stable Load Time When a stable load is seen all data except peak load are recorded against the stable load Load monitoring continues the SWL percentage is continually checked against the SWL percentage which was stored if the percentage increases a new stable load will ...

Page 118: ...nch is selected on the display As a further precaution on twin winch systems SUM winch logging can also occur A log which refers to the M SUM or A SUM winch as the affected winch is implying that the combination of main auxiliary loads would have exceeded the Logging Percentage value when referenced to what the boom can lift This log is recorded in the instance when the main and auxiliary loads se...

Page 119: ...en recorded a total of 4 times This example serves to illustrate that if the crane is continually working on its outer radius the Logger will fill very quickly It should be noted that if motion cut is connected and the display is not in over ride luffing to the outer radius limits of the load chart could cause the crane to oscillate as motion cut activates In this case many logs may be recorded ...

Page 120: ...DATA LOGGING DESCRIPTION MAN 1111 Rev H Copyright 2015 LSI Robway Pty Ltd Page 120 Example Lift Cycles ...

Page 121: ...n log where xxxxx is the last 5 digits of the software WA number and nnnnnn is the date ddmmyy the log was downloaded Note that this date comes from the internal RCI 4100 clock The log can also be imported into MSExcel for easier viewing Each record will be printed in chronological order followed by the lift counter If no records have been stored only a summary is shown A header is at the top of t...

Page 122: ...ogger Contents Erasing the data logger will cause all currently recorded logs to be erased hence the information can no longer be downloaded and it also clears the SWL counters Errors in Logger Data On powering the display the contents of the data logger is checked in three separate operations In almost all cases these checks will all pass OK If however a check fails the state of the logger is imm...

Page 123: ...ure below Turn the over ride key switch ON and access Calibration Mode Go to the Download Data Log function code and press the ENTER key The default setting on the screen is RS232 Use the up down arrow keys to select SD CARD While SDCARD is shown on the screen press the ENTER key and this will download the logger contents into the SD card This may take a few minutes depending on the amount of data...

Page 124: ...ent load exceeds line pull Linepull 00 80 00 00 00 301 Angle is off load the chart or limit is exceeded Angle out of allowed range 00 00 01 00 00 302 Length is off load the chart or limit is exceeded Length out of allowed range 00 00 02 00 00 304 Radius is off load the chart or limit is exceeded Radius out of allowed range 00 00 04 00 00 308 Height is off load the chart or limit is exceeded Height...

Page 125: ...ease restart RCI 1550 3100 only 00 00 00 00 20 Datalogger error code notes Multiple errors may be shown in one error code Eg 0140000000 would be a 101 and 240 at the same time 0300000000 would be a 101 and a 102 at the same time As hex code is used when errors in a particular column exceed 9 hex codes are used A 10 B 11 C 12 D 13 E 14 F 15 etc Eg 00C0000000 would be a 240 and a 280 at the same tim...

Page 126: ......

Page 127: ...EX D BARRIER GLAND INSTALLATION INSTRUCTIONS MAN 1111 Rev H Copyright 2015 LSI Robway Pty Ltd Page 127 APPENDIX G Cable Gland Installation Instructions ...

Page 128: ......

Page 129: ...EX D BARRIER GLAND INSTALLATION INSTRUCTIONS MAN 1111 Rev H Copyright 2015 LSI Robway Pty Ltd Page 129 ...

Page 130: ......

Page 131: ...RESTRICTED SLEW ZONE MONITORING MAN 1111 Rev H Copyright 2015 LSI Robway Pty Ltd Page 131 APPENDIX H Restricted Slew Zone Monitoring Option ...

Page 132: ......

Page 133: ...crane boom and a fixed structure obstacle The RSZ controller works independently from the normal Rated Capacity Indicator mode of the RCI 4100 system It is comprised of the following components integrated into the system Slew Encoder The slew encoder is used to monitor the position slew angle of the crane boom It is usually fitted with a suitable drive gear and meshed directly with the crane s sle...

Page 134: ...le and RSZ Status Rated Capacity Indicator RCI Mode RSZ View Mode Press hold UP or DOWN arrow key for about 5 seconds to view slew angle and RSZ status RSZ status Safe Rest No Go Boom slew angle Press UP or DOWN arrow key again to enter RSZ setup mode see next Section Setting Up Zones Press SETUP CANCEL key to return to RCI mode ...

Page 135: ...wing the current slew angle and RSZ status Permanent and Temporary Zones Two independent sets of zones are maintained The permanent zone set can only be accessed by authorised personnel who are equipped with the over ride key The temporary set can be accessed and edited by the operator freely The system will monitor both sets continuously and will work out combined safety restrictions Press SETUP ...

Page 136: ...ill need to enter the RSZ setup mode If the over ride key switch is concurrently switched on the Permanent Set will be active otherwise the Temporary Operator s Set will be active The operator can browse through the menu items list by pressing the UP or DOWN arrow key The menu items on RSZ setup mode are as follows Set L Set left Set an unsafe zone left boundary Set R Set right Set an unsafe zone ...

Page 137: ...s can be created Set Left or Set Right command will only adjust an existing unsafe zone boundary in this case no splitting no adding If two safe zones become adjacent to each other they will be automatically merged into one In order to create a safe zone inside a restricted zone split it into three first and then delete the middle zone Alarms and Motion Cut Conditions The following are the zone in...

Page 138: ...e of the obstacle and executes Set Right zone boundary Set R command Two safe adjacent zones will be automatically merged together For the unsafe area being fully defined the boom angle limits have to be set The boom must be placed somewhere inside the respective unsafe area and luffed to the position of the limit Then the Set High Angle Limit Hi Ang or Set Low Angle Limit Lo Ang command has to be...

Page 139: ...WIND SPEED MONITORING OPTION MAN 1111 Rev H Copyright 2015 LSI Robway Pty Ltd Page 139 APPENDIX I Wind Speed Monitoring Option ...

Page 140: ......

Page 141: ...n in metre per second ms as shown on the illustration below Wind speed monitoring can be included in the RCI 4100 system with the following options Basic Wind Speed Monitor o This option provides continuous monitoring and display of the wind speed but without alarms on warning and maximum limit Wind Speed Monitor with Alarm Limit o This option provides continuous monitoring and display of the wind...

Page 142: ...WIND SPEED MONITORING OPTION MAN 1111 Rev H Copyright 2015 LSI Robway Pty Ltd Page 142 ...

Page 143: ...WIND DIRECTION MONITORING MAN 1111 Rev H Copyright 2015 LSI Robway Pty Ltd Page 143 APPENDIX J Wind Direction Monitoring Option ...

Page 144: ......

Page 145: ...r right hand side of the alphanumeric screen in degrees as shown on the illustration below If Restricted Slew Zone RSZ is being used RSZ messages may overlay the wind direction reading Calibration The wind direction sensor is pre calibrated in the RCI 4100 software and is shipped with the direction arm locked to the mounting shaft The wind direction sensor is normally mounted on a cross arm LSI Ro...

Page 146: ...nstallation is complete remove the locking bolt and retain for future use The wind direction sensor is now free to rotate The sensor will now face into the prevailing wind and is fully operational Periodic System Testing There is no periodic testing required Wind Direction Sensor ANEMOMETER4 ...

Page 147: ...WIND DIRECTION MONITORING MAN 1111 Rev H Copyright 2015 LSI Robway Pty Ltd Page 147 ...

Page 148: ......

Page 149: ...AUTOMATIC GROSS OVERLOAD PROTECTION MAN 1111 Rev H Copyright 2015 LSI Robway Pty Ltd Page 149 APPENDIX K Automatic Gross Overload Option ...

Page 150: ......

Page 151: ...ressure table versus boom angle to validate the load data THEORY OF OPERATION The LSI Robway AGOP system uses a combination of hardware interlocks and software checks to prevent the unwanted release of a load suspended in an on board condition i e release is prevented over the deck of the platform on board and at all times during a personnel lift Several conditions must be met in order for the LSI...

Page 152: ...duty selection an operator console is provided which gives the crane operator a single rotary switch to select duty and a second rotary switch to select sea state The operator console has two indicator lamps which gives the operator an AMBER lamp indicating that AGOP is armed and a RED lamp warning that AGOP has been activated These indicator lamps are driven by the RCI 4100 controller based upon ...

Page 153: ... processor to allow output diagnostics with each system start up By having two relays in series the RCI 4100 can test one relay at a time without generating an AGOP active output This is only performed when the system starts or is reset and only if there is no load on either the main or aux hook This prevents an unwanted AGOP active signal in the event of loss of power and subsequent restart durin...

Page 154: ...haft revolution and 12 bits of resolution to count number of shaft revolutions The serial data is continuously clocked out of the AVM14 via a hardware shift register implemented in a PCB4205 CPLD The AVM14 also has an encoder zero preset function which may be performed in the sensor junction box by connecting a shorting jumper between the zero preset function pin to signal ground for one second By...

Page 155: ...W Ascending Jumper to Pin 1 CW Ascending The following must performed to commission the absolute slew encoder 1 Identify and document intended zero degree heading for the installation Zero degree heading must be in an onboard location for fail to safe response 2 Install and power encoder as per system diagram and instructions 3 Slew crane to the pre determined zero degree reference heading 4 Set E...

Page 156: ......

Page 157: ...TILT SENSING OPTION MAN 1111 Rev H Copyright 2015 LSI Robway Pty Ltd Page 157 APPENDIX L Tilt Sensing Option ...

Page 158: ......

Page 159: ...tilt in any direction The Tilt value is calculated by trigonometrically summing the X and Y axis tilt magnitudes Thus if the tilt of the crane is 10 degrees in any direction throughout a 360 degree range the X and Y output signals will be converted to vectors and summed This means that the orientation of the sensor in the X and Y axis is not important only the initial level when it is zeroed The R...

Page 160: ...ystem GA drawing CALIBRATION The tilt sensor is pre calibrated in the RCI 4100 firmware to a range of 10 degrees in each axis A single slope value is computed from the X and Y axis vectors There is no RCI 4100 system programmability however the sensor must be zeroed according to the following 1 Tilt Sensor must be zeroed upon initial installation 2 Tilt Sensor must be zeroed if the RCI 4100 contro...

Page 161: ...or Zero Range Within 5 Mechanical Housing Material Plastic PBT GF20 V0 Dimensions LxWxH mm 60 x 30 x 20 mm Weight 0 05 kg Power Supply Voltage 10 30 VDC Current 20 mA Environmental Temperature 20C to 70C Ingress IP68 Humidity 99 Shock 30 g 11 ms Vibration 55 Hz 1 mm Compliance RoHS Yes CE Yes EMC Emissions EN 61362 2 3 Interconnection Power zero teach and 2 axis outputs M12 5 male ...

Page 162: ...TILT SENSING OPTION MAN 1111 Rev H Copyright 2015 LSI Robway Pty Ltd Page 162 ...

Page 163: ...HOOK HEIGHT DISRCI4100 DISPLAY OPTION MAN 1111 Rev H Copyright 2015 LSI Robway Pty Ltd Page 163 APPENDIX M Hook Height DISRCI4100 Display Option ...

Page 164: ......

Page 165: ...ncoder to monitor hook height Note Hook Height indication is not a linear measure The height at either calibration point will be correct but at other heights is not linear and may not be accurate Operation Display Hook height for the selected winch is displayed in the upper display The picture below illustrates the hook height display Note If the RCI 4100 system also has the RSZ option installed R...

Page 166: ... Function codes View Uncalibrated Main Hook Height Input Main and View Uncalibrated Auxiliary Hook Height Input Auxiliary display uncalibrated data from the encoders The displayed numbers should change as the encoder rotates This can be useful to ensure correct operation of the encoder and also for fault finding Periodic System Testing Hook height should be re calibrated whenever boom length is ch...

Page 167: ... Vibration 5 to 2000 Hz 20 g s Humidity 100 RH Hazardous Area Rating Underwriters Laboratories listed for use in hazardous locations NEMA Enclosure 7 Class 1 Group C D Division 1 NEC Class 2 circuits only or Class 2 Groups E F and G Mechanical Specifications Shaft Diameter 3 8 nominal Shaft Loading Up to 40 pounds axial and 20 pounds radial applied 1 4 from housing Shaft Runout 0 0005 T I R Starti...

Page 168: ...HOOK HEIGHT DISRCI4100 DISPLAY OPTION MAN 1111 Rev H Copyright 2015 LSI Robway Pty Ltd Page 168 ...

Page 169: ...SYSTEM DRAWINGS MAN 1111 Rev H Copyright 2015 LSI Robway Pty Ltd Page 169 APPENDIX N System Drawings ...

Page 170: ......

Page 171: ...SYSTEM DRAWINGS MAN 1111 Rev H Copyright 2015 LSI Robway Pty Ltd Page 171 ...

Page 172: ...SYSTEM DRAWINGS MAN 1111 Rev H Copyright 2015 LSI Robway Pty Ltd Page 172 ...

Page 173: ...SYSTEM DRAWINGS MAN 1111 Rev H Copyright 2015 LSI Robway Pty Ltd Page 173 ...

Page 174: ...SYSTEM DRAWINGS MAN 1111 Rev H Copyright 2015 LSI Robway Pty Ltd Page 174 ...

Page 175: ...SYSTEM DRAWINGS MAN 1111 Rev H Copyright 2015 LSI Robway Pty Ltd Page 175 ...

Page 176: ...SYSTEM DRAWINGS MAN 1111 Rev H Copyright 2015 LSI Robway Pty Ltd Page 176 ...

Page 177: ...SYSTEM DRAWINGS MAN 1111 Rev H Copyright 2015 LSI Robway Pty Ltd Page 177 ...

Page 178: ...SYSTEM DRAWINGS MAN 1111 Rev H Copyright 2015 LSI Robway Pty Ltd Page 178 ...

Page 179: ...SYSTEM DRAWINGS MAN 1111 Rev H Copyright 2015 LSI Robway Pty Ltd Page 179 ...

Page 180: ......

Page 181: ...Hook Height and Winch Speed Monitoring RCI1550 Display Option MAN 1111 Rev H Copyright 2015 LSI Robway Pty Ltd Page 181 APPENDIX O Hook Height and Winch Speed RCI1550 Display Option ...

Page 182: ......

Page 183: ...Direction and relative height Aux Hoist Rope Winching Direction and relative height Main Hook Height in meters Main Winch Speed in meters per minute Main Winch Speed in meters per minute There are no user features accessible in the DISRCI1550 Display The operator has the option to reset the zero height point using the DISRCI4100 Screen To set the hook height zero point perform the following steps ...

Page 184: ...85 data link The DISRCI1550 Display is hard coded to display hook height in meters and winch speed in meters per minute NOTE The system uses incremental encoders If the crane is operated with the RCI 4100 powered off then each hook zero setting will need to be reset NOTE The payout counting algorithm and calibration does not take into account the winch drum number of layers and wraps per layer so ...

Page 185: ...0 Display Option MAN 1111 Rev H Copyright 2014 LSI Robway Pty Ltd Page 185 INSTALLATION NOTE The system may only be used in safe cabin installations NOTE See relevant system GA for wiring details Winch Proximity Switch Installation Customer Detail ...

Page 186: ...tep 4 Scroll to F 17 using up down arrows Step 5 Press Enter to set zero height automatically Step 6 Display will prompt to hoist up to high hook Hook Up message Step 7 Press Enter Step 8 Using up down arrows set reading to actual hook height in meters above initial zero setting Step 9 Press Enter Step 10 The DISRCI1550 Display will now display Main hook height in meters CALIBRATING AUX HOOK HEIGH...

Page 187: ...SYSTEM CONFIGURATION DOCUMENTS MAN 1111 Rev H Copyright 2014 LSI Robway Pty Ltd Page 187 ATTACHMENTS RCI System Configuration Documents ...

Reviews: