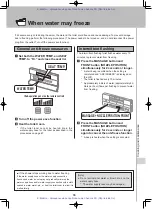
Cleaning and maintenance
60
Assembling the nozzle
[Note]
●
Do not damage the O-ring of the nozzle. Water
leakage may occur.
* If the nozzle retracts to its original position, perform
steps 2 to 5 of “Removing the nozzle” to expose the
nozzle.
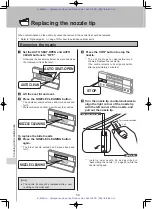
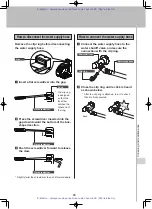
Align the right corner of the nozzle tip
with the left corner of the nozzle, insert
the nozzle tip completely, and turn it
clockwise as far as possible.
[Note]
●
After installing the nozzle tip, check that the
corner of the nozzle is aligned with that of the
nozzle tip, and that the engaged section is fl at.
* I n a p p r o p r i a t e e n g a g e m e n t m a y c a u s e
failures. Also, the angle of the water spray
may change.
Insert
Turn clockwise
Left corner of
the nozzle
O-ring
Right corner of the
nozzle tip
Press the STOP button to return the
nozzle to its original position.
Check the engaged point.
* Check that the corner of the nozzle is aligned
with that of the nozzle tip, and that the
engaged section is fl at.
Engaged point
Corner of
the nozzle
Corner of the
nozzle tip
Align the corners.
STOP
E-Bidet.ru -
официальный
дилер
Roca Lumen Avant
в
РФ
(http://e-bidet.ru)
E-Bidet.ru -
официальный
дилер
Roca Lumen Avant
в
РФ
(http://e-bidet.ru)


