background image

58

Symbols, problems and error messages

12

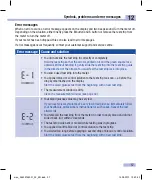
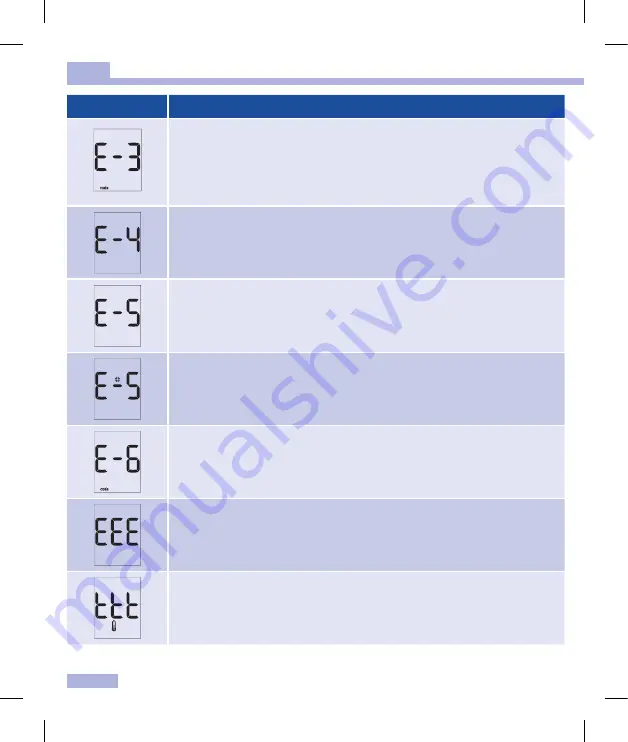
Error message Cause and solution

•  The code chip cannot be read.

Remove the code chip and re‑insert it into the meter.

•  The incorrect code chip is currently in the meter.

Remove the code chip and insert the code chip that belongs to the 

Accu‑Chek Active test strips you are currently using.

•  While the test was in progress, you connected the meter to a computer that 

was on.

Remove the USB cable and repeat the test.

•  The meter was exposed to a strong electromagnetic field.

Change your position or turn the source of electromagnetic radiation off.

•  The meter is exposed to too much light.

Go to a shaded place or shade the meter, for example with your body.

•  You removed the code chip while testing was in progress.

Re‑insert the code chip into the meter. Repeat the test with a new test strip.

•  A meter error has occurred.

Start again from the beginning. If the error message appears again, the meter 

is defective. Please contact your customer support and service centre.

•  The ambient temperature or the temperature of the meter is too low or too 

high for a test.

Ensure that the ambient temperature is b8 and +42 °C and wait for 

the meter to adapt to that temperature.

man_06658768001_02_EN.indb   58

14.08.2013   10:20:46

Summary of Contents for Accu-Chek Active

Page 1: ...2013 09 M_Version01_Rev2 User s Manual Blood Glucose Meter ONR 4285 4all 4468 V1 1 man_cover_06658768001_02_EN_ Format 127 x 154 mm Black 2013 Frau Ritzerfeld Pr fmittelnummer n a R2 1 man_cover_06658...

Page 2: ...s follows Symbol Meaning B Consult instructions for use W Caution refer to safety related notes in the instructions for use accompanying this product Biohazard risks used meters carry a risk of infect...

Page 3: ...results on the PC 35 7 Checking your meter 38 8 Cleaning the meter 44 9 Changing the battery 46 10 Testing blood glucose in more than one patient 48 11 Test and storage conditions 50 12 Symbols probl...

Page 4: ...etes The system is only suitable for use outside the body Visually impaired persons must not use the meter The meter must only be used for its intended purpose if used otherwise preventive measures co...

Page 5: ...ctions to be taken appear as shown in the example below Gently slide the test strip into the test strip guide in the direction of the arrow until you feel it lock into place The meter turns on and fir...

Page 6: ...eter overview 3 Cover covers the measurement window 4 Measurement window underneath the cover 5 Test strip guide slide the test strip in here 8 5 4 3 1 2 7 9 10 6 6 Locking catch opens the battery com...

Page 7: ...lt after a test mark the test result after a test change settings go to the next setting call up the previous saved test result call up the next saved test result change from the earliest saved test r...

Page 8: ...can mark test results with different symbols which indicate particular situations during the test Memory The meter automatically saves up to 500 test results with the time and date of the test and al...

Page 9: ...splays the unit of measurement you are accustomed to You can find the unit of measurement that your meter displays on the type plate on the back of your meter 1 If you do not know which is the right u...

Page 10: ...are missing or the unit of measurement shown for the blood glucose results is not the correct one please ask your healthcare professional to exchange the meter Press the M and S buttons at the same t...

Page 11: ...ts Incorrect test results can cause the wrong therapy recommendation to be made and so produce serious adverse health effects If the code number on the display does not match the code number on the te...

Page 12: ...results properly it is necessary to set the correct time and date Press the S button for longer than 2 seconds The display above appears on the display When appears on the display it is possible to m...

Page 13: ...he final display all changes are lost and the original settings remain unchanged Press the S button briefly to go to the next setting Press the S button repeatedly until the final display appears on t...

Page 14: ...the time Setting the time format You can choose between two formats 24 hour format Time from 0 00 to 23 59 date in the day month format DD MM 12 hour format Time from 12 00 to 11 59 followed by am or...

Page 15: ...he hours flash on the display The minutes flash on the display The year flashes on the display Press the M button to set the hours Press the M button to set the minutes Press the M button to set the y...

Page 16: ...hour format 12 hour format 24 hour format 12 hour format The month flashes on the display The day flashes on the display Press the M button to set the month Press the M button to set the day Press th...

Page 17: ...on the display At the end of making settings the meter displays the current settings Press the M and S buttons briefly at the same time to turn the meter off Press the M button briefly to turn the bee...

Page 18: ...blood glucose Using the Accu Chek Active meter you can test blood glucose in two different ways You can either apply the blood drop to the test field while the test strip is in the meter see page 19 o...

Page 19: ...lock into place Do not bend the test strip The test strip must lie flat on the measurement window cover Following the display check the code number is displayed 689 is just an example The meter turns...

Page 20: ...s time the meter turns itself off Check that this code number is the same as the code number on the label of the test strip container If the numbers do not match even though the code chip in the meter...

Page 21: ...warning in the form of 3 beeps sounds You can then apply an additional amount of blood Lance the side of a fingertip with your lancing device Figure A shows the recommended sites for obtaining blood...

Page 22: ...in During the last 5 seconds a beep sounds once per second It is to remind you to slide the test strip with blood back into the meter If you do not slide the test strip back into the meter within this...

Page 23: ...he meter automatically saves the result You can now mark the test result set a test reminder or turn the meter off mg dL meter mmol L meter Turning the meter off Turn off Remove the test strip from th...

Page 24: ...not use this test strip any more Start the blood glucose test from the beginning with a new test strip Do not rub the blood drop onto the test field when applying blood Do not store used test strips...

Page 25: ...mbol For test results from tests that you performed after your meals Test reminder apple bell symbol For test results from tests that you performed before your meals and which you would like to check...

Page 26: ...e marker appears below on the display 1 When you press the M button the markers appear in the reverse order If you decide to not mark the test result press the S button or M button repeatedly until no...

Page 27: ...ide and perform a blood glucose test As soon as you slide the test strip in the test reminder is turned off The test result is saved together with the symbol After meal If you decide not to perform a...

Page 28: ...rform a test with that test strip After the blood glucose test The label on the test strip container shows blood glucose values in mg dL and mmol L next to each coloured dot Within 30 to 60 seconds af...

Page 29: ...t The test result is higher than 600 mg dL 33 3 mmol L The test strips are past their use by date W The display may indicate that your blood glucose is very low possibly a severe hypoglycaemia The dis...

Page 30: ...low or too high If test results repeatedly do not reflect the way you feel check the points in the following section Sources of implausible test results Sources of implausible test results If your me...

Page 31: ...the symbol on your meter s display no Are the test strip guide and measurement window clean yes Did you perform the test within the correct temperature range 8 to 42 C yes Did you follow the storage c...

Page 32: ...or the test This includes all symbols which are displayed after a blood glucose test with the test result except the battery symbol and the markers with which you marked the result Retrieving test res...

Page 33: ...corresponding test result is displayed When the oldest saved test result is displayed and you press the M button again you hear a beep When the newest saved test result is displayed and you press the...

Page 34: ...tests marked with test results without a valid date or time as well as test results that were displayed as or are not included in the calculation Press the S button briefly The first average the 7 day...

Page 35: ...After meal are displayed in the same order When the last average is displayed 90 day average marked with and you press the S button again you hear a beep If you keep the S button or M button pressed t...

Page 36: ...esults is interrupted As the meter can only calculate averages based on test results in an uninterrupted chronological order it therefore does not take into account test results prior to the interrupt...

Page 37: ...re effectively and use graphs and tables to understand them better For further information on diabetes management products please contact your customer support and service centre USB cable 1 The USB p...

Page 38: ...mputer has been successfully established the meter transfers all saved test results During the data transfer does not flash The test results remain in the meter s memory after being transferred i If y...

Page 39: ...are not transferred is still flashing on the display the meter turns itself off automatically after approx 90 seconds There can be different reasons for a failed transfer Eliminate the cause and star...

Page 40: ...t and service centre on where to obtain control solutions Preparing for a control test For a control test you need the meter with the code chip inserted the Accu Chek Active test strips that belong to...

Page 41: ...rst performs a default display check approx 2 seconds Check that all the segments of the numeric display mg dL meter or mmol L meter as well as the unit of measurement are displayed If segments are mi...

Page 42: ...rop to the centre of the green field without touching it with the tip of the bottle The field must be completely covered with solution As soon as the meter detects the control solution you hear a beep...

Page 43: ...Compare the result of the control test with the concentration table on the label of the test strip container The test result must be within the specified concentration range Make sure that you compar...

Page 44: ...following the instructions in the User s Manual yes Did you use a used test strip no Did you wipe the tip of the bottle before you applied control solution to the test strip yes Did you apply a suspe...

Page 45: ...erts yes Are the test strips or the control solution past their use by date The use by date is printed next to the e symbol on the label of the test strip container or on the label of the bottle next...

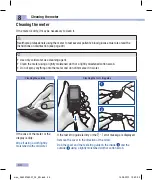
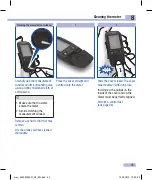
Page 46: ...ab the cover and the test strip guide on the inside 1 and the outside 2 using a lightly moistened cloth or cotton swab Cleaning the test strip guide W Healthcare professionals using the meter to test...

Page 47: ...atching the measurement window Remove any fluff or lint that may remain Dry the areas you have cleaned thoroughly 1 Place the cover straight and centred onto the meter Slide the cover closed The cover...

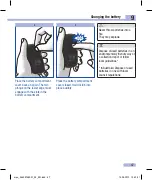
Page 48: ...e type CR2032 With a new battery you can perform approx 1000 tests or test for approx 1 year When you change the battery your saved test results always remain saved Remove the used battery right befor...

Page 49: ...he lower edge must engage with the slots in the battery compartment W Never throw batteries into a fire They may explode j Dispose of used batteries in an environmentally friendly way at a collection...

Page 50: ...e above During this time the meter must not be used to test any other patient Patients and medical staff are potentially at risk of becoming infected if the same Accu Chek Active meter is used to test...

Page 51: ...o clean recesses grooves and gaps Cotton swabs pads or cloths which are lightly moistened with 70 isopropanol are suitable for disinfecting Carefully dab the measurement window and its surrounding are...

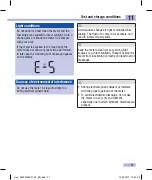
Page 52: ...se the wrong therapy recommendation to be made and so produce serious adverse health effects Never try to speed up warming or cooling of the meter e g in a refrigerator or on a radiator H At temperatu...

Page 53: ...ostatic discharge do not use the meter in a very dry environment especially one in which synthetic materials are present Sources of environmental interference Do not use the meter in close proximity t...

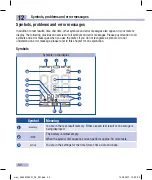
Page 54: ...meter If you do not recognise a symbol or do not understand an error message please refer to this chapter for an explanation Symbols Symbols on the display 5 4 10 11 12 13 14 15 16 17 18 1 2 3 6 7 8...

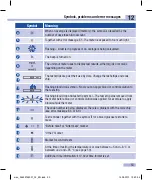
Page 55: ...ymbol Now you can apply blood or control solution to the test strip 10 11 Flashing blood drop and test strip symbol The test strip was removed from the meter before blood or control solution was appli...

Page 56: ...you have not set the time and date only test results without a time and date are saved only test results that are not included in the calculation are saved e g results from control tests no test resu...

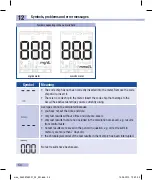
Page 57: ...ou feel perform a control test Repeat the blood glucose test afterwards If the new test result still does not reflect the way you feel please contact your healthcare professional Symbol Meaning The te...

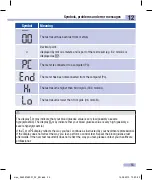
Page 58: ...eter to warm up to this temperature The electronics have become damp through condensation Allow the meter to dry slowly The meter is defective Please contact your customer support and service centre T...

Page 59: ...k into place You slid a used test strip into the meter You applied blood or control solution to the test strip too soon i e before the drop symbol flashed on the display Start the blood glucose test f...

Page 60: ...ition or turn the source of electromagnetic radiation off The meter is exposed to too much light Go to a shaded place or shade the meter for example with your body You removed the code chip while test...

Page 61: ...lease contact your local council or authority Healthcare professionals must dispose of used meters according to the health and safety policy of their laboratory or institution The meter falls outside...

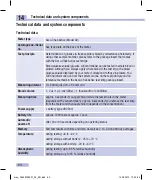
Page 62: ...methods in the Accu Chek Active test strip package insert Measuring interval 10 600 mg dL 0 6 33 3 mmol L Blood volume 1 2 L 1 L microlitre 1 thousandth of a millilitre Measuring time approx 5 seconds...

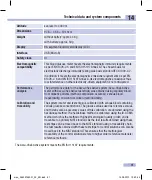
Page 63: ...ng capillary blood from diabetic patients method comparison accuracy venous blood repeatability and control solution reproducibility Calibration and traceability The system meter and test strips is ca...

Page 64: ...only these test strips when you test blood glucose using the Accu Chek Active meter Accu Chek Active control solutions Use only these control solutions when you carry out control tests using the Accu...

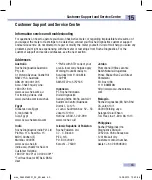
Page 65: ...he Diagnostics India Pvt Ltd Plot No 114 Road No 15 MIDC Andheri E Mumbai 400093 www accu chek in india accu chek roche com Customer Helpline 1800 22 60 20 or 30 300 400 Toll free lines for MTNL BSNL...

Page 66: ...1927 Randburg 2125 Accu Chek Customer Care Centre 080 DIABETES Dial 080 34 22 38 37 www diabetes co za Thailand Roche Diagnostics Thailand Ltd 18th Floor Rasa Tower 555 Phaholyothin Road Chatuchak Cha...

Page 67: ...agnetic field 51 58 61 error messages 57 exp symbol 29 53 H Hi display 27 55 hourglass Symbol 19 53 I intended use 2 L light conditions 51 Lo display 27 55 M marking test result 23 measuring interval...

Page 68: ...man_06658768001_02_EN indb 66 14 08 2013 10 20 46...

Page 69: ...man_06658768001_02_EN indb 67 14 08 2013 10 20 46...

Page 70: ...man_06658768001_02_EN indb 68 14 08 2013 10 20 46...

Reviews: