background image

Page | 6  


Battery operation: 


Open the battery lid on the underneath of the electronic keyboard and insert 6 x 1.5V Size D 

alkaline batteries. Ensure the batteries are inserted the correct way round and replace the battery lid. 

 
Caution: 

Do not mix old and new batteries. Do not leave batteries in the keyboard if the keyboard is not 

going to be used for any length of time. This will avoid possible damage caused by leaking batteries.


Jacks and Accessories 

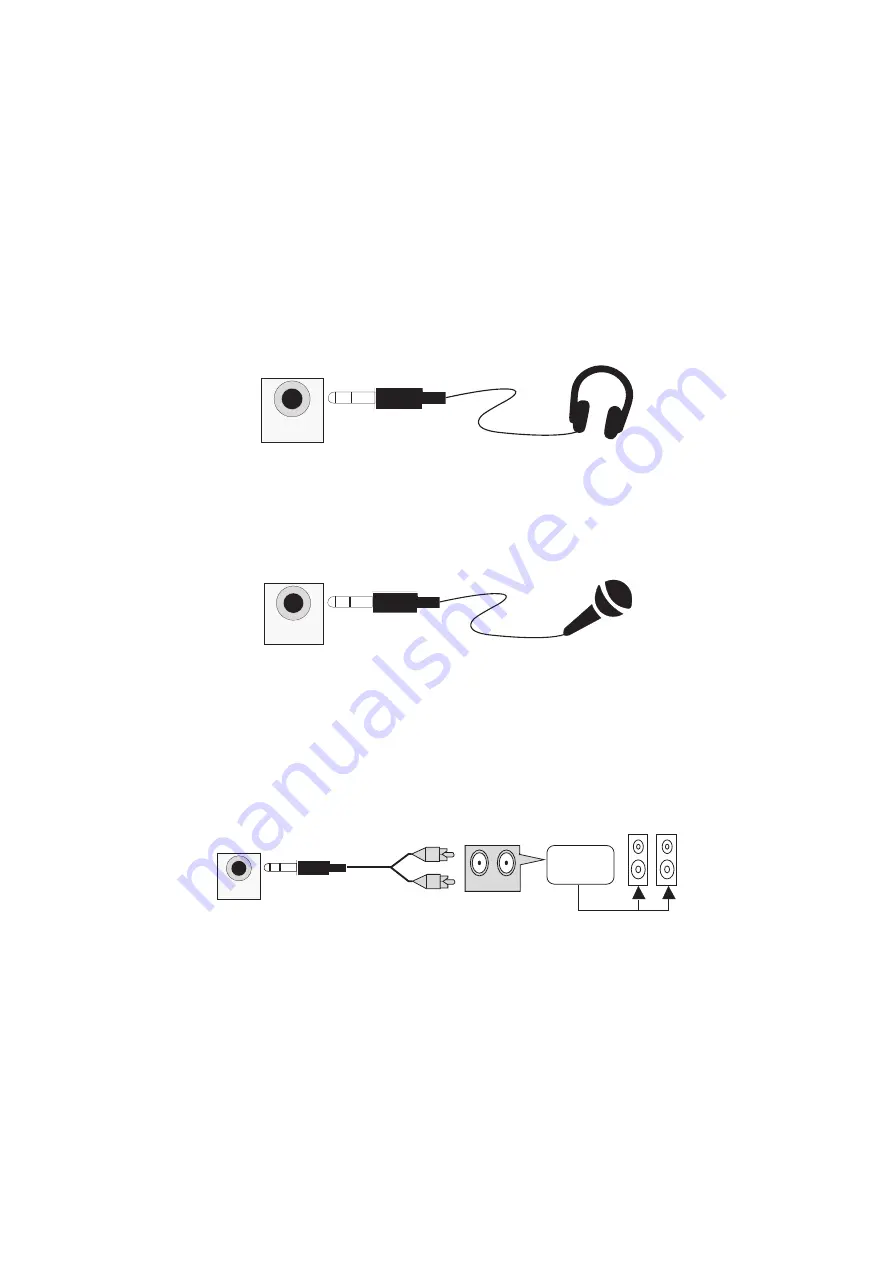
Using headphones: 


Connect the 3.5mm headphone plug into the [PHONES] jack on the rear of the keyboard. The 

internal speaker will cut off automatically once headphones are connected. 


Connecting a microphone: 


This electronic keyboard has a 3.5mm socket for connecting an electret microphone (not 

included). Connect the microphone to the 3.5mm socket and sing along in time with the music. 


Connecting an Amplifier or Hi-Fi Equipment: 


This electronic keyboard has a built in speaker system but it can be connected to an external 

amplifier or other hi-fi equipment. First turn off the


power to the keyboard and any external equipment you 

are looking to connect. Next insert one end of a stereo audio cable into the LINE IN or AUX IN socket on 
the external equipment and connect the other end into the [PHONES] jack on the rear of the electronic 
keyboard. 


3.5 mm PLUG

HEADPHONES

PHONES

3.5 mm PLUG

MICROPHONE

MIC

PHONES

3.5 mm PLUG

AUDIO INPUT JACK

OF AMPLIFIER

AMPLIFIER

SPEAKER BOX

R  IN  L

Summary of Contents for RJ-661

Page 1: ...RJ 661 Multi function Keyboard User Guide...

Page 2: ...keyboard To avoid damaging the appearance of the electronic keyboard or damaging the internal parts please do not place the electronic keyboard in a dusty environment in direct sunlight or in places...

Page 3: ...and Accessories 6 Using headphones 6 Connecting a microphone 6 Connecting an Amplifier or Hi Fi Equipment 6 Basic Operation 7 Power and Volume 7 Power control 7 Adjustment of the Master Volume 7 Tone...

Page 4: ...cording Function 14 Demo Song Playback 15 Teaching Modes 15 Single Key Course 15 Synchronised Course 15 Concert Course 16 Progressive Learning 16 Appendix I Rhythm Table 17 Appendix II Tone Table 18 A...

Page 5: ...etronome 14 Tone Select 15 Rhythm Select 16 Dual Keyboard External Connections POWER MIC PHONES 1 2 3 17 Demo Songs 18 Start Stop 19 Rhythm Sync 20 Fill In 21 Chord Off 22 Tempo Slow Fast 23 Keyboard...

Page 6: ...power adapter Please use the special AC DC power adapter that came with the electronic keyboard or a power adapter with DC9V output voltage and 500mA output current with a centre positive plug Connect...

Page 7: ...s are connected Connecting a microphone This electronic keyboard has a 3 5mm socket for connecting an electret microphone not included Connect the microphone to the 3 5mm socket and sing along in time...

Page 8: ...r volume return to the default level Tone Tone Selection When the keyboard is first switched on the default status is TONE To change the tone you can either press the or buttons on the numerical keypa...

Page 9: ...eyboard mode Sustain Press the Sustain button to enter Sustain mode The LCD display will show a flag next to SUSTAIN Once this mode is selected the sound of each note played is prolonged Pressing the...

Page 10: ...l indicate the beat you have chosen The metronome effect is added to the music once you start playing To exit this mode press the Metronome button Panel Percussion Instruments There are 7 kinds of per...

Page 11: ...ix for the detailed rhythm table Press the RHYTHM SELECT button to enter the rhythm selection function The LCD display will show the current rhythm number You can select the rhythm you require by pres...

Page 12: ...m will continue playing as normal Accompaniment Volume Adjustment The default Accompaniment Volume is level 8 this can be adjusted by pressing the ACCOMP VOLUME buttons The LCD display will show the v...

Page 13: ...NGER button to enter the single finger auto chord mode A flag is displayed on the LCD next to SINGLE FINGER Chords are played by pressing certain keys in the chord area on the left hand side of the ke...

Page 14: ...or stop the chord accompaniment Chord Tones There are 4 kinds of chord accompaniment tone to choose from To select the chord tone press the CHORD TONES button repeatedly during chord accompaniment Th...

Page 15: ...the rhythm editing mode The LCD display will show a flag next to PROGRAM RECORD You can edit a section of rhythm by pressing any of the 7 kinds of panel percussion on the keyboard The maximum recordi...

Page 16: ...beat point will flash on the LCD display to indicate the tempo The keyboard will then play the main melody in time with any key presses even incorrect ones Synchronised Course Press the SYNC COURSE b...

Page 17: ...indicate the correct keys to be pressed Progressive Learning In general follow the sequence below in order to master any of the included songs Listen to the song in DEMO mode to get an idea of the no...

Page 18: ...34 Classic Piano 59 Pop New Age 84 Acoustic Ballad 10 8 Beat Pop 35 Cumbia 60 UK Pop 85 Piano Ballad 11 8 Beat Soul 36 Disco 61 USA March 86 R B Ballad 12 8 Beat Rock 37 Latin Rock 62 Club Dance 87 R...

Page 19: ...ss 59 French Horn 84 Sitar 10 Music Box 1 35 Slap Bass 1 60 Brass Section 85 Banjo 11 Vibraphone 36 Slap Bass 2 61 Synth Brass 1 86 Shamisen 1 12 Marimba 1 37 Synth Bass 1 62 Synth Brass 2 87 Koto 1 1...

Page 20: ...nt 08 My Future Is Not A Dream 33 Turkish March 09 Moon Ship 34 Girl s Prayer 10 Tuberose 35 Wedding March 11 Kiss Goodbye 36 Lullaby 12 Wild Lily Spring 37 Minuet In Gg 13 Birch 38 Mary Had A Little...

Page 21: ...the power adapter supplied or the batteries may need replacing There is a slight difference in timbre of some notes This is normal and is caused by the many different voice sampling ranges of the keyb...

Page 22: ...Page 21 Appendix V Chord Tables Single Finger Chords...

Page 23: ...Page 22 Fingered Chords...

Page 24: ...Playback 32 Beat Rhythm Programming Percussion 7 Kinds of panel percussion instruments 12 in keyboard percussion mode Accompaniment Control Start Stop Sync Fill in Tempo Intelligent Teaching Metronom...

Page 25: ...ut in place to encourage the recycling of products using best available recovery and recycling techniques to minimise the impact on the environment treat any hazardous substances and avoid the increas...

Reviews: