background image


4

ROCK-OLA END-USER LICENSE AGREEMENT 

 
You have acquired a Rock-Ola Digital Music Center that includes embedded software from Qsonix, Inc. 
 
Qsonix License Agreement 

This is a legal agreement between you, the user, and Qsonix, Inc. (“Qsonix”). This agreement covers all embedded software that is distributed 
with the Rock-Ola Digital Music Center, for which there is no separate license agreement between you and the manufacturer or owner of the 
software (collectively the “Software”). By using the Software that has been embedded in your computer, you agree to be bound by the terms of 
this agreement. If you do not agree to these terms, promptly return the Rock-Ola Digital Music Center with the embedded Software.   
 
You may use the embedded Software on only the Rock-Ola Digital Music Center for personal, non-commercial use only.   
 
The embedded Software is protected by United States copyright laws and international treaties. You may not rent or lease the embedded 
Software or copy the written materials accompanying the embedded Software. You may not reverse engineer, decompile or disassemble the 
embedded Software. 
 
You may permanently transfer rights under this EULA only as part of a permanent sale or transfer of the Rock-Ola Digital Music Center, and only 
if the recipient agrees to this EULA. If the embedded Software is an upgrade, any transfer must also include all prior versions of the embedded 
Software. 
 
QSONIX LIMITED WARRANTY 
Qsonix warrants that the embedded Software will be free from defects in materials and workmanship under normal use for one year (365) days 
from the date you receive it. This Warranty is limited to you and is not transferable. Any implied warranties are limited to one year (365) days 
from the date you receive the embedded Software. Some jurisdictions do not allow limits on the duration of an implied warranty, so this limitation 
may not apply to you. The entire liability of Qsonix and its suppliers, and your exclusive remedy, shall be replacement of any embedded 
Software media not meeting this warranty at your cost and risk. This limited warranty is void if any disk or flash memory damage has resulted 
from accident, abuse, misapplication, or service or modification by someone other than Qsonix. Any replacement disk or flash memory is 
warranted for the remaining original warranty period or ninety (90) days, whichever is longer.   
 
Qsonix does NOT warrant that the functions of the embedded Software will meet your requirements or that operation of the embedded Software 
will be uninterrupted or error free. You assume the responsibility for achieving your intended results and for the use and results obtained from 
the embedded Software. 
 
QSONIX DISCLAIMS ALL OTHER WARRANTIES, EXPRESS OR IMPLIED, INCLUDING, BUT NOT LIMITED TO, IMPLIED WARRANTIES 
OF MERCHANTABILITYAND FITNESS FOR A PARTICULAR PURPOSE, FOR THE EMBEDDED SOFTWARE AND ALL ACCOMPANYING 
WRITTEN MATERIALS. This limited warranty gives you specific legal rights; you may have others, which vary from jurisdiction to jurisdiction. 
 
IN NO EVENT SHALL QSONIX OR ITS SUPPLIERS BE LIABLE FOR ANY DAMAGES WHATSOEVER (INCLUDING, WITHOUT LIMITATION, 
DAMAGES FOR LOSS OF BUSINESS PROFITS, BUSINESS INTERRUPTION, LOSS OF BUSINESS INFORMATION, OR OTHER 
PECUNIARY LOSS) ARISING OUT OF USE OR INABILITY TO USE THE EMBEDDED SOFTWARE, EVEN IF ADVISED OF THE 
POSSIBILITY OF SUCH DAMAGES. Because some jurisdictions do not allow an exclusion or limitation of liability for consequential or incidental 
damages, the above limitation may not apply to you. 
 
U.S. GOVERNMENT RESTRICTED RIGHTS 
The embedded software and documentation are “commercial items” as that term is defined at 48 C.F.R. 2.101; consisting of “commercial 
computer software” and “commercial computer software documentation” as such terms are used in 48 C.F.R.  12.212. Consistent with 48 C.F.R. 
12.212 and 48 C.F.R. 227.7202-1 through 227.7202-4, all U.S. Government end users acquire the software and documentation with only those 
rights set forth herein. Contractor/manufacturer is Qsonix Inc., 5737 Kanan Road #241, Agoura Hills, CA 91301-1601. 
 
GENERAL 
This license is effective until terminated. It will terminate upon the conditions set forth above or if you fail to comply with any of its terms. Upon 
termination, you agree that the embedded Software and accompanying materials, and all copies thereof, will be destroyed. This agreement is 
governed by the laws of the State of California. Each provision of this agreement is severable. If a provision is found to be unenforceable, this 
finding does not affect the enforceability of the remaining provisions, terms, or conditions of this agreement. This agreement is binding on 
successors and assigns.  Qsonix agrees and you agree to waive, to the maximum extent permitted by law, any right to a jury trial with respect to 
the Software or this agreement. Because this waiver may not be effective in some jurisdictions, this waiver may not apply to you. You 
acknowledge that you have read this agreement, that you understand it, that you agree to be bound by its terms, and that this is the complete 
and exclusive statement of the agreement between you and Qsonix regarding the embedded Software. 


Microsoft Addendums 

You have acquired a Rock-Ola Digital Music Center that includes software licensed by Qsonix, Inc. from Microsoft Licensing Inc.  or its affiliates 
(“MS”). Those installed software products of MS origin, as well as associated media, printed materials, and “online” or electronic documentation 
(“SOFTWARE”) are protected by international intellectual property laws and treaties. The SOFTWARE is licensed, not sold. All rights reserved. 
 
NOT FAULT TOLERANT. THE SOFTWARE IS NOT FAULT TOLERANT. QSONIX INC. HAS INDEPENDENTLY DETERMINED HOW TO USE 
THE SOFTWARE IN THE DEVICE, AND MS HAS RELIED UPON QSONIX INC. TO CONDUCT SUFFICIENT TESTING TO DETERMINE 
THAT THE SOFTWARE IS SUITABLE FOR SUCH USE. 

Summary of Contents for QB8-PV

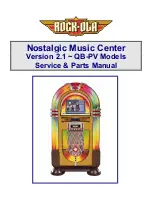
Page 1: ...Nostalgic Music Center Version 2 1 QB PV Models Service Parts Manual...

Page 2: ...ng Corporation 2335 208th Street Torrance CA 90501 This document contains information proprietary to Rock Ola Manufacturing Corporation and may not be reproduced published or distributed in any form o...

Page 3: ...ur outlet consult an electrician for replacement of the obsolete outlet i Protect the power cord from being walked on or pinched particularly at plugs convenience receptacles and the point where they...

Page 4: ...URPOSE FOR THE EMBEDDED SOFTWARE AND ALL ACCOMPANYING WRITTEN MATERIALS This limited warranty gives you specific legal rights you may have others which vary from jurisdiction to jurisdiction IN NO EVE...

Page 5: ...r functions You may access and use AMG Data only by means of the intended End User functions of this application software You agree that you will use the AMG Data the AMG Technology and the AMG Server...

Page 6: ...X 20 3 ALBUM BROWSER DISPLAY 20 4 ALBUM BROWSER CONTROLS 20 5 CUE BAR CONTROL 20 6 PLAYLISTS PANEL 20 7 NOW PLAYING PANEL 20 8 SOUND TRANSPORT CONTROLS 20 USING THE QB8 PV NOSTALGIC MUSIC CENTER TOUCH...

Page 7: ...ifier Installation 46 TROUBLESHOOTING REPAIR 47 CIRCUIT BREAKER AND FUSE LOCATION 47 TOUCH MONITOR 47 TROUBLESHOOTING CHARTS 49 Power Problems 49 Touchmonitor Problems 49 Amplifier Problems 50 LIGHTIN...

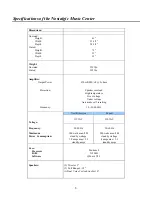
Page 8: ...d High temperature Over voltage Under voltage Automatic self resetting Frequency 30 20 000 Hz North America Export Voltage 115VAC 230VAC Frequency Maximum Power Consumption 50 60 Hz 900 watts max 288...

Page 9: ...lity Independent volume control for up to 2 zones IR remote control Sophisticated system maintenance tools Loading your CD collection directly to the hard drives of the system is simple and fun How ma...

Page 10: ...with the sight and sound of music from the world s premier jukebox manufacturer and now manage selection and delivery with simple drag and drop operations from the integrated touchscreen With its exce...

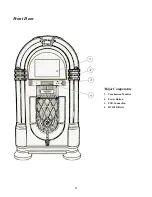
Page 11: ...11 Front Door Major Components 1 Touchscreen Monitor 2 Power Button 3 USB Connection 4 DVD CD Drive...

Page 12: ...Nostalgic Music Center Jukebox 2 Power Distribution Box 3 Manual Holder 4 Power Amplifier 5 Crossover Directs audio for the speakers 6 Cooling Fan Assembly 2 7 Woofer Speaker 8 DVD CD reader 9 Touchs...

Page 13: ...age Thread the free end of your Ethernet cable through the access hole in the rear of the cabinet Bring enough inside the cabinet to reach the computer Connect the free end of your Ethernet cable to t...

Page 14: ...TIP The series of set up screens will instruct you step by step A comprehensive reference to the Nostalgic Music Center its operation configuration screens and procedures is covered in this manual Fol...

Page 15: ...tinue re trying for a connection until the connectivity test succeeds When completed you will be presented with the following screen Success When you have reached the Connectivity Success screen congr...

Page 16: ...er or solvent such as alcohol or benzene Do not rub touch or tap the surface of the screen with sharp or abrasive items such as a pen or screwdriver This type of contact may result in a scratched glas...

Page 17: ...to load into the system Be sure that your Internet connection is available if necessary refer back to Page 12 of this manual for set up and preparation instructions Automatic CD Loading Automatic Loa...

Page 18: ...ded or type in your own using the on screen keypad When done tap NEXT Enter the song titles in the spaces provided The Nostalgic Music Center has already calculated and noted the time of each track Us...

Page 19: ...s that require manual input you may find it more comfortable to use a keyboard for your data entry Any USB keyboard can be connected to the USB port located next to the power button on the door of the...

Page 20: ...his user guide will take you through each of the system s key functions illustrated in the sample screen shown on this page Use this illustration along with the Quick Start Guide to familiarize yourse...

Page 21: ...is being loaded onto the hard drive It only appears during the CD loading process Open Padlock This symbol lets you know that the Protected Access is set but has been disabled allowing the user to ma...

Page 22: ...Artist Mode 3 View Genre The View Genre mode allows you to quickly browse all of the albums CDs that have been classified in a given genre or style of music When you load it into your library each CD...

Page 23: ...to match your keywords to the Albums CDs in your library The search results are displayed in the Album Browser area beneath the keyboard View Search Mode If there are no matches you will be notified...

Page 24: ...loaded including number of tracks date and time the album was loaded Tap on any of the fields in this screen and the system will take you to that album immediately View Recent 9 View Imported Like th...

Page 25: ...network Volume Leveling different CDs vary widely in their respective normal playback volume especially older vs newer CDs Volume Leveling automatically evens out the volume of the music loaded since...

Page 26: ...ywhere on the screen when the system is in protected access mode A pop up numeric keypad will appear on the screen Enter the password PIN number on the pad The menu screen appears with an open padlock...

Page 27: ...yles Playback info shows Now Playing Black Screen blank black screen Custom Photos displays photos This style requires additional configuration such as identifying the network location of the photos a...

Page 28: ...network from the Music Center Use Add Network Place to create custom network locations As always help is nearby in the form of the question mark 1 You will be asked to give your new Network Place a u...

Page 29: ...85 CDs When you ve selected the quality capacity you wish tap the DONE button on the bottom of the screen Audio Quality Selection Screen You can specify different levels of audio quality for different...

Page 30: ...in addition to the previously mentioned fade duration settings other important audio output settings reside on this menu screen Allow Local Volume Control This setting lets you determine whether or n...

Page 31: ...st Update System Stats number of tracks artists albums genres From the information screen you have access to three vital procedures for setting up the first time or anytime new hardware is replaced or...

Page 32: ...e Album Menu Fast Preview This feature allows you to preview a track at any time even when you re listening to music in the Now Playing area Double tap any track in either of the album browsers Any mu...

Page 33: ...albums Remember that the albums available to page through are determined by the current Artist Genre Cover or Search menu selections described above Cue Bar Control The cue bar control provides a visu...

Page 34: ...e categories such as artist or genre or style from the various view mode lists For example you can drop the genre Jazz onto a playlist and all albums tracks in this genre will be added to that playlis...

Page 35: ...ton will move the currently selected song down one position in the playlist Cancel Tap the Cancel button to exit the edit playlist interface without saving any changes you made to your playlist Save T...

Page 36: ...ing Screen will change to show Recording in Progress When the disk has been written the drive will open to eject the disk and the system screen will return to the Album Browser view iPod If an iPod ru...

Page 37: ...ngth of playlist to be generated The PREVIEW tab allows you to review your definitions before proceeding to create the playlist When you re satisfied with your selections generate the playlist name it...

Page 38: ...m the Now Playing list 1 Open the Now Playing Menu 2 Select Save All to New Playlist An entry field and touch keyboard will appear onscreen 3 Using the touch keyboard enter a playlist name 4 Tap OK to...

Page 39: ...ettings to easily optimize your Rock Swing Dance and Classical playback or you may make your own adjustments on 5 different channels Set your equalizer for the track currently in play You can change t...

Page 40: ...d you have selected Play Nostalgic Music Center will continue playing each track in your Now Playing list and automatically repeat from the beginning when it reaches the end of the last track Frequent...

Page 41: ...he card you will receive an extended warranty on the amplifier WARNING The PV 900 Amplifier is capable of delivering up to 450 watts RMS power to external speaker systems Be Sure the speakers you conn...

Page 42: ...kers are connected the speakers in the jukebox may be reduced in volume or turned off with the control provided NOTE Power is limited to the jukebox speakers to prevent unwanted vibration of the drive...

Page 43: ...l output types for connecting to another audio system or to powered speakers Figure B shows the signal path and connections for a single stereo zone This is how the unit is shipped from the factory Th...

Page 44: ...k and plug it into the Zone 2 R jack 2 Move the mode switch to the mono position NOTE If the fixed RCA jacks are used to feed an external audio system they remain in stereo Fig C Refer to figure D Mov...

Page 45: ...will control the volume of the jukebox and the external speakers connected to CH 1 together The zone 2 slider will control the volume of the speakers connected to CH 2 TIP If the volume of the system...

Page 46: ...front of the panel Computer Core Module Amplifier Amplifier Removal Disconnect amplifier power cable from the power distribution box Remove wingnuts and lift amplifier hood Remove 4 bolts from amplifi...

Page 47: ...e Touchmonitor is provided in a separate document Power Distribution Box main switch with Circuit breaker The Jukebox is protected by a main switch circuit breaker located on the back of the cabinet T...

Page 48: ...48 Block Diagrams...

Page 49: ...sound Application running on screen Control cable not plugged into Power Box or remote volume interface Lights not plugged into lighting connector on amplifier Junction box on door not plugged in Tou...

Page 50: ...Cables to audio interface not connected Defective audio interface Green POWER LEDs ON Yellow COM LEDs blinking or on Red OVERLOAD LEDs Dark Audio output cable not connected Be sure speakers are conne...

Page 51: ...2 YELLOW M BUBBLETUBE HEATER RIGHT SIDE LIGHT BAR LEFT SIDE LIGHT BAR RED 2 YEL BALLAST WHITE BLK JUNCTION BOX LIGHTING WIRING DIAGRAM QB8 M POWER IN F20T12CW 24 F20T12CW 24 F6T5CW 9 4 WATT CANDALABR...

Page 52: ...p account with an Internet Service Provider such as MSN AOL EarthLink etc A personal computer You will need to program the dial up telephone number access name and password into the modem using a PC b...

Page 53: ...l Assembly 7 57472 19250 Grill Cloth Diamond Pattern 19 1 4 23 57393 Casting Large Grill 8 57450 Grill Support 24 57394 Star Logo 9 61478 A Power Button Harness 25 SV 60771 A Grill Diffuser Plastic Br...

Page 54: ...SV 60764 A Bubble Tube Heater Mtg Assy 4 pl 4 58931 Speaker 3 Tweeter 2 pl 20 58617 Dual Lock Strike 5 58936 Speaker 6 Midrange 2 pl 21 60747 A Junction Box Assembly 6 57474 Light Diffuser Metal Fram...

Page 55: ...7435 3A Color Cylinder Assy LH 14 SV 58045 A Motor Assy LH 7 57415 Fluorescent bipin Socket 15 SV 60715 A Arch Light Cable Assy 8 57433 Bulb 11W Orange 16 57440 Nylon Latch 1 4 Turn Light Bar Assembly...

Page 56: ...715 A LF Junction Box Assy 230 volt 19 57372 Extension Spring SV 61704 A LF Power Distribution Box 115V 20 60820 Cooling Fan 2pl 6 SV 61697 LF Speaker Crossover Assy 21 61149 Fan Grille 2pl 7 SV 57366...

Page 57: ...61240 A Harness Peavey Audio Input 61710 A LF Harness Speaker QB8 PV 60843 LF Shielded Audio harness 61515 1A LF CDP Power Extension harness 61535 A IDE 4 round cable 57854 A LF Ground strap harness...

Page 58: ...58 Harnesses...

Page 59: ...59 Accessories Part No Description 02467 Wireless Bridge Kit 02466 Dial Up Modem Kit...

Page 60: ...60 61743 Nostalgic Music Center Version 2 1 QB PV Models Service Parts Manual...

Reviews: