REPLACING THE ND4/ND8 DOME
both the ND4 and ND8.
1. Gently remove tweeter assembly from mounted
location.
2. Disconnect the tweeter wire harness, at the .110
Fastons end, from the filter network wire har-
ness.
3. Remove the "strain relief clip" from the back of
the tweeter assembly.
4. Carefully grasp one of the wires leading into the
Magnet Enclosure and gently pull it straight out.
Repeat for the other wire.
5. Carefully remove the replacement Coil/Dome
Assembly from the Transport/Tool.
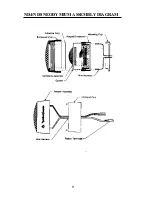
6. Insert the spanner wrench detail of the Trans-
port/Tool into two of the holes located on the
bottom of the Magnet Enclosure. While holding
the tweeter assembly firmly in one hand, un-
screw the Magnet Enclosure until the Enclosure
shell can be lifted off cleanly.
7. Place the Magnet Enclosure on a flat, hard
surface. Gently insert the tip of a sharp, pointed
object under the edge of the Adhesive Ring and
lift up. The entire Coil/Dome Assembly should lift
out cleanly. If it does not, re-insert a sharp,
pointed object under the attached Gasket and lift
up.
8. Clean off any excess adhesive from the Magnet
Enclosure.
1. Grasp the replacement Coil/Dome Assembly
with your thumb and forefinger, and extend the
protruding voice coil wires such that they extend
straight down from the Coil/Dome Assembly.
2. Hold the Magnet Enclosure with your free hand,
and line up the polarity dot on the Gasket with
one of the holes marked with a "+" on the Magnet
Enclosure. Slowly insert the wire into the hole on
the Magnet Enclosure. Once the wire enters the
hole, insert the other wire into the opposite hole
marked with a "–", and bring the two pieces
together, being very careful not to touch the
Disassembly
Reassembly
7


