background image

E5

1. Precautions

Choose the mounting location carefully so that the unit will not interfere with the 

normal driving functions of the boat.

Avoid installing the unit where it would be subject to high temperature, such as


from direct sunlight or hot air , or where it would be subject to dust, dirt or excessive


 vibration.

Use only the supplied mounting hardware for a safe and secure installation.


INSTALLATION

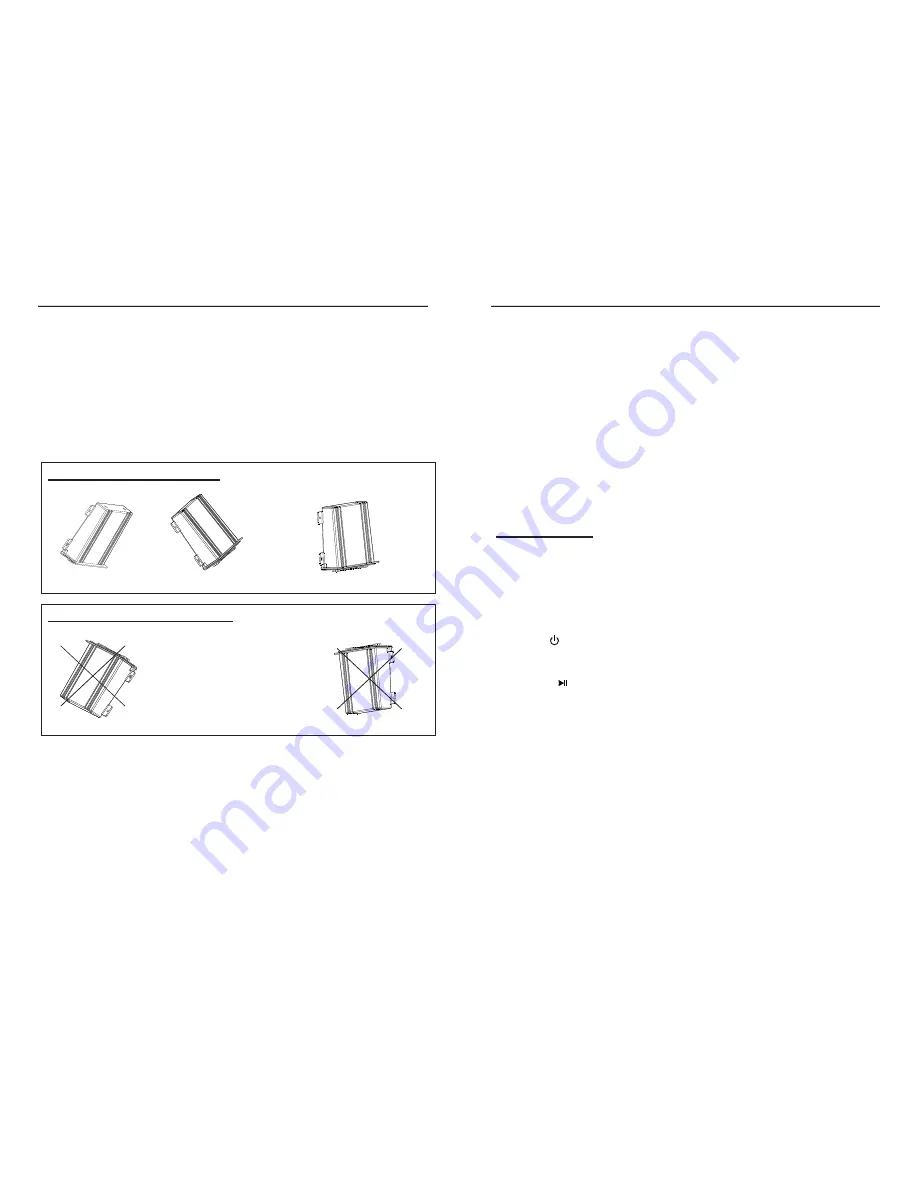
Correct mounting positions

Incorrect  mounting positions

Better

45 facing upward

Best

90 facing upward

Do


not


mount


black


box


in


either

of


the


following


positions

this

will


allow


water


to


intrude


and

will


result


in


damage


to


the


unit

.

2. Mounting illustration

3. 

Installation Note

Please find enclosed nylon wire tie-downs(wire clamps)for added support.

use the wire clamps to hold down the harness, preventing water from running

along the wires and into the unit.

E12

USB PORT

When a USB device with audio files is plugged, the unit will play the audio files 

automatically. You may use SCAN as "10+" button and BAND as "10-" button for

 fast search during the USB operation.

USB

our

our

The marine unit can support playing the music in 

 by inputting the song 

sequence number directly: when the unit is playing songs, press  AS/PS button

 on the front panel, it will display "SCH 0000" on the LCD, the f

 digits indicates

 the sequence number that you want to listen to. You can use preset key 1,2,3,4, 

to set the f

 digits by pressing them repeatedly and press SEL to confirm input, 

 the unit will start playing the new song automatically. 

USB/SD/CDC  OPERATION

IMPORTANT NOTE:

Because of the great variety of products with USB port and sometimes quite 

manufacturer-specific functions we can neither guarantee that all devices will

be recognized nor that all operating options that are possible in theory will 

actually work. 

devices may take more than 45 seconds to initiate after plugging in.

Some USB/SD 

Notes for CD

(1)  Keep the disk clean and undamaged, do not stick things on the dis .

(2)  Do not play the damaged or transformative disc, keep the disc correctly .

(3)  Do not keep the disc under sunshine or in high temperature environment .

(4)  Put the disc into its box after using.

(5)  Finger mark or besmirch will effect the disc playing quality, it can't be cleaned 

      by soft cloth.  If it is necessary , diluted natural solvent can be used to help clean

      the disc. Record cleaner or antistatic solvent can't be used to clean the disc. 

c

CDC Operation 

(1)   Press      to power on.

(2)   Connect the CDC to your unit, then press "MODE" to CDC mode.

(3)   The LCD will display "disc style" " item number" "playing time".

( 4)   Press "      " to pause the playing. 

(5)   Press PRESET 2 (11) to enter REPEAT playing mode.

(6)   Press PRESET 3 (12) to enter RANDOM playing mode.

(7)   Follow the function key instruction to do the operation.  

(8)  You may press SCAN as "next- disc" button and BAND as "pre-disc" button

        for change disc operation. 

SD PORT

When a SD card with a card-reader is plugged, the unit  will turn to the SD mode and 
play the audio files that in the SD card automatically.

The SD mode has the same function as the USB mode.

Summary of Contents for RFX4000

Page 1: ... DIGITAL AUDIO PLAYER SIRIUS READY AM FM STEREO RADIO USB SD MUSIC PLAY BLUETOOTH STRAM MODEL RFX4000 ...

Page 2: ...OL PANEL ILLUSTRATION REMOTE CONTROL FUNCTION WIRE DIAGRAM INSTALLATION BASIC OPERATION SIRIUS OPERATION RADIO OPERATION AUX SPECIFICATION TROUBLESHOOTING USB SD CDC OPERATION BLUETOOTH OPERATION 1 2 3 4 5 6 7 10 11 12 13 14 15 ...

Page 3: ...in consult the dealer No sound out put when operating the unit with amplifiers or power antenna is attached Power antenna lead is shorted to ground or excessive current is required for amplifiers or power antenna Button is not responsive or the LCD display is wrong The connection pins for the front panel may be dirt Use a soft cloth to clean its surface If it does not fix the problem consult your ...

Page 4: ...0 1710 KHz Usable Sensitivity 32 dBuV Channel Step 10KHz Signal to Noise Radio 50dB Frequency Range LINE OUT Impedance 33 Ohm Output 3 Volt max GENERAL 13 8V DC 10 15 6V allowable Speaker Impedance 4 or 8 ohm Output Power 50W x 4CH Fuse 10A Power Supply Note Specifications and the design are subject to possible modification without notice due to improvement ...

Page 5: ... may hare a poor Bluetooth signal Bluetooth mode select Press the MODE 4 button and select the Bluetooth mode Make sure the Bluetooth Dongle is connected to the appropriate port on the unit Pairing with a Bluetooth device The unit is ready to pair when the BT mode is selected To pair your device to the unit make sure you are close enough to the unit 1 Open the Bluetooth setting on your device 2 Ch...

Page 6: ...ng them repeatedly and press SEL to confirm input the unit will start playing the new song automatically USB SD CDC OPERATION IMPORTANT NOTE Because of the great variety of products with USB port and sometimes quite manufacturer specific functions we can neither guarantee that all devices will be recognized nor that all operating options that are possible in theory will actually work devices may t...

Page 7: ... DISP 5 buttons together for 3 seconds to lock the RFX MR5BB control panel the Black Box will not response the button press on the panel when the panel is locked Press and hold SEL and DISP buttons for 3 seconds again to unlock the RFX MR5BB control panel E11 Listening to the radio Press the MODE 4 button and select the radio mode the frequency appears in the display Press the BAND 8 button and se...

Page 8: ...preset station 5 15 Preset 6 For preset station 6 16 MENU Short press to turn on off Category When category is on you can press SEL key to select between categories and then seek in current selected category by pressing SEEK key 17 LCD DISPLAY 1 Button definitions User needs follow the instruction of SCCI or SCVDOC1 for installation Always make sure the Sirius SIRIUS antenna is connected properly ...

Page 9: ...r the third digit changes incrementally from 0 1 2 To 9 When 3 digits are selected press SEL button to enter the desired channel 6 Parental Control You can lock any Sirius channels you do not others to have access without your permission The default code is 5220 if you forget your pass code you may disconnect the unit completely from power The unit will restore to the default pass code after power...

Reviews: