background image

14

FCC Class B Part 15

This device complies with Part 15 of the Federal Communications Commission (FCC) Rules. Operation is subject 

to the following two conditions:

• 

This device may not cause harmful interference.

• 

This device must accept any interference received, including interference that may cause undesired 

operation.

CAUTION

Changes or modifications to this unit not expressly approved by the party responsible for compliance could void 

the user’s authority to operate this equipment.
This equipment has been tested and found to comply with the limits for a Class B digital device, pursuant to Part 

15 of the FCC Rules. These limits are designed to provide reasonable protection against harmful interference 

in a residential installation. This equipment generates, uses, and can radiate radio frequency energy and, if not 

installed and used in accordance with the manufacturer’s instructions, may cause interference harmful to radio 

communications.
There is no guarantee, however, that interference will not occur in a particular installation. If this equipment does 

cause harmful interference to radio or television reception, which can be determined by turning the equipment off 

and on, the user is encouraged to try to correct the interference by one or more of the following measures:

• 

Reorient or relocate the receiving antenna.

• 

Increase the separation between the equipment and receiver.  Connect the equipment to an outlet on a 

circuit different from that to which the receiver is connected.

• 

Consult the dealer or an experienced radio or TV technician for help.

Product Disposal Instructions (European Union)

The symbol shown here and on the product, means that the product is classed as Electrical or Electronic 

Equipment and should not be disposed with other household or commercial waste at the end of its working 

life. The Waste Electrical and Electronic Equipment (WEEE) Directive (2012/19/EU) has been put in place to 

encourage the recycling of products using best available recovery and recycling techniques to minimise the 

impact on the environment, treat any hazardous substances and avoid the increase of landfill. When you have 

no further use for this product, please dispose of it using your local authority’s recycling processes. For more 

information please contact your local authority or the retailer where the product was purchased.

PDT Ltd.  Unit 4B, Greengate Industrial Estate, White Moss View, Middleton, Manchester, 

M24 1UN, United Kingdom   -   info@pdtuk.com   -   Copyright PDT Ltd. © 2017

Summary of Contents for RJ549

Page 1: ...RJ549 Multi function Keyboard User Guide...

Page 2: ...not functioning correctly please stop using it and send it to a qualified service agent for repair Use of the electronic keyboard To avoid damaging the appearance of the electronic keyboard or damagin...

Page 3: ...Jacks and Accessories 5 Using headphones 5 Connecting an Amplifier or Hi Fi Equipment 6 LED Display 6 Keyboard Operation 6 Power control 6 Adjusting the Master Volume 7 Tone Selection 7 Demo Songs 7 E...

Page 4: ...3 Controls Indicators and External Connections Front Panel 1 2 3 4 5 6 7 8 9 10 11 12 13 14 15 16 17 18 19 20 21 22 23 24 25 26 1...

Page 5: ...B 11 LED Display 12 Rhythm Selection 13 Fill In 14 Stop 15 Tempo Slow Fast 16 Multi Finger Chords 17 Sync 18 Single Finger Chords 19 Chord Off 20 Chord Keyboard 21 Rhythm Program 22 Rhythm Playback 23...

Page 6: ...tery operation Open the battery lid on the underneath of the electronic keyboard and insert 6 x 1 5V Size AA alkaline batteries Ensure the batteries are inserted with the correct polarity and replace...

Page 7: ...N or AUX IN socket on the external equipment and plug the other end into the PHONES jack on the rear of the electronic keyboard Keyboard Operation Power control Press the POWER button to turn the powe...

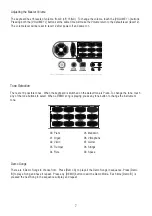
Page 8: ...andolin 06 Vibraphone 07 Guitar 08 Strings 09 Space Tone Selection There are 10 possible tones When the keyboard is switched on the default tone is Piano To change the tone touch any of the tone butto...

Page 9: ...o Song Percussion The Keyboard has 8 percussion and drum effects Press the keys to produce a percussive sound The percussion effects can be used in combination with any other mode Tempo The instrument...

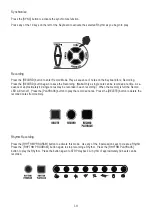
Page 10: ...eyboard The SINGLE button selects single finger chord mode You can then play the chords as shown on page 11 The FINGER button selects the fingered chord function You can then play the chords as shown...

Page 11: ...a time A se quence of approximately 40 single notes may be recorded in each recording When the memory is full the Record LED will turn off Press the PLAYBACK button to play the recorded notes Press th...

Page 12: ...11 C D D E E F F G G A B B m m7 M 7 Chord Table Single Finger Chords...

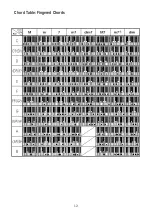
Page 13: ...12 Chord Table Fingered Chords...

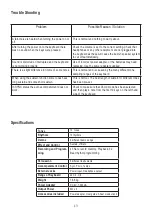
Page 14: ...y different tone sampling ranges of the keyboard When using the sustain function some tones have long sustain and some short sustain This is normal The best length of sustain for different tones has b...

Page 15: ...rmined by turning the equipment off and on the user is encouraged to try to correct the interference by one or more of the following measures Reorient or relocate the receiving antenna Increase the se...

Reviews: