MP-Series Low Inertia Servo Motor Installation Instructions
13
Publication MP-IN002C-EN-P - April 2009
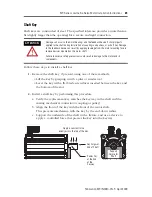
Mount the Motor
Follow these steps to mount the motor on a machine.
1.
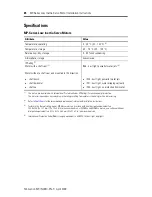
Provide sufficient clearance, heatsink mass, and air flow for the motor so it
stays within the operating temperature range of 0…40 °C (32…104 °F).
Do not enclose the motor unless cooling air is forced across the motor, and
keep other heat producing devices away from the motor. Heatsink
requirements are listed in a footnote to the
Specifications
table.
2.
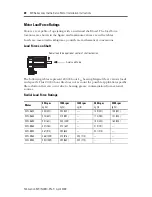
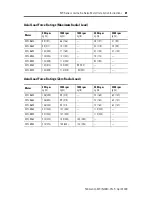
Verify the axial and radial shaft loads of your application do not exceed
those listed in the
Motor Load Force Ratings
.
3.
Position the motor on the machine with its connectors pointing downward.
4.
Insert and hand-tighten the fasteners in each of the four mounting holes in
the motor faceplate.
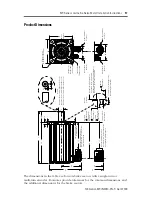
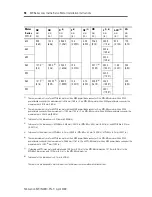
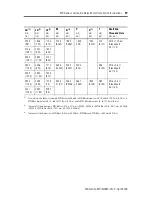
The mounting hole diameter is specified in the
Product Dimensions
table.
5.
Align the motor on the machine using the mounting pilot hole to verify the
correct alignment.
6.
Tighten the fasteners within the recommended torque range.
7.
Rotate the shaft for electrical phasing and encoder alignment.
The index pulse occurs on a single-turn encoder when the shaft key is
aligned with the connectors. Refer to
Product Dimensions
for a visual
reference of this alignment.
ATTENTION
Outer surfaces of a motor can reach high temperatures, 125 °C (275 °F) during
operation.
Take precautions to prevent accidental contact with hot surfaces. Consider motor
surface temperature when selecting connections and cables to install on a
motor.
Failure to observe safety precautions could result in personal injury or damage to
equipment.
Cat. No.
Torque Range
MPL-B6
xx
, and MPL-B8
xx
8…20 N•m (70…180 lb•in)
MPL-B9
xx
17…45 N•m (150…400 lb•in)


