9
RANDOM ORBIT SANDER
ENG
the unwanted marks before going on to a finer grit and
finishing the job.
NOTE:
Do not use the same sanding sheet for wood and
metal. Metal particles will be embedded in the sanding
sheet and will scour a wooden surface.
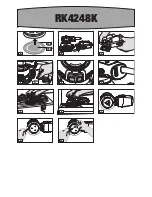
8. FLUSH SANDING (See Fig. H)
Flush sanding can be performed with the front edge
of this sander. Upon completion of sanding operation,
turn sander off and wait until sanding disc comes to a
complete stop before removing from workpiece.
9. ORBITAL MOTION (See Fig. I)
As shown in Figure H, the orbit diameter of the sander
is 1/8-in. in diameter so the sandpaper moves in tiny
circles at very high speed, allowing the sander to move
easily.
This orbital action duplicates a “hand sanding” motion
for more aggressive sanding as you push the sander
forward. This powerful orbital action is ideal for heavy-
duty sanding applications, such as:
1. Removing old finishes
2. Smoothing rough wood
3. Sanding stock down to required dimensions
4. Finishing surfaces that are to be painted.
10. CHANGING THE OUTER/INNER PAD
NOTE:
Before changing the pad, take off the sanding
paper.
Take off the Outer Pad by removing the four screws (See
Fig. J1). Align the new pad according to the screw holes
and attach the pad using the provided screws.
Follow the same steps as above to change the Inner
Pad. Please hold the inner pad firmly while removing or
attaching the screws. (See Fig. J2)
WORKING HINTS FOR YOUR SANDER
If your power tool becomes too hot, especially when used
at low speed, set the speed to maximum and run it with
no load for 2-3 minutes to cool the motor. Avoid prolonged
usage at very low speeds. Always use sand paper that is
suitable for the material you want to sand.
Always ensure the work-piece is firmly held or clamped to
prevent movement.
Any movement of the material may affect the quality of the
sanding finish.
Start your sander before sanding and turn it off only after
you stop sanding. For the best results, sand wood in the
direction of the grain.
Do not start sanding without having the sandpaper fitted.
Do not allow the sandpaper to wear away, it will damage the
base-plate. The guarantee does not cover base-plate wear
and tear.
Use coarse grit paper to sand rough surfaces, medium grit
for smooth surfaces and fine grit for the final surfaces. If
necessary, first make a test run on scrap material.
Use sandpaper designed for the vibrafree
®
sander
specifically.
The sandpaper controls the sanding efficiency, not the
amount of force you apply to the tool. Excessive force will
reduce the sanding efficiency and cause motor overload.
Replacing the sandpaper regularly will maintain optimum
sanding efficiency.
MAINTAIN TOOLS WITH CARE
Remove the plug from the socket before carrying
out any adjustment, servicing or maintenance.
Keep tools sharp and clean for better and safer
performance. Follow instructions for lubricating and
changing accessories. Inspect tool cords periodically
and if damaged, have repaired by authorized service
facility. Your power tool requires no additional
lubrication or maintenance. There are no user
serviceable parts in your power tool. Never use water or
chemical cleaners to clean your power tool. Wipe clean
with a dry cloth. Always store your power tool in a dry
place. Keep the motor ventilation slots clean. Keep all
working controls free of dust.
If the replacement of the supply cord is necessary, this
has to be done by the manufacturer or his agent in order
to avoid a safety hazard .
TROUBLESHOOTING
1. If your sander will not operate, check the power at
the electrical plug.
2. If the sander does not abrade surface, check the
sanding paper. If the sanding paper has been
worn, replace the new paper and try again. The
paper must be kept in a dry place, if it is allowed to
become damp, the abrasive particles will lose their
adhesion to the backing paper and will not abrade.
3. If the sander does not move smoothly, the sanding
paper may be loose, damaged or wrinkled. Replace
and try again.
4. If a fault can not be rectified return the sander to an
authorized dealer for repair.
Summary of Contents for RK4248K
Page 3: ...RK4248K 2 3 4 1 9 8 6 7 5...
Page 4: ...RK4248K 11 10B 10A 7 B D E F G H J2 J1 I C A...
Page 22: ......
Page 23: ......

