background image

6

3.5A  OSCILLATING SPINDLE SANDER  

 ENG

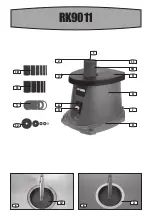
ACCESSORIES

Sanding sleeves 

6

Table inserts 

6

Rubber sanding drums 

5

Drum washers 

5

Hex wrench 

1

We recommend that you purchase your accessories 

from the same store that sold you the tool. Use good 

quality accessories marked with a well-known brand 

name. Choose the type according to the work you 

intend to undertake. Refer to the accessory packaging 

for further details. Store personnel can assist you and 

offer advice.

California proposition 65:


WARNING: This product may contain lead, 
phthalate or other chemicals known to the 

State of California to cause cancer, birth defects 
and other reproductive harm. Wash your hands 
after use.

READ ALL INSTRUCTIONS BEFORE 

USING THIS APPLIANCE


INSTRUCTIONS PERTAINING TO A RISK OF INJURY

GENERAL

A.  GROUNDING INSTRUCTIONS

1.  All grounded, cord-connected tools:

  In the event of a malfunction or breakdown, 

grounding provides a path of least resistance 

for electric current to reduce the risk of 

electric shock. This tool is equipped with an 

electric cord having an equipment-grounding 

conductor and a grounding plug. The plug 

must be plugged into a matching outlet that is 

properly installed and grounded in accordance 

with all local codes and ordinances.

  Do not modify the plug provided – if it will not fit 

the outlet, have the proper outlet installed by a 

qualified electrician.

  Improper connection of the equipment-

grounding conductor can result in a risk of 

electric shock. The conductor with insulation 

having an outer surface that is green with 

or without yellow stripes is the equipment-

grounding conductor. If repair or replacement 

of the electric cord or plug is necessary, do not 

connect the equipment-grounding conductor to 

a live terminal.

  Check with a qualified electrician or service 

personnel if the grounding instructions are 

not completely understood, or if in doubt as to 

whether the tool is properly grounded.

  Use only 3-wire extension cords that 

have 3-prong grounding plugs and 3-pole 

receptacles that accept the tool’s plug.

  Repair or replace damaged or worn cord 

immediately.

2.  Grounded, cord-connected tools intended for 

use on a supply circuit having a nominal rating 

less than 150V:

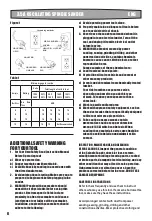
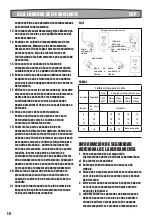
  This tool is intended for use on a circuit that 

has an outlet that looks like the one illustrated 

in Sketch A in Figure 1. The tool has a grounding 

plug that looks like the plug illustrated in 

Sketch A in Figure 1. A temporary adapter, which 

looks like the adapter illustrated in Sketches 

B and C, may be used to connect this plug to 

a 2-pole receptacle as shown in Sketch B if a 

properly grounded outlet is not available. The 

temporary adapter should be used only until a 

properly grounded outlet can be installed by a 

qualified electrician. The green-colored rigid 

ear, lug and the like, extending from the adapter 

must be connected to a permanent ground such 

as a properly grounded outlet box.

3.  Grounded, cord-connected tools intended for 

use on a supply circuit having a nominal rating 

between 150-250V, inclusive:

  This tool is intended for use on a circuit 

that has an outlet that looks like the one 

illustrated in Sketch D in Figure 1. The tool 

has a grounding plug that looks like the plug 

illustrated in Sketch D in Figure 1. Make sure 

the tool is connected to an outlet having the 

same configuration as the plug. No adapter is 

available or should be used with this tool. If the 

tool must be reconnected for use on a different 

type of electric circuit, the reconnection should 

be made by qualified service personnel; and 

after reconnection, the tool should comply with 

all local codes and ordinances.

4.  Permanently connected tools:

  This tool should be connected to a grounded 

metal permanent wiring system; or to a system 

having an equipment-grounding conductor.

Summary of Contents for ShopSeries RK9011

Page 1: ...RK9011 3 5A OSCILLATINGSPINDLESANDER PAGE5 ENG 3 5A LIJADORADEEJEOSCILANTE PAGE11 ESP 3 5A PONCEUSE CYLINDRE PAGE19 FRE...

Page 2: ...producto y de que estar completamente satisfecho con su compra Lea cuidadosamente las instrucciones de seguridad y de operaci n para obtener mayor informaci n acerca de c mo utilizar ste producto cor...

Page 3: ...1 2 11 3 10 11 3 12 4 5 10 9 8 7 12 3 6 B A RK9011...

Page 4: ...12 11 a b 7 c 3 10 1 C E G I B D F H J A K L...

Page 5: ...HEX NUT TABLE INSERT SWITCH FRAME ON OFF SWITCH BASE RUBBER SANDING DRUM STORAGE AREA HOUSING WORKTABLE SANDING SLEEVE RUBBER SANDING DRUM DRUM WASHER Not all the accessories illustrated or described...

Page 6: ...ersonnel if the grounding instructions are not completely understood or if in doubt as to whether the tool is properly grounded Use only 3 wire extension cords that have 3 prong grounding plugs and 3...

Page 7: ...he gage number the heavier the cord 10 WEAR PROPER APPAREL Do not wear loose clothing gloves neckties rings bracelets or other jewelry which may get caught in moving parts Nonslip footwear is recommen...

Page 8: ...wing grinding drilling and other construction activities contain chemicals known to cause cancer birth defects or other reproductive harm Some examples of these chemicals are a Lead from lead based pa...

Page 9: ...ls WARNING Use of this tool can generate and or disburse dust which may cause serious and permanent respiratory or other injury Always use NIOSH OSHA approved respiratory protection appropriate for th...

Page 10: ...sing the Switch 5 Always run the sander for a few seconds before contacting the workpiece See G 2 Contact the workpiece with minimal pressure If the spindle sander is not removing enough material try...

Page 11: ...RRUPTOR INTERRUPTOR ENCENDIDO APAGADO BASE REA DE ALMACENAMIENTO DE LOS TAMBORES DE LIJADO DE GOMA COMPARTIMENTO DEL MOTOR MESA MANGAS DE LIJA TAMBORES DE LIJADO DE GOMA ARANDELAS DE TAMBOR No todos l...

Page 12: ...rgas el ctricas El conductor con aislamiento que tiene una superficie exterior de color verde con o sin franjas amarillas es el conductor de conexi n a tierra del equipo Si es necesario reparar o reem...

Page 13: ...ue las llaves de ajuste no se encuentren en lugar de la herramienta antes de encenderla 3 Mantenga limpia el rea de trabajo Las reas de trabajo y bancos desordenados podr an causar accidentes 4 No uti...

Page 14: ...as partes m viles la sujeci n de las partes m viles la rotura de partes el montaje y cualquier otra condiciones que podr a afectar el funcionamiento de la herramienta Cualquier guarda o parte que se e...

Page 15: ...do CCA por sus siglas en ingl s que puede ser t xico Al lijar estos materiales se deben extremar las precauciones para evitar una inhalaci n y minimizar el contacto con la piel INSPECCI N MANTENIMIENT...

Page 16: ...LAS MANGAS DE LIJA VER A F Extraiga el enchufe de la toma el ctrica antes de llevar a cabo cualquier reparaci n o ajuste 1 Para instalar la manga de lija deber identificar primero el eje de lijado e a...

Page 17: ...xtraiga el enchufe de la toma el ctrica antes de llevar a cabo cualquier reparaci n o ajuste 1 ALMACENAMIENTO DE TAMBORES DE LIJADO DE GOMA ADICIONALES Es posible almacenar en el rea de almacenamiento...

Page 18: ...INTERRUPTEUR INTERRUPTEUR MARCHE ARR T BASE LOGEMENT POUR LE TAMBOUR DE PON AGE EN CAOUTCHOUC CAISSON MOTEUR TABLE MANCHONS DE PON AGE TAMBOURS DE PON AGE EN CAOUTCHOUC RONDELLES DE TAMBOUR Lesaccesso...

Page 19: ...te prises correctement mise la terre Une mauvaise connexion du conducteur de mise la terre de l quipement peut entra ner un risqu de d charge lectrique Le conducteur avec isolant dont la surface ext r...

Page 20: ...surface de travail 6 Prenez toutes les pr cautions n cessaires pour que les enfants n aient pas acc s votre atelier fermez avec des cadenas mettez des disjoncteurs et retirez les clefs de d marrage d...

Page 21: ...rde ou toute autre pi ce endommag e doit tre r par e ou remplac e 20 Direction de l alimentation du mat riel N alimentez les pi ces ouvrer que dans le sens contraire de la rotation de la lame ou du co...

Page 22: ...t riaux il vous faudra prendre d avantage de pr cautions pour viter de respirer ces substances et r duire le contact avec la peau INSPECTION MAINTENANCE ET NETTOYAGE AVANT CHAQUE UTIISATION inspectez...

Page 23: ...ez la prise de la prise murale avant d effectuer n importe quel travail de r glage de r paration ou d entretetien 1 Pour installer un manchon de pon age vous devez tout d abord rep rer le cylindrre de...

Page 24: ...I PRENEZ SOIN DE VOS OUTILS ET ENTRETENEZ LES BIEN Retirez la prise de la prise murale avant d effectuer n importe quel travail de r glage de r paration ou d entretetien 1 RANGEMENT DES TAMBOURS DE PO...

Page 25: ......

Page 26: ......

Page 27: ......

Page 28: ...Copyright 2016 Positec All Rights Reserved Derechos reservados 2016 Positec Todos los derechos reservados Copyright 2016 Positec Tous droits r serv s...

Reviews: