background image

Panther DR886EX User Manual   

                                                           roda                        

————————————————————————— 

—————————————————————————


Page 79 of 110 


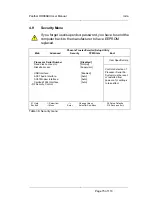
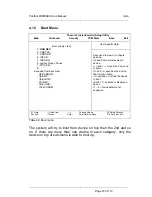
4.12 Boot 

Menu 


Phoenix TrustedCore(tm) Setup Utility


Main               Advanced               Security               TPM State               Boot               Exit


Item Specific Help 


Boot priority order: 

1: USB KEY:


2: USB FDC: 
3: USB HDD: 
4: IDE CD: 
5: IDE HDD: 
6: Legacy Floppy Drives 
7: PCI SCSI: 
8: 

Excluded from boot order: 

: USB CDROM: 
: USB ZIP: 
: USB LS120: 
: PCI BEV: 
: Other USB: 
: 1394 CDROM 


Keys used to view or configure 
devices: 
Up and Down arrows select a 
device. 
<+> and <–> moves the device up 
or down . 
<f> and <r> specifies the device 
fixed or removable . 
<x> exclude or include the device 
to boot . 
<Shift + 1> enables or disables a 
device. 
<1 – 4> Loads default boot 
sequence. 

F1  Help               

↑↓

 Select Item                –/+               Change Values                          F9 Setup Defaults 

Esc Exit                

 Menu 

              Enter            Select 

 Sub-Menu                   F10 Save and Exit


Table 42: Boot menu 

 
The system will try to boot from device on top then the 2nd and so 
on. If there are more than one device in each category, only the 
device on top of sub-menu is able to boot up. 


Summary of Contents for Panther DR886EX

Page 1: ...User Manual Tablet Computer Panther DR886EX...

Page 2: ...Panther DR886EX User Manual roda Page 2 of 110...

Page 3: ...Page 3 of 110 roda computer GmbH Landstrasse 6 77839 Lichtenau Baden Telefon 49 0 7227 9579 0 Telefax 49 0 7227 9579 20 roda Service Center H llhorst Bredenhop 20 32609 H llhorst Telefon 49 0 5744 94...

Page 4: ...r expressed or implied with respect to the contents hereof and specifically disclaims any warranties as to merchantability or fitness for any particular purpose Any of the software described in this m...

Page 5: ...emarks of International Business Machines Corp MS DOS and Windows are registered trademarks of Microsoft Corp Pentium Pentium II Pentium III Pentium 4 and Pentium M are the registered trademarks of In...

Page 6: ...ns are written in square brackets e g Ctrl Alt F1 means that you must press Control Alt and F1 keys simultaneously Note Notes contain important information in connection with the directly related text...

Page 7: ...er is encouraged to try to correct the interference by one or more of the following measures Reorient or relocate the receiving antenna Increase the separation between the equipment and receiver Conne...

Page 8: ...ing comply with both the EMC Directive 2004 108 EC and the Low Voltage Directive 2006 95 EC issued by the Commission of the European Community Compliance with these directives implies conformity to th...

Page 9: ...tromagnetic Compatibility 2004 108 EC Low voltage Directive 2006 95 EC and the Amendment Directive 93 68 EEC the procedures given in European Council Directive 99 5 EC and 89 336EEC The equipment was...

Page 10: ...ower Please read the power saving features and the setting procedures described in this manual for setting your computer Recycling All materials used in the construction of this unit are recyclable or...

Page 11: ...and Operation 26 2 1 Location 26 2 2 Ruggedness 26 2 3 Operating Systems 27 2 4 Power supply for the Panther DR886EX 27 2 4 1 Mains adapter 27 2 4 2 Battery operation 28 2 5 Shutdown 33 2 6 Safe Guard...

Page 12: ...ter 49 3 1 8 Stand Unit 49 3 1 9 Material and Recycling 49 3 2 Interfaces 50 3 2 1 DC jack industry 50 3 2 2 DC jack military 50 3 2 3 Serial port 51 3 2 4 RGB port 52 3 2 5 LAN jack 53 3 2 6 USB 53 3...

Page 13: ...5 USB 2 0 84 5 1 6 Touch Screen 84 5 1 7 PCMCIA 84 5 1 8 PCIe Gigabit LAN 84 5 1 9 WLAN 84 5 1 10 Bluetooth 85 5 1 11 Modem 85 5 1 12 GPRS GSM 85 5 2 Utilities 86 5 2 1 Wireless Manager 86 6 Maintena...

Page 14: ...Panther DR886EX User Manual roda Page 14 of 110...

Page 15: ...Panther DR886EX User Manual roda Page 15 of 110 Commissioning C H A P T E R 1...

Page 16: ...ction against shock vibration dust and humidity The technical details are listed in chapter 3 Specifications The following lists the standard scope of delivery for the notebook Please use this list to...

Page 17: ...nable alternative function keys Sleep button refer Timeout Standby Wake up Display brightness decrease Display brightness increase Power button refer Timeout Standby Wake up Battery charge Heater acti...

Page 18: ...nther DR886EX User Manual roda Page 18 of 110 1 2 2 Rear view 1 2 Figure 3 Rear view 3 4 1 secondary battery connector 2 roda label with serial number 3 roda type label 4 Windows licence label optiona...

Page 19: ...a Page 19 of 110 1 2 3 Left side view Figure 4 Left side view 1 2 3 4 1 Battery 2 LAN 3 USB 4 PCMCIA Slot 1 2 4 Right side view Figure 5 Right side view 1 2 1 DC jack 2 pin for DR886EX AC I 3 pin for...

Page 20: ...f 110 1 2 5 Top view Figure 6 Top view 1 2 3 4 1 Antenna optional 2 GPS WLAN Antenna Camera module 3 HDD 4 Kensington lock slot 1 2 6 Bottom view Figure 7 Bottom view 1 2 3 1 Warranty seal 2 Docking c...

Page 21: ...es o Press power button for 4 seconds to have a Hard power off System shuts down without saving any data or parameters o Press power button momentarily to Standby or Hibernate dependent on operating s...

Page 22: ...ting systems may not support these functions Note In temperatures below 0 C 32 F the tablet may not boot immediately The system will create a signal while the notebook is heating up After 13 to 15 min...

Page 23: ...st the main tablet components are checked processor memory interrupt controller inputs and outputs DMA controller clock unit and video controller As part of this self test the current hardware configu...

Page 24: ...ed software will be installed and configured Since this process may not be interrupted you should allow some time for it and should leave the notebook connected to the line voltage via the mains adapt...

Page 25: ...Panther DR886EX User Manual roda Page 25 of 110 C H A P T E R 2 Components and Operations...

Page 26: ...on However it is still necessary to provide appropriate protection while operating in harsh environments NEVER immerse the computer completely in water Doing so may cause permanent damages Drop may ca...

Page 27: ...e mains adapter or the integrated battery Optionally a DC DC converter is available it can be used to operate the tablet via a vehicle or similar battery 2 4 1 Mains adapter Figure 9 Mains adapter The...

Page 28: ...hese instructions 2 4 2 Battery operation The exchangeable Lithium Ion battery is the tablet s main power source when the mains adapter is not connected As a standard the Panther DR886EX is equipped b...

Page 29: ...ng the battery After connecting the notebook with the mains adapter and power line the battery will charge The tablet can either be switched on or off during this process The Panther s charge indicato...

Page 30: ...lose any data Warning with low battery charge state If the remaining battery power drops under 10 of the overall capacity the tablet will inform you about this situation as follows in the standard set...

Page 31: ...l switch to idle state If you have not done so you must now connect the tablet with the mains adapter or replace the low battery with a fully charged one If you switch on the Panther DR886EX after the...

Page 32: ...ce Energy options you can set the tablet s energy saving functions Windows Vista Under Start symbol System control Mobile PC Energy options you can set the tablet s energy saving functions Other opera...

Page 33: ...ereafter the tablet shuts down Depending on the open programs this process may take a few seconds 2 5 Shutdown The following procedure is recommended in shutting down the computer Save any work you wa...

Page 34: ...nther DR886EX User Manual roda Page 34 of 110 2 6 Safe Guard the Computer Figure 12 Kensington lock Plug the Kensington lock into the slot near HDD and turn lock it Both the computer and HDD are secur...

Page 35: ...ode Use a coin to turn loose the screws on the modules Remove battery from the compartment Remove the HDD from he computer Be sure to turn OFF the computer before replacing any module Figure 13 Replac...

Page 36: ...orage device Capacity of the HDD may vary The HDD is removable This provides convenience and security It can ONLY be removed while power is OFF NEVER drop your HDD module or expose it to high temperat...

Page 37: ...5 Touch screen calibration Use the touch screen by moving with the pen over the surface of the touch screen The mouse curser will follow your movements You can perform a one time click by briefly tipp...

Page 38: ...ht side of the Panther is the COM1 Port It is a Sub D 9 interface for RS232 standard configuration DC jack The last connector on the right side is the DC jack It can be a 3pin DR886EX AC M military or...

Page 39: ...esktop keyboard plus extra functions The interface is via USB port or PS 2 Figure 16 External backlight keyboard USB Track Point The track point is functionally equivalent to a mouse Pushing the track...

Page 40: ...lation via USB CD ROM is not possible even the Windows itself supports USB Audio CD output is via the audio jack on CD ROM drive only 2 10 4 Memory Card The memory card will expand main memory to faci...

Page 41: ...vates heating when computer is turned ON at temperature 0 C 20 C 32 F 4 F The heating is automatically just turn ON power the heater controller will detect temperature and take over The power indicato...

Page 42: ...ooked to accept system unit Mount Stand Unit Open the rubber cap on the docking connector Align the computer into stand unit Push the lever to engage and fix Lock the computer Add DockLite e g 2 10 13...

Page 43: ...te top view 1 1 Docking connector Front View S 1 2 3 4 5 6 7 8 S Figure 18 DockLite front view 1 Audio jacks Microphone Speaker 2 RGB port 3 Modem jack RJ11 4 LAN jack RJ45 5 Serial port COM3 6 USB po...

Page 44: ...44 of 110 DockLite Military View Front View S 1 2 3 4 5 6 S Figure 19 DockLite MIL 1 X5 interface Ethernet 2 X6 interface DVI 3 Serial port Sub D9 RS232 4 X8 X9 interface USB option 5 X10 interface R...

Page 45: ...Panther DR886EX User Manual roda Page 45 of 110 C H A P T E R 3 Specifications...

Page 46: ...97 sound with Speaker Buttons front ON OFF LCD Brightness up down Standby F1 F6 Fn Interfaces left 2x PCMCIA Type II or 1x PCMCIA Type II und PCMCIA Express 1x USB 1x RJ45 Interfaces right DC jack 2Pi...

Page 47: ...86EX Secondary Battery Available Modem Available WLAN Available GPS Available HSDPA Available Bluetooth Available RS422 RS485 Available DockLite Available Industrial or MIL Stand Unit Available Dual B...

Page 48: ...TD 461 Table 4 Industry Military models configuration 3 1 5 Primary and secondary Battery Primary battery Type 6x 18650 Lithium Ion cells Capacity 11 1V 4400mAh Dimensions 150mm x 58mm x 20 mm Weight...

Page 49: ...ight 1 6Kg Table 8 Stand unit 3 1 9 Material and Recycling Component Material Plastic Cabinet UL grade PC ABS GE C2800 or C6200 Magnesium Cabinet Magnesium alloy AZ91D Bracket Aluminium 5052 Steel wit...

Page 50: ...110 3 2 Interfaces 3 2 1 DC jack industry GND 19V Figure 20 DC jack Machine side LTWS 02PMMS LS Mating plug LTWAD 02AFFM LL6000 3 2 2 DC jack military 19V CN GND Figure 21 DC MIL Machine side Amphenol...

Page 51: ...ort Machine side Sub D 9 jack Mating plug Sub D 9 plug Pin assignment Pin RS232 RS422 Option RS485 Option 1 CD TXD Data 2 RXD TXD Data 3 TXD RXD Data 4 DTR RXD Date 5 GNR GND GND 6 DSR RTS NC 7 RTS RT...

Page 52: ...15 jack Mating plug Sub D 15 plug Pin assignment Pin Assignment DR886EX VESA for reference 1 RED RED 2 GRENN GREEN 3 BLUE BLUE 4 GND RES 5 GND GND 6 GND RGND 7 GND GGND 8 GND BGND 9 GND 5V 10 GND SGND...

Page 53: ...e side RJ45 jack Mating plug RJ45 plug Pin assignment Pin 10 100 Mbit s 1000 Mbit s 1 LANTX LANTX 2 LANTX LANTX 3 LANRX LANRX 4 NC LANTX1 5 NC LANTX1 6 LANRX LANRX 7 NC LANRX1 8 NC LANRX1 Table 12 Pin...

Page 54: ...SB 4 GND Table 13 Pin assignment USB 3 2 7 USB proprietary sealed on DockLite Figure 26 USB on DL Machine side proprietary lock and sealed USB connector Mating plug available via roda Pin assignment P...

Page 55: ...B Prim Battery res 64 V_3 3 3V 400mA max 5 VA AC input 65 GND 6 P0 1394 interface 66 IDE_PDD4 2 nd IDE 7 VB Prim Battery res 67 IDE_PDD6 2 nd IDE 8 V_5 5V 400mA max 68 IDE_PDD5 2 nd IDE 9 reserve 69 I...

Page 56: ...ST 31 RTXD3 COM3 RS232 91 IDE_PDA2 2 nd IDE 32 RDCD3 COM3 RS232 92 CD_L 2 nd IDE 33 GND 93 USB_PP2 USB interface 34 RDSR3 COM3 RS232 94 USB_PN2 USB interface 35 RCTS3 COM3 RS232 95 DVI TXC DVI res 36...

Page 57: ...56 IDE_PDD0 2 nd IDE 116 CRT_R CRT VGA 57 Line_inL Sound 117 LINE Modem 58 IDE_PDD1 2 nd IDE 118 LAN TX D1 GLAN 59 CD DASP 2 nd IDE 119 CRT_G CRT VGA 60 IDE_PDD2 2 nd IDE 120 CRT_B CRT VGA Table 15 P...

Page 58: ...14 Mating plug SJTG06GS 14 35PN014 Pin assignment Pin Assignment 1 TDMS TX2 N 2 TDMS TX2 P 3 TMDS 2 GND 4 PWRSW 5 nc 6 DDC Clock SCL 7 DDC DATA SDA 8 nc 9 TDMS TX1 N 10 TDMS TX1 P 11 TDMS 1 GND 12 Spe...

Page 59: ...X 21 USB P TX 22 GND 23 TDMS CLK P 24 TDMS CLK N 25 COM n TX optional 26 COM n RX optional 27 nc 28 COM n TX optional 29 GND 30 GND 31 nc 32 nc 33 nc 34 nc 35 nc 36 nc 37 nc Table 17 Pin assignment MI...

Page 60: ...10 11 X10 MIL RS232 1 7 5 Figure 30 MIL DL X10 Machine side Amphenol SJT00RT 10 35PN014 Mating plug SJTG06RT 10 35SN014 Pin assignment Pin Assignment 1 CD 2 RXD 3 TXD 4 DTR 5 GND 6 DSR 7 RTS 8 CTS 9 R...

Page 61: ...000ft Non Operating 12 180m 40 000ft High temperature According to MIL STD 810F Method 501 4 procedure I II Operating 50 C 122 F Non Operating 70 C 158 F Low temperature According to MIL STD 810F Met...

Page 62: ...H58A C Operating OH58A C helicopter 3 According to MIL STD 810D Method 514 5 category 20 procedure I Composite wheeled vehicle vibration Operating Figure 514 5C 3 and Table 514 5C VII Shock According...

Page 63: ...lity Bulk Cable Injection 10KHz 200MHz CS115 Conducted Susceptibility Bulk Cable Injection Impulse Excitation CS116 Conducted Susceptibility Damper Sinusoidal Transients Cable and Power Leads 10KHz to...

Page 64: ...Panther DR886EX User Manual roda Page 64 of 110 C H A P T E R 4 BIOS Setup...

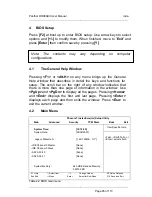
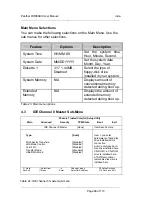
Page 65: ...ay all the pages Pressing Home and End displays the first and last page Pressing Enter displays each page and then exits the window Press Esc to exit the current window 4 2 Main Menu Phoenix TrustedCo...

Page 66: ...f extended memory detected during boot up Table 23 Main menu options 4 3 IDE Channel 0 Master Sub Menu Table 24 IDE channel 0 master sub menu Phoenix TrustedCore tm Setup Utility Main Advanced Securit...

Page 67: ...le CD ROM IDE Removable Other ATAPI User Auto autotypes hard disk drive installed here None ATAPI Removable removable disk drive is installed here CD ROM a CD ROM drive is installed here IDE Device Ot...

Page 68: ...Bit I O Disabled Enabled This setting enables or disables 32 bit IDE data transfers Table 27 IDE channel 0 slave sub menu selections Phoenix TrustedCore tm Setup Utility Main Advanced Security TPM St...

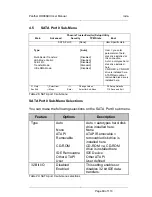
Page 69: ...movable removable disk drive is installed here F1 Help Select Item Change Values F9 Setup Defaults Esc Exit Menu Enter Select Sub Menu F10 Save and Exit Table 28 SATA port 0 sub menu SATA Port 0 Sub M...

Page 70: ...movable removable disk drive is installed here F1 Help Select Item Change Values F9 Setup Defaults Esc Exit Menu Enter Select Sub Menu F10 Save and Exit Table 30 SATA port 1 sub menu SATA Port 1 Sub M...

Page 71: ...y the diagnostic screen during boot F1 Help Select Item Change Values F9 Setup Defaults Esc Exit Menu Enter Select Sub Menu F10 Save and Exit Table 32 Advanced Menu Advanced Menu Selections You can ma...

Page 72: ...ed regardless if a mouse is present Auto Detect will enable the PS 2 mouse only if present OS Controlled only displayed if the OS controls the mouse PCI Express Root Port 1 Disable Enable Auto Disable...

Page 73: ...Printer1 mode Standard Printer2 Disabled Configure COM1 using device options Disabled No configuration 3F8 IRQ 4 Set the base I O address for COM1 F1 Help Select Item Change Values F9 Setup Defaults E...

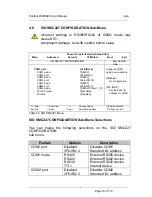
Page 74: ...32 TTL3 External RS485 device External RS422 device External RS232 device Internal device COM4 port Disabled 2E8 IRQ 5 Disables COM4 Standard I O address COM4 mode RS485 RS422 RS232 TTL4 External RS48...

Page 75: ...ific Help Processor Serial Number Disabled Fixed disk boot sector Normal Diskette access Supervisor USB Interface Enabled AC97 Audio Interface Auto AC97 Modem Interface Auto Cardbus 1394 Interface Aut...

Page 76: ...to protect against viruses Diskette access Supervisor User Control access to diskette drives USB Interface Disabled Enabled Control the listed USB Functions by setting the item to the desired value A...

Page 77: ...c Exit Menu Enter Select Sub Menu F10 Save and Exit Table 38 RF security control sub menu RF Security Control Sub Menu Selections You can make the following selections on the RF Security Control sub m...

Page 78: ...ange Enable Activate Deactivate Disable Clear Change TPM State Table 41 TMP state menu selections Phoenix TrustedCore tm Setup Utility Main Advanced Security TPM State Boot Item Specific Help Current...

Page 79: ...ed to view or configure devices Up and Down arrows select a device and moves the device up or down f and r specifies the device fixed or removable x exclude or include the device to boot Shift 1 enabl...

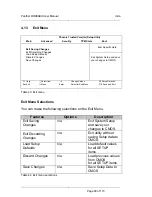
Page 80: ...oad default values for all SETUP items Discard Changes n a Load previous values from CMOS for all SETUP items Save Changes n a Save Setup Data to CMOS Table 44 Exit menu selections Table 43 Exit menu...

Page 81: ...Panther DR886EX User Manual roda Page 81 of 110 C H A P T E R 5 Drivers and Utilities...

Page 82: ...hen follow prompt to complete driver installation Windows 2000 XP may recommend using their driver but you should confirm changing to the factory bundled driver After restart and back to Settings wind...

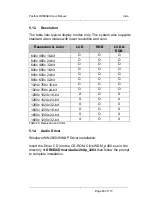
Page 83: ...800x 600x 16 bit 800x 600x 24 bit 800x 600x 32 bit 1024x 768x 16 bit 1024x 768x 24 bit 1280x 1024x 16 bit X X 1280x 1024x 24 bit X X 1280x 1024x 32 bit X X 1600x 1200x 16 bit X X 1600x 1200x 24 bit X...

Page 84: ...ry of DR8EX Driver Touchscreen DP9000 2kxpVista3264 PM Universal v1 0 0 8 then follow the prompt to complete installation 5 1 7 PCMCIA Windows WIN2000 WINXP Driver Installation The driver is automatic...

Page 85: ...ation 5 1 11 Modem Windows WIN2000 WINXP Driver Installation Insert the Driver CD into the CD ROM Click setup exe in the directory of DR8EX Driver MDC mdc_w2kxp then follow the prompt to complete inst...

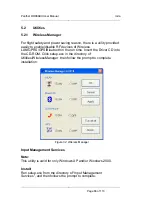
Page 86: ...RS GPS Bluetooth in the run time Insert the Driver CD into the CD ROM Click setup exe in the directory of Utilities WirelessManager then follow the prompt to complete installation Figure 32 Wireless M...

Page 87: ...tartup 4 Launch On Screen keyboard at logon 5 Exit As the title is named you could activate Function Key Manager and or On Screen Keyboard In addition if you activate Launch Function key manager at st...

Page 88: ...ault browser 3 Replace with another key 4 Mouse cursor move to 5 Simulate mouse button click 6 Change display output 7 Rotate screen 8 Change desktop background color 9 Change desktop wallpaper 10 Lau...

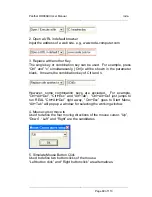
Page 89: ...on key of Ctrl and x However some combination keys are excluded For example Ctrl Alt Del Ctrl Esc and Alt Tab Ctrl Alt Del just jumps to run REAL Ctrl Alt Del right away Ctrl Esc goes to Start Menu Al...

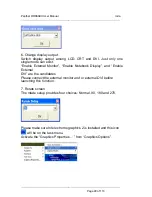
Page 90: ...able Notebook Display and Enable External DVI are the candidates Please connect the external monitor and or external DVI before launching this function 7 Rotate screen The rotate setup provides four c...

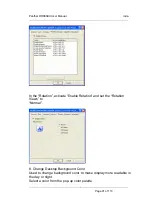
Page 91: ...110 In the Rotation activate Enable Rotation and set the Rotation Views to Normal 8 Change Desktop Background Color Used to change background color to make display more readable in the day or night S...

Page 92: ...data by using a pointing device or joystick You can toggle this function key to enable disable the on screen keyboard 11 Toggle function 2 This is only for F1 in Function 1 and no parameter has to be...

Page 93: ...Panther DR886EX User Manual roda Page 93 of 110 C H A P T E R 6 Maintenance and Service...

Page 94: ...plied 6 2 Troubleshooting Should the computer fail to function properly the troubleshooting steps below may be followed Check AC vehicle adapter battery and the power source Minimize the configuration...

Page 95: ...da computer com which you have to fill in 6 3 1 Service Supply Note Figure 34 Service Supply Note Geman Version Include this sheet with the following information Name Address Serial number Customer nu...

Page 96: ...ate of failure A DETAILED description of the problems you have encountered A list of the hardware software configuration if applicable 6 3 2 Downloads Check our website www roda computer com for downl...

Page 97: ...Panther DR886EX User Manual roda Page 97 of 110 A N N E X Annex...

Page 98: ...de Semiconductor CPU Central Processing Unit CRT Cathode Ray Tube DC Direct Current DL DockLite DMA Direct Memory Access DOS Disc Operation System D sub D subminature auch als Sub D verwendet DVD Digi...

Page 99: ...it MB Mega Byte unit Mbit s Mega Bit per second unit MHz Mega Hertz unit PC Personal Computer PCI Peripheral Component Interconnect PCMCIA Personal Computer Memory Card Industry Association POST Power...

Page 100: ...able of power supply connectors for different countries Version Country region Technical data Europe 220V 50Hz 6A Switzerland 220V 50Hz 6A Great Britain 240V 50Hz 6A Australia 240V 50Hz 6A North Ameri...

Page 101: ...modules 35 Figure 14 Hard disk drive case 36 Figure 15 Touch screen calibration 37 Figure 16 External backlight keyboard USB 39 Figure 17 DockLite top view 43 Figure 18 DockLite front view 43 Figure...

Page 102: ...e 17 Pin assignment MIL DL X6 59 Table 18 Pin assignment MIL DL X10 60 Table 19 MIL STD 810 62 Table 20 IEC IP 62 Table 21 MIL STD 461 63 Table 22 BIOS main menu 65 Table 23 Main menu options 66 Table...

Page 103: ...ge 103 of 110 Table 40 TPM state menu 78 Table 41 TMP state menu selections 78 Table 42 Boot menu 79 Table 43 Exit menu 80 Table 44 Exit menu selections 80 Table 45 Resolution and Color 83 Table 46 Ta...

Page 104: ...the Dangerous Goods Regulation effective January 2009 transporting a lithium ion battery is not subject to Dangerous Goods Regulations if the total Watt Hour rating is no more than 100Wh Model Total...

Page 105: ...not to expose the battery to condensation water drop or not the store it under frozen condition Please avoid storing the battery in the places where it is exposed to the static electricity It may cau...

Page 106: ...ernment Disposal of the worn out battery may be subjected to Collection and Recycling Regulations Transport Information All Lithium ion and lithium polymer cells and bateries must be tested in accorda...

Page 107: ...endations on the Transport of Dangerous Goods Manual of Tests Criteria USA Code of Federal Regulations 49CFR Ch 1 173 185 IATA und ICAO Provision A45 und IMO Special Provision 188 IATA T1 T8 Nr Test I...

Page 108: ...ting no disassembly no rupture no fire T4 Shock Batteries were secure to the testing machine by means of a rigid mount which will support all mounting surfaces of each test battery Each battery was su...

Page 109: ...t The minimum voltage of the test was as follows when the manufacturers charge voltage is not more than 18V the minimum voltage of the test shall be the lesser of two times the maximum charge voltage...

Page 110: ...Panther DR886EX User Manual roda Page 110 of 110...

Reviews: