background image

Getting Started 


1.


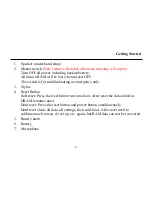
Speaker (under hand strap) 

2.


Master switch

 (Don’t remove the label, otherwise warranty will expire)


Turn OFF all power including backup battery.  
All data in RAM will be lost when turned OFF. 
The switch is for troubleshooting or emergency only. 

3.


Stylus 

4.


Reset Button 
Soft reset: Press the reset button to warm-boot. After reset the data stored in 
DRAM remains intact.  
Hard reset: Press the reset button and power button simultaneously. 
Hard reset clears all data, all settings, then cold-boot. After reset need to 
calibrate touch screen, do set up, etc. again, but RAM data can not be recovered. 

5.


Battery knob 

6.


Battery 

7.


Microphone  


Summary of Contents for DA04 SERIES

Page 1: ...HANDHELD COMPUTER DA04 SERIES USER S GUIDE...

Page 2: ...h revision or changes The manufacturer makes no representations or warranties either expressed or implied with respect to the contents hereof and specifically disclaims any warranties as to merchantab...

Page 3: ...ket PC and Windows Mobile are registered trademarks of Microsoft Corp Intel Xscale are the registered trademarks of Intel Corp All product and company names are trademarks or registered trademarks of...

Page 4: ...ection against such interference when operated in a commercial or residential environment Countermeasures if interference occurs You are encouraged to do the following if interference occurs while you...

Page 5: ...wing standards were applied EN55022 A2 2003 Class B EMI Conduction and Radiation EN61000 3 2 Harmonics EN61000 3 3 A1 2001 Flicker Voltage fluctuation EN55024 EMS EN61000 4 2 A2 2001 ESD EN61000 4 3 A...

Page 6: ...aterial Safety and Recycling Notice All materials used in the construction of this unit are recyclable or environmentally friendly No mercury cadmium CFC or related materials were used in the manufact...

Page 7: ...ECK 3 CONTROLS INDICATORS AND PORTS 4 OPERATING ENVIRONMENT AND RUGGEDNESS 13 COMPONENTS AND FUNCTIONS 14 AC ADAPTER 14 BATTERY 14 Charge Battery 15 Swap Battery 15 OPTIONAL DEVICES 18 CRADLE OPTIONAL...

Page 8: ...NLY 24 BLUETOOTH 24 GPS GLOBAL POSITIONING SYSTEM 24 BASIC OPERATION 25 WINCE VERSION 25 START PROGRAMS 25 CALIBRATE TOUCH SCREEN 25 SETTING POWER 25 ADJUST VOLUME 26 SET YOUR OWN BUTTON FUNCTIONS 26...

Page 9: ...SCREEN 29 FIND A FILE 30 REMOVE PROGRAMS 30 MANAGE CERTIFICATES 30 INPUT 31 MENUS 31 OWNER INFORMATION 31 PASSWORD 31 SOUNDS NOTIFICATIONS 31 CLOCK 32 MEMORY 32 POWER 32 WIRELESS LAN FUNCTION 32 POCK...

Page 10: ...UETOOTH CONNECTION SETTING 49 Pair 51 Serial Port 53 WINCE VERSION 56 SPECIFICATIONS 59 CPU 59 MEMORY 59 DISPLAY 59 TOUCH SCREEN 59 I O PORTS 60 SYSTEM UNIT DIMENSIONS AND WEIGHT 60 AC ADAPTER 60 BATT...

Page 11: ...MAINTENANCE SERVICE 64 CLEANING 64 TROUBLESHOOTING 64 RMA SERVICE 65...

Page 12: ......

Page 13: ...ng Started 1 GETTING STARTED Unpacking The following components come with your handheld computer If anything is missing or damaged please notify the dealer immediately 4 3 2 5 1 6 1 Handheld computer...

Page 14: ...Getting Started 2 2 AC adapter 3 AC power cord 4 User s guide 5 Microsoft Companion CD PPC version only 6 Data sync cable USB 7 Spare stylus...

Page 15: ...harge LED will light up till the battery is full Charging time will be about 4 hours For first time use please charge for more than 8 hours Press the power button momentarily to turn on this device Fo...

Page 16: ...Getting Started 4 Controls Indicators and Ports Front 4 1 6 7 2 5 3...

Page 17: ...n 5 User programmable Dial button in PPC Phone edition 3 Button 2 User programmable 4 Cursor Control Left Right Up Down 4 directions Enter at the center 5 Button 1 User programmable 6 Button 4 User pr...

Page 18: ...Getting Started 6 9 Battery charge indicator 10 Wireless indicator...

Page 19: ...Getting Started 7 Rear 2 3 8 4 5 6 7...

Page 20: ...for troubleshooting or emergency only 3 Stylus 4 Reset Button Soft reset Press the reset button to warm boot After reset the data stored in DRAM remains intact Hard reset Press the reset button and p...

Page 21: ...Getting Started 9 Left 3 2 1 4 1 Antenna optional Wireless device antenna 2 USB client port Data sync with the computer 3 USB Host port For Keyboard mouse USB Flash storage 4 Kensington lock slot...

Page 22: ...Getting Started 10 Right 1 2 4 3 1 Microphone Earphone jack 2 Infrared port IR optional 3 SD I O slot Secured Digital card and device 4 2nd antenna optional...

Page 23: ...Getting Started 11 Top 1 1 Serial port serial port may be not be used in some configurations...

Page 24: ...Getting Started 12 Bottom 2 3 1 1 DC jack 2 PCMCIA slot One PCMCIA type II slot CF Compact Flash card will be available by PCMCIA to CF adapter 3 Cradle docking connector Connection to cradle...

Page 25: ...priate protection while exposing to harsh environments All connectors will decay or corrode if exposed to water or moisture Corrosion is accelerated if the power is ON Please take proper water resista...

Page 26: ...se interference Use a power strip with built in surge protection The AC adapter automatically detects the AC line voltage 110V or 220V and adjusts accordingly Battery The computer will automatically s...

Page 27: ...g 1 Save and close the files you are currently working on 2 Plug in the AC adapter to recharge the battery 3 Swap a charged battery Charge Battery Plug in AC adapter will charge the battery automatica...

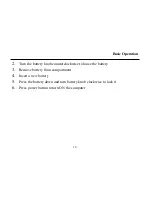
Page 28: ...the battery knob counterclockwise to loose the battery 3 Remove battery from compartment 4 Insert a new battery 5 Press the battery down and turn battery knob clockwise to lock it 6 Press power butto...

Page 29: ...Basic Operation 17 Note During battery swap the memory data is sustained by a small backup battery Please swap battery within 20 minute to avoid data loss...

Page 30: ...ptional Cradle is the device for docking port extension and battery charging AC adapter may attach directly to cradle and charges the computer battery as well as spare battery There is a battery slot...

Page 31: ...Basic Operation 19 Front Cradle connector...

Page 32: ...Basic Operation 20 Rear 1 2 6 3 4 5 7 8...

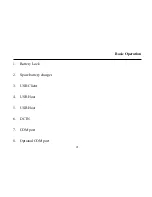
Page 33: ...Basic Operation 21 1 Battery Lock 2 Spare battery charger 3 USB Client 4 USB Host 5 USB Host 6 DC IN 7 COM port 8 Optional COM port...

Page 34: ...y latch to fix the computer Remove from the cradle 1 Turn loose the rotary latch to release computer 2 Pull away the computer either power is ON or OFF Mount spare battery spare battery is optional Pe...

Page 35: ...be sure to fix the PCMCIA rubber cap tightly with screws SD Slot The computer accepts one SD card Secured Digital Card Insert the card firmly into the slot and fix the rubber cover for water dust pro...

Page 36: ...ss LAN module GSM GPRS General Packet Radio Service PPC version only Wireless voice and data communication Bluetooth Short range wireless data communication GPS Global Positioning System Positioning y...

Page 37: ...r desired programs Calibrate Touch Screen Tap Start Settings Control Panel Stylus to calibrate Use pen to touch the center of mark and repeat the action when the mark moves Tap the screen to confirm w...

Page 38: ...ut period as desired Timeout is the idle time that the LCD backlight would turn OFF automatically Adjust Volume Tap Start Settings Control Panel Volume Sounds adjust the volume level as desired Set Yo...

Page 39: ...ill be lost when hardware reset or master switch turns OFF And if primary battery been removed for too long time for example swap battery for 20 minutes there are risks to lose RAM data as back up bat...

Page 40: ...th the USB cable Follow the prompt to execute data sync Perform Copy Paste Cut Delete etc same as PC Note ActiveSync run on Windows CE prompts Failed to Set Up Partnership because it s designed for Po...

Page 41: ...r icon on the top bar and adjust the volume level as desired Set Your Own Button Functions Tap Start Settings Personal Buttons Define the button functions from the selection list Today Screen The toda...

Page 42: ...he item from the list In Type select a data type to help narrow your search Tap Go My document folder and subfolder are searched in the results list Remove Programs Tap Start Settings System Remove Pr...

Page 43: ...ation Tap Start Settings Personal Owner Information and follow the descriptions On the identification tab enter your personal information Select Show information when device is turn on your informatio...

Page 44: ...torage versus the available memory The storage card tab displays how much memory is available on a storage card that is inserted in your device The running programs tab displays the list of the curren...

Page 45: ...eration 33 Pocket PC version 1 Turn on the Wireless signals 2 Tap Start Settings System Power 3 Select Wireless Wireless signal on GlobespanVirata PRISM 4 Wireless function has been enabled Refer to F...

Page 46: ...6 Select the connection and tap Connect note If the connection type is not connected to Internet directly via proxy it s necessary to choose Work option and set the proxy later Refer to Fig PPC 2 7 If...

Page 47: ...Basic Operation 35 Just type a correct network keys and then tap Connect Refer to Fig PPC 3...

Page 48: ...Basic Operation 36 Fig PPC 3 Fig PPC 2...

Page 49: ...eral page Fig PPC 4 select the connect to option for this connection The Internet or Work select Work if internet access will via a local network for this connection for example proxy 12 In the Networ...

Page 50: ...Basic Operation Fig PPC 5 Fig PPC 4 38...

Page 51: ...nnection is via proxy server Fig PPC 6 16 Tap Start Settings Connections Edit my proxy server Fig PPC 7 17 Input the proxy IP address and its port number Fig PPC 8 PPC 9 18 Open Internet Explorer type...

Page 52: ...Basic Operation 40 Fig PPC 8 Fig PPC 7...

Page 53: ...Basic Operation 41 Fig PPC 9...

Page 54: ...Basic Operation Windows CE Net 4 2 1 Click icon located in the bottom bar system will pop up a setting dialog as Fig CE 1 It will include all discoverable access point ad hoc 42 Fig CE 1...

Page 55: ...an access point 2 1 Tap the access point Ad Hoc link name in the list 2 2 Tap Connect button then the Wireless Network Properties dialog will pop up Fig CE 2 2 3 Tap OK button after setting done then...

Page 56: ...ically should be disabled 2 If the connection type is Ad Hoc the This is a Computer to Computer ad hoc network option should be enabled 3 Open Pocket Internet Explorer tap tools Options the Internet s...

Page 57: ...antenna icon and G icon on title bar 2 Tap Start Settings Connections tap Connection tap Add a new modem connection under My ISP section then select modem type to Cellular Line GPRS tap Next then ent...

Page 58: ...Basic Operation 46...

Page 59: ...Basic Operation 47...

Page 60: ...Basic Operation 48...

Page 61: ...me Connected Bluetooth Wireless Transmission Bluetooth is a short distance wireless communication technology with an effective range under 10 meters 30 feet When you turn on the power for Bluetooth th...

Page 62: ...anager Setting screen 4 Tap Bluetooth Manager the Setting tab Power nTap ON to turn on Bluetooth power oTap OFF to turn off Bluetooth power Make sure that you turn off the power when you need to save...

Page 63: ...LE allow other devices to connect The Bluetooth connection is on Within an effective range of 10 meters 30 feet all devices supporting Bluetooth can detect your Pocket PC and data transmission is perf...

Page 64: ...as personal computers Bluetooth headsets Pocket PCs etc Tap Search New Device to enter the search screen Follow the instructions on the screen This screen is for reference only The actual screen displ...

Page 65: ...ial Port If you have Bluetooth GPS software use the product as instructed and refer to the accompanied documentation and this section to register your Pocket PC as an effective serial port or search f...

Page 66: ...Basic Operation 54 Tap Bluetooth Manager the Serial Port tab Register new serial port ap Register New Server Port or R e T egister New Client Port to enter th Setting screen...

Page 67: ...ix field then the valid options for the COM Index field are 0 7 and 9 oIf you select BTS for the COM Prefix field then the valid options for the COM Index field are 0 to 9 If you no longer need to use...

Page 68: ...ion Serial Port If you have Bluetooth GPS software use the product as instructed and refer to the accompanied documentation and this section to register your Pocket PC as an effective serial port or s...

Page 69: ...Basic Operation 57 1 Tap Bluetooth Serial Port on the screen 2 Register new serial port 3 Tap Register New Server Port or Register New Client Port to enter the Setting screen...

Page 70: ...field then the valid options for the COM Index field are 0 7 and 9 oIf you select BTS for the COM Prefix field then the valid options for the COM Index field are 0 to 9 If you no longer need to use a...

Page 71: ...A255 CPU speed 400MHz Memory RAM 128MB ROM 64MB Display Type 4 Active TFT Transflective Color LCD Resolution 480 x 640 pixels WinCE or 240 x 320 PPC Mode VGA WinCE or QVGA PPC Color 256 for VGA or 64K...

Page 72: ...rt USB 1 1 compatible USB client port Serial port Audio ports Microphone Earphone PCMCIA slot type II x 1 SD slot System Unit Dimensions and Weight Width 90mm W 3 5 Depth 150mm H 5 9 Height 33mm D 1 3...

Page 73: ...Output Voltage DC 10V 3 5A Maximum Power 35 Watts Dimension 108mm 4 2 W x 56mm 2 2 D x 34mm 1 3 H Weight 270 g 9 5 oz Battery Type Lithium Ion Capacity 7 4V 1800mAH Dimension 71mm W 2 8 x 64mm D 2 5...

Page 74: ...ium alloy AZ91D UL grade PC ABS GE C6200 or TN 3813BW Bracket Aluminum 5052 Steel with Nickel plating Stainless Steel S304 Cushion pad Nature rubber PCB FR 4 UL 94V0 Battery Rechargeable Lithium Ion P...

Page 75: ...e DA04I 0 C 45 C 32 F 113 F operating 20 C 60 C 4 F 140 F storage DA04M 10 C 50 C 4 F 122 F operating 40 C 70 C 40 F 158 F storage Humidity 5 95 Non condensing operating 95 maximum storage Altitude 0...

Page 76: ...non alcohol based glass cleaner to the cloth and wipe An air gun is recommended for cleaning water and dust For salty water please wipe with fresh water then blow dry with an air gun Close all caps t...

Page 77: ...rs please follow the dealer s instructions for RMA procedure Shipping instructions 1 Use the original shipping container and packing materials if possible 2 If the original packing materials are not a...

Page 78: ...dware software configuration if applicable 4 Clearly mark the outside of the shipping box with the RMA number This will facilitate faster processing and avoid faulty return 5 Unless prior arrangements...

Page 79: ...1...

Reviews: