background image


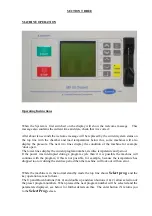
The machine will go through an automatic test process and if it is fitted with autofill, will fill 
with water.  Provided all is correct the machine will display the current time and the message 
'Waiting for start'.  The machine will start when the preset time is reached. 
If the delayed start is pressed accidentally, press it again to turn the function off. 
 
 
Note 
The delayed start time is not part of the program and has to be entered whenever required. 


Standby 

This button only functions on some machines. To speed up the heating process it is possible 
for the machine to maintain the water at a preset temperature, in the case of in chamber 
heated machines the water will be maintained at 40C, this function can be turned on or off for 
each individual program so that sensitive loads will not be effected by prolonged heat 
exposure.  The standby button allows manual override of this function. If the Standby 
indicator is alight then the water will be maintained at this temperature. 


Program set up 

Any of the 25 programs can be changed to suit your specific needs.  If the Smart card 
function has been enabled then you will require a card that has valid access to the program 
you wish to change (see section regarding Smart cards for further details). 
 
Program changes must be carried out while the machine is in standby (Displaying 

Select 

prog.

) Any changes to a program will be automatically saved when they are changed, 

changes made at the slave end will be passed back to the master end when the program is 
started.  When setting times they are displayed in minutes except for the sterilise time which 
is in hours and minutes, temperature is always in degrees centigrade.  Note that some 
functions described may not operate on your machine; if they are disabled then you will not 
be able to select them. 
 
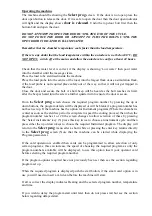
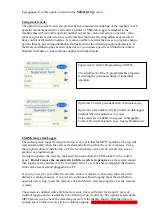
To make changes to the program select the required program number using the up and down 
keys then press the Enter key (5) to return to the Select prog screen now press the Options 
key (5) to display the options menu with the arrow alongside the ‘change program’ function, 
press the Select key (5) again to display the Program settings function, the current ‘free steam 
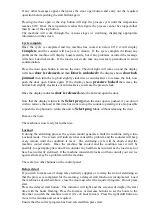
temperature’ will be displayed, use the buttons marked select (1 & 2) to scroll through all the 
different program options available and use the adjust keys (3 & 4) to change the set value, if 
either key is held down the value will start to index rapidly.  Note that some of the items 
listed may not be available on your machine and will not therefore be displayed. 
If no keys are pressed for a short while the display will return to the ‘Select prog’ screen, 
parameters are as follows: 
 
 
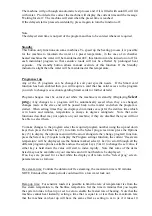
Free steam time: Controls the duration of free steaming, the maximum time is 60 minutes 
NOTE Extended free steam periods could result in a low water lock out. 


Ramp up time:  For sensitive loads it is possible to limit the rate of temperature rise from the 
free steam temperature to the Sterilise temperature. Set the time in minutes that you require 
the system to take to heat up or set to zero to enable the fastest rate of heating.  Note that the 
machine cannot heat instantly, setting a time that is equal to or less than the maximum rate 
that the machine can heat up will have the same effect as setting to zero (ie if it takes 10 

Summary of Contents for GEMINI-MP25 with SmartCard

Page 1: ...Operators Manual GEMINI MP25 with SmartCard Serial number 2140 Rodwell Scientific Instruments Bentalls Basildon Essex England Tel 44 0 1268 286646 Fax 44 0 1268 287799 Manual issue 14 12 10...

Page 2: ...ECHNICAL INFORMATION 7 RISK ASSESSMENT AND SAFETY 8 USER REPONSIBILITES 9 A GUIDE TO THE PLANNING AND IMPLEMENTATION OF YOUR HEALTH AND SAFETY CONTROL MEASURES 10 DISPOSAL CARING FOR THE ENVIRONMENT 1...

Page 3: ...a means of breaking the pressure seal with the door restrained The development of the Rodwell GEMINI has resulted in a unit that is both easy to use and service SAFETY NOTE We recommend that a copy o...

Page 4: ...ard water areas the supply should be treated to avoid chamber element and pipe scaling Distilled water water softening units that use salts reverse osmosis systems or de ionised water supplies are not...

Page 5: ...packing materials are removed from inside the autoclave chamber Fill the chamber with water until display stops displaying Low water message Close the door and tighten the bolt tip of bolt must regist...

Page 6: ...nt program number sterilise temperature and period If the power was interrupted during a program cycle then if it is possible the machine will continue with the program if this is not possible for exa...

Page 7: ...ressing the up or down buttons the program details will be displayed or will be blank if a program number has not been set up If the machine has the option for Instrument programs Where the chamber is...

Page 8: ...r open is pushed if you do not wish to remove the load at this time but want to stop the sounder operating it is also possible to push the stop button to return the unit to Select prog Mode without re...

Page 9: ...they are displayed in minutes except for the sterilise time which is in hours and minutes temperature is always in degrees centigrade Note that some functions described may not operate on your machin...

Page 10: ...top button will cause the machine to abort the current cycle and to immediately start cooling Standby If set to on the water temperature will be maintained at a preset temperature to speed up the heat...

Page 11: ...has occurred take any necessary precautions as the load my not be sterile NOTE you will not be able to reset a lockout condition until the temperature has fallen below 80 C USB Memory This option will...

Page 12: ...to operate the memory stick must be inserted into the USB socket on the control panel Do not remove the memory stick while a cycle is in progress as the system cannot then log the cycle and data may b...

Page 13: ...n suffix MSL is applied to all log names Using the logger display program Please refer to the separate manual for information on using this program A PDF file on the memory stick explains fully how to...

Page 14: ...low water if filling is required Close the door and tighten the bolts until you hear a beep Bottom bolt first Choose the required program cycle if the correct program is not already set then change th...

Page 15: ...epeating the above sequence To re start the cycle simply press the start button once the cause of the fault has been rectified Pressure switch The safety door interlock pressure switch failed to opera...

Page 16: ...thermal lock solenoid does not pull in then the door cannot be opened Turn the bottom lock bolt a little in each direction to try and free it Water level low Out of water Fill with water and restart...

Page 17: ...art Door not closed Tighten door bolts DO NOT FORCE Water level Low Fill with water Water level is not Water too pure detected by probes Setting too high Reset temperature 136 degrees C max Fails to r...

Page 18: ...rinter mechanism press and hold the paper feed button until the mechanism takes the paper and it starts to appear from the front of the printer 4 Ensure that the paper follows the correct path as per...

Page 19: ...Correct paper path Main door release catch Printer release catch PUSH Figure 1 Figure 2 Figure 3 Figure 4 Ribbon above paper Feed paper between ribbon and cartridge...

Page 20: ...fitted 120 5 C 1 0bar 134 C 2 0bar 2 Check that indicating display and alarms function correctly 3 Check pipe connections for signs of leaks 4 Lightly lubricate the door bolt with high melting point c...

Page 21: ...d in the form of a Preventative Maintenance Contract along with Rodwell or NAMAS Calibration Services For details of Service Calibration Contracts contact Rodwell Scientific Instruments Service Depart...

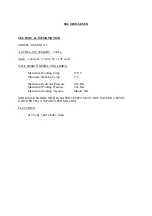
Page 22: ...FE DESIGN OPERATING LIMITS Maximum Working Temp 138 C Minimum Working Temp 7 C Maximum Hydraulic Pressure 4 14 Bar Maximum Working Pressure 2 26 Bar Maximum Working Vacuum Minus1 Bar SODIUM CHLORIDE W...

Page 23: ...through loading and unloading Use Loading Hoist or Loading Trolley Burns and Scolds from opening the autoclave before cycle complete Locks fitted However care should always be taken Damage to Load Pro...

Page 24: ...odium chlorides from the load or from the water used in filling the vessel the operator carries out routine maintenance checks as stated in this manual the operator must is fully trained before using...

Page 25: ...y Records Earth Continuity Test on all metal panels recorded This is a Safety Critical Operation Insulation Type Class1 for Insulation Resistance Test Safety Critical Components adjusted and maintaine...

Page 26: ...y If the Autoclave is to be permanently demolished and or scrapped divide the material to be disposed of according to type and composition as follows 1 Iron or ferrous materials composed of metal alon...

Page 27: ...rent legislation s and guide lines relevant to the country in which the equipment is to be used are obtained and adhered to for the safety of personnel and the safe operation of the equipment Whilst e...

Page 28: ...rts for 2 years 2 off 312 0009 Door Seal 6 off 315 0201 Heater Element 277V 4 off 309 5038 Heater Glands 6 off 836 0180 PT100 Black Probes 2 off 820 0067 Bolt Safety Switch 2 off 309 0763 Thermal Lock...

Page 29: ...piry date Comments Signature Service 3 Date Machine cycle count Engineer s Name Company Name Rodwell certification No Certification expiry date Comments Signature Service 4 Date Machine cycle count En...

Page 30: ...neer s Name Company Name Rodwell certification No Certification expiry date Comments Signature Service 16 Date Machine cycle count Engineer s Name Company Name Rodwell certification No Certification e...

Page 31: ...ick opening doors locking mechanisms may be manually or power operated In the following text the term door should be taken as including the lid of a vertical autoclave DANGERS 7 Autoclaves give rise t...

Page 32: ...s SAFEGUARDS Design 14 All parts of an autoclave its foundations and supporting structures should be properly designed of good construction sound material and adequate strength The requirements for ac...

Page 33: ...inated That may be achieved by using an interlocking arrangement incorporating a temperature sensing device located in that part of the vessel which is expected to remain at the highest temperature at...

Page 34: ...tly robust and securely attached to the autoclave prevent them being distorted overridden or defeated during normal operation They should function reliably be properly maintained and be kept correctly...

Page 35: ...affected by a work activity 37 The Factories Act 1961 Section 30 may apply see HSE Guidance Note GS5 Entry into confined spaces 38 The Pressure Systems and Transportable Gas Container Regulations 1989...

Reviews: