Installation Manual
Alcar
®
H51
7
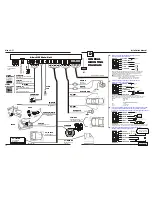
C2
(brown)
input for checking the engine state ON/OFF.
Connect to ON wire (coil) of the
contact key switch.
In order to find this wire:
- Switch the key in contact until the lights in the dashboard turn on;
- Search on the contact key hub the wire on which the voltage is +12V;
In this position and in
START position too, the voltage on this wire should 12V.
NOTE!
There is another wire, marked sometimes ACCESSORIES, used to power up some accessories
(radio, cooler etc.), which pr12V with the key in hub and the engine turned on. However, in
START position the +12V voltage is not provided anymore. Do not confuse with this one!
C3
(green + white)
negative triggered input
, for trunk and hood state closed/opened.
C4
(green)
negative triggered input,
for doors state closed/opened.
Note:
For C3 and C4 negative triggered inputs is important the doors switches type!
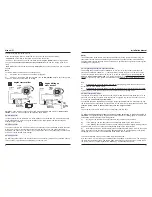
One can check by using a voltmeter the switching type of the doors switches, this way:
1.
Open a door and locate the door switch.
2.
Connect the voltmeter between GND and the main contact of the switch.
3.
If the inside lamp turns on and the voltmeter indicates 0V then
the switching is negative.
In
this case the doors switches will be connected directly to C4, in parallel, according to general
mounting diagram (D)
4.
If the voltmeter indicates 12V, then
the switching is positive. In this case
the connection will
be made by means of a relay according to diagram C.
Relay NO
+12V
La
m
p
Door
switch
85
86
87
30
Relay for positive trigger
doors switches
C
C4/GREEN
Input for negative
trigger switches
C5
(purple)
Input from
(+) pole of the position lights
(for warning when arming with the position
lights turned on).
C6
(white)
Input from
(+) pole of the backlights (for reverse moving warning function).
C7
(yellow) -
open collector, negative trigger and maximum 500mA load output for command of the
external engine killer relay.
In order to use anti-carjacking function, the engine killing will be made on the injection pump, fuel
pump, coil etc.
18
b) From this point the system waits 30s, then it returns to the upper state 3, resuming the warning
signals. If the button 2 of the remote control is pressed again, with contact key in OFF position only,
the system leaves the anti-carjacking mode. It emits 1 acoustic signal for 1s, followed by 2 optical
signals and it enters the disarming mode.
c) If the button 2 is not pressed and the system reaches the state 4, then the exit procedure should
be executed again from point a).
Note:
After entering the anti-carjacking procedure, if the alarm power supply is disconnected, when the
system is powered up again it will enter anti-carjacking state.
5.5.9 Trunk release function
If an interface module RB-04 is connected, for trunk release, it will be actionated pressing long, for
about 2s, button 2 of the remote control.
The function is active
only when the system is disarmed and the engine turned off.
5.5.10 Two level - Door unlocking, when disarming
For two level door unlocking when disarming the system should be provided with the diode D19
on board. This way, the parameter 6 (unlocking doors when disarming)
should be inactivated
.
In this configuration the system doesnt unlock the doors when disarming while pressing the button
1. For unlocking the doors by remote the button 2 must be pressed more than 2 seconds.
Once this
option enabled the trunk release function is not anymore available!
5.5.11 Two steps disarming
Any alarm state can be stoped pressing the button 1 or 2 for short time (aprox. 2s) without the
system to be disarmed. For system disarming when the alarm is triggered, the button 1 should be
pressed twice (once for alarm stoping and seconnd for disarming).
5.6 E
LECTRIC
WINDOWS
CLOSING
WHEN
ARMING
When arming the system, if there is connected an optional module RB-06, then the
windows will
close automatically
.
5.7 R
EVERSE
CAR
MOVING
WARNING
When moving backwards the system warns by optical-acoustical signals (or just optical if the
system was disarmed silent), according to the setting of parameter 2
(see system parameters
programming). This parameter is enabled by default for optical-acoustic notification.
Also, when disarming silent, the reverse car warning is optical only.
5.8 D
OOR
OPENED
WARNING
If, after the engine is turned on, one of the doors remains opened for more than 15s, the system will
warn by 6 optical-acoustical signals, or just optical, according to the value of parameter 3
(see
system parameters programming). This parameter is set by default for
optical-acoustical warn-
ing.
If the disarming was silent, the door-opened warning is optically only.
If a door is opened while riding, the system wil emit the same warning signals, after 15s.
Also, the same warning signals will be emitted when the hood or the trunk are opened.


