background image

PRIMARY

SECONDARY

PROG

TEST

+

-

F3

F2

F1

M1

M2

X

- +

X

Y

Y

Z

Z

COR

13

14

ANT

F4

15

16

17

18

19

20

21

22

23

24

25

26

27

31

32

33

34

35

36

37

29

30

COM

+LAM

+ES

+24V

COM

SC

COM

FT2

FT1

COS2

COS1

COM

ST

COM

ORO

AP

CH

PED

COM

COM

COM

COM

COM

COM

COM

LAM

PED

PP
CH
AP

IN1

ST

CS1
IN2
FT1
FT2

SC

24V

ES

PP

28

AUX

L

N

0

19

0

26

SEC2

SEC1

1
2

3
4

BA

TT

ER

Y CHARGE

R

BATTERY

TRANSFORMER

Blu/Blue

Blu/Blue

L

N

Nero/Black

Nero/Black

Nero/Black

Nero/Black

Blu/Blue

Blu/Blue

- +

MOTOR 1

MOTOR 2

FIFTHY/24

+ -

F4ES-F4S

Series

1 2 3

2 3 4 5

+ -

+ -

TX

RX

1

CS/STD

1

2

POWER SUPPLY

230 Vac / 115 

Vac

BATTERIES

2 x 12V 4,5Ah

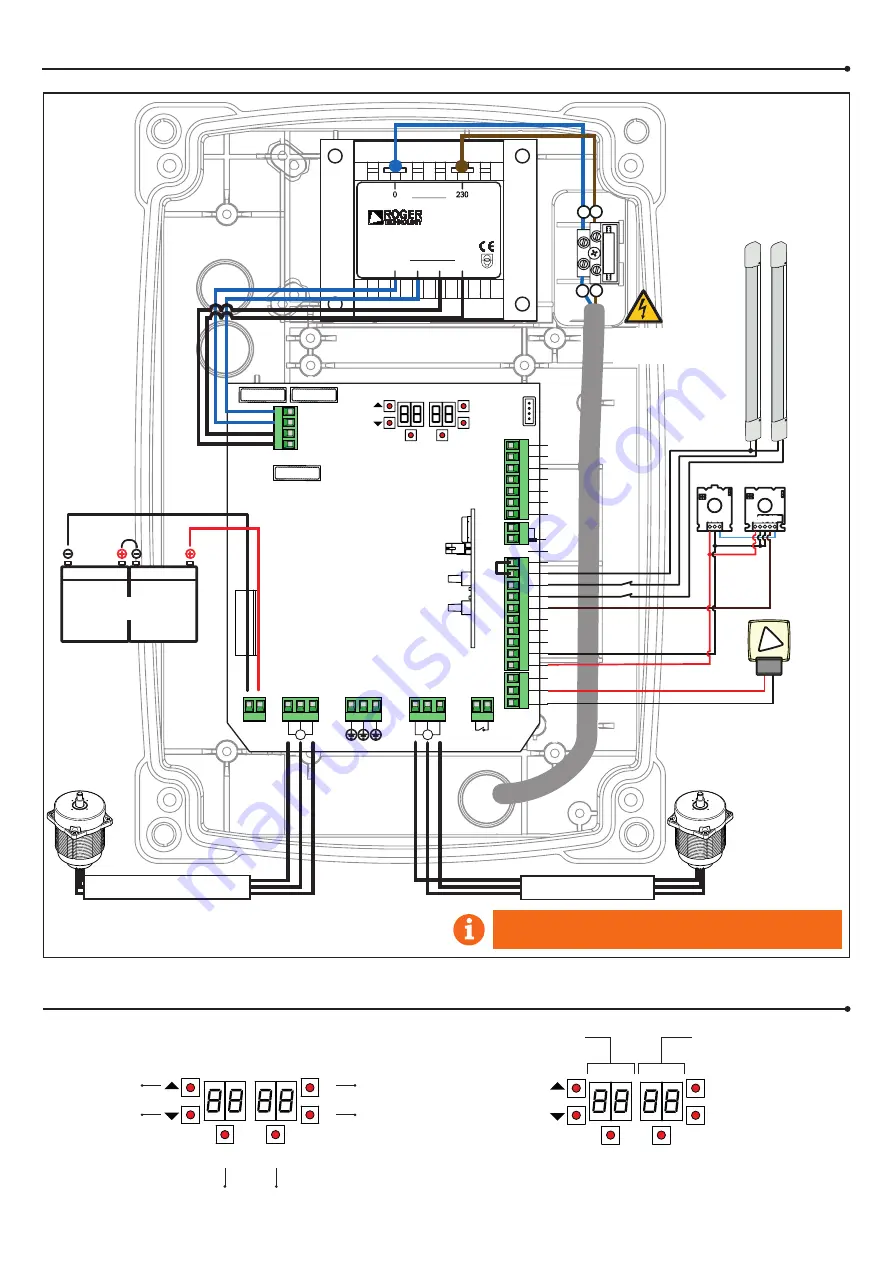
2. Electrical  connections

3. Display: functions and settings

Accessories illustrated are indicative only

PROG

TEST

+

-

Back

Programming Check error alarms

PARAMETER

PARAMETER 

VALUE

Increase value

Decrease value

Next

PROG

TEST

+

-

Summary of Contents for EDGE1

Page 1: ...ulated cable max 10 m 3x4 mm2 max 30 m 1 Photocell Receiver 5x0 5 mm2 double insulated cable max 20 m 2 Photocell Transmitter 3x0 5 mm2 double insulated cable max 20 m 3 Flashing lamp unit 2x1 mm2 double insulated cable max 10 m 4 Antenna RG58 or KX6 50 Ohm cable for external use max 10 m 5 Selector Keypad 3x0 5 mm2 cable max 20 m 1 Typical installation EDGE1 is the range of 36V DC digital control...

Page 2: ... N 0 19 0 26 SEC2 SEC1 1 2 3 4 BATTERY CHARGER BATTERY TRANSFORMER Blu Blue Blu Blue L N Nero Black Nero Black Nero Black Nero Black Blu Blue Blu Blue MOTOR 1 MOTOR 2 FIFTHY 24 F4ES F4S Series 1 2 3 2 3 4 5 TX RX 1 CS STD 1 2 POWER SUPPLY 230 Vac 115 Vac BATTERIES 2 x 12V 4 5Ah 2 Electrical connections 3 Display functions and settings Accessories illustrated are indicative only PROG TEST Back Prog...

Page 3: ...se F3 and wait 5 seconds Reconnect to mains power or refit the fuse Press and hold PROG until the message and appear on the display Repeat acquisition procedure 4 Before starting d Move the gate into the completely CLOSE position e Press TEST button Possible alarms and safety device messages SEE ACQUISITION PROCEDURE PROG TEST PROG TEST PROG TEST a Select the automation system model installed with...

Page 4: ...ment MOTOR2 Deceleration MOTOR 1 during CLOSING Deceleration MOTOR 2 during CLOSING Opening speed Opening speed Closing speed Closing speed Start acceleration MOTOR 2 during opening MOTOR 1 MOTOR 2 6 Setting basic parameters 5 Acquisition procedure 1 Press and hold PROG for 4 seconds 2 APP appears on the display 3 Press PROG 4 AUTO appears on the display 5 MOTOR 1 starts opening at low speed 6 Aft...

Page 5: ... s 3 Hold button A only on the NEW transmitter you want to store 4 The LED flashes 3 s 5 Hold the previously stored transmitter as close as possible to the NEW transmitter 6 Press button A on the OLD transmitter 7 The LED lights for 1 s to confirm that the copy procedure was successful 9 Photocells grounding connection Grounding connection negative terminal COM photocells series F4ES F4S or other ...

Reviews: