Instrument Tour
R&S
®
NGA100
21
Getting Started 5601.8902.02 ─ 03
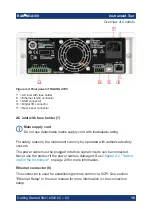
To change the power fuse / mains voltage setting:
1. Peel off the yellow label sticker on the AC inlet.
2. Pull out the fuse holder which is located directly on top of the socket.
3. Remove the preloaded fuses from the fuse holder.
4. Check the rating on the caps of both fuses that you want to change.
By default, the instrument is preloaded with two 230 V fuses.
For more information, see
"Voltage selector (12), Voltage selector label (13)"
5. Once verified, insert the fuses into each groove of the fuse holder.
6. Return the fuse holder to its position in the panel.
To switch on the instrument:
1. Connect the power cable to the AC power connector on the rear panel of the
R&S NGA100.
2. Connect the power cable to the socket outlet.
3. Press [Power] key on the front panel.
The instrument performs a system check, boots the operating system and
starts the R&S NGA100 firmware.
By default, all output channels are turned off when the instrument is switched
on to prevent connected loads from being damaged unintentionally.
During startup, the R&S NGA100 is loaded with the last saved instrument set-
tings from memory location "M1" and auto saved parameters. See "Store and
Recall" in the User Manual.
To switch off instrument:
1. Press [Power] key.
2. Disconnect the AC power cable from the socket outlet.
Switching On the Instrument

