Connecting the R&S AM300 to the AC Line
R&S AM300
E-1007.9922.12
3-40
Operating manual, 02/2005
3.3
Connecting the R&S AM300 to the AC Line
Caution
The R&S AM300 meets the requirements for Safety Class I to DIN EN 61010-
1/IEC 61010-1, e.
g. all metal parts that can be touched or accessed without
removing the enclosure are connected to the protective ground of the power
supply network.
The connection to the AC line is made via a power cord and a connector with
a protective ground contact.
Automatic AC line
voltage
detection
When the R&S AM300 is connected to the AC line, it automatically sets itself
to the correct voltage (range: AC voltage 100 V to 240 V, AC frequency 50 Hz
to 60 Hz). There is no need to set the voltage manually or change the fuse.
Connecting the
AC line
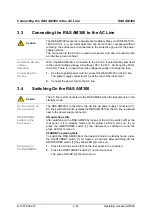
1.
Use the supplied power cord to connect the R&S AM300 to the AC line.
The power supply connector [21] is at the rear of the instrument.
2.
Connect the power cord to the AC line.
3.4
Switching On the R&S AM300
Hazard
The AC line is still connected to the R&S AM300 when the instrument is in the
standby mode.
AC line switch on
the rear panel
The R&S AM300 is connected to the AC line via power supply connector [21].
AC line switch [23] which isolates the R&S AM300 from the AC line is located
next to the power supply connector.
ON/STANDBY
switch on the
front panel
ON operating state
After switching on the R&S AM300 by means of the AC line switch [23] at the
rear panel, it is in standby mode and the yellow LED [2] comes on. If you
press the ON/STANDBY switch [1], the instrument is switched on and the
green LED [2] comes on.
STANDBY operating state
To switch the R&S AM300 from the operating mode to standby mode, press
the ON/STANDBY switch [1] for approx. 2 seconds. After switching off the
ON/STANDBY switch [1] the yellow LED [2] comes on.
Switching on
the R&S AM300
1.
Press the AC line switch [23] on the rear panel in the I position.
2.
Press the ON/STANDBY switch [1] on the front panel.
The green ON LED [2] should come on.
Summary of Contents for AM 300
Page 2: ...02 2005 ...

