Page
10
of 16
Level: 10 / 2020
Enjoy
your results
7. OTHER FEATURES
7.1. Transport / Delivery
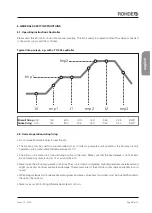
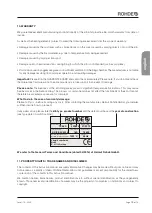
It may be necessary to dismantle the kiln to move it to its final operating position� This is not usually necessary for
smaller models� However, it is easier to transport models from TE 60 upwards if the cover, rings and floor are dis-
assembled� Only use the designated handles or the stand for transportation� When lifting the kiln do not pull the
cover bolt next to the safety switch� There is a risk of pulling the safety switch out of the round hole, which would
affect its functionality� If you pull the switch, this will cause the kiln to switch off and an error message will be displayed�
7.1.1. Dismounting kiln cover
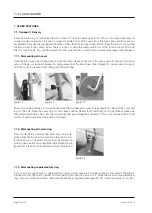
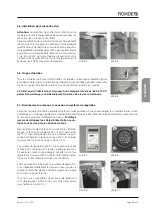
Open the kiln cover� Use a screwdriver to push the metal sleeve on the top of the spring upwards (figure 11) until you
can pull the gas-operated compression spring away from the ball-shaped head (figure 12)� Have a second person
hold the cover to prevent it from falling onto the main ring�
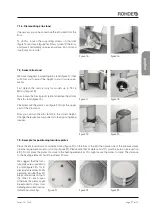
Now use a size 8 Allen key to loosen and remove the two hexagon socket screws (figure 13)� Now lift the cover and
lay it to the side� Place the cover on a smooth, even surface� Never stand it vertically on its side! Please make sure
that safety switch drops back into the round hole after assembling the Toploader� If this is not checked, the kiln will
switch off and an error message will be displayed�
7.1.2. Dismounting kiln main ring
From model TE 60 onwards the main ring can be de-
tached from the floor� For transportation the catch is pro-
tected with a pin� The protection pin must be removed in
order to remove the main ring� Bend the protection pin
(figure 14) so that it is horizontal and pull out of the catch�
7.1.3. Dismounting supplementary ring
If your kiln is equipped with a supplementary ring you must remove it for transportation� Disconnect the electric
connection from the switch cabinet and proceed as described in section 7�1�2� Place the main and supplementary
rings on a smooth, even surface; otherwise the fire bricks might be damaged! Do not stand it vertically on its side!
figure 11
figure 14
figure 12
figure 13
Summary of Contents for Ecotop 20
Page 16: ...Seite 16 von 16 Stand 10 2020 Aus Freude am Ergebnis ...
Page 17: ...english Instruction Manual Electric Toploaders for Ceramics up to 1320 C ...
Page 32: ...Page 16 of 16 Level 10 2020 Enjoy your results ...
Page 33: ...français Mode d emploi Fours électriques verticaux pour la céramique jusqu à 1320 C ...
Page 48: ...Page 16 de 16 Version 10 2020 Pour le plaisir du résultat ...
Page 49: ...italiano italiano Istruzioni per l uso Forni elettrici a pozzetto per ceramica fino a 1320 C ...
Page 64: ...Pagina 16 di 16 Versione 10 2020 Godetevi i vostri risultati ...
Page 65: ...Manual de instrucciones Horno eléctrico de carga superior para cerámica hasta 1320 C español ...
Page 80: ... 10 2020 broon design ...


