background image

In

 t

he

 e

ve

nt

 o

d

et

ec

tin

g

 a

ny

 d

ef

ec

in

 t

he

 p

ro

d

uc

w

ith

in

 t

he

 p

er

io

d

 o

g

ua

ra

nt

ee

yo

m

us

fil

l i

th

fo

llo

w

in

G

ua

ra

nt

ee

 C

er

tif

ic

at

an

d

 s

en

d

 it

 t

us

 s

ta

m

p

ed

 t

og

et

he

w

ith

 a

 c

op

of

 t

he

 s

al

es

 in

vo

ic

vi

em

ai

l s

up

p

or

t@

ro

in

te

.c

o.

uk

 o

to

 t

he

 f

ol

lo

w

in

p

os

ta

l a

d

d

re

ss

IN

D

U

S

TR

IA

S

 R

O

YA

TE

R

M

IC

S

.L

., 

C

/E

P

ar

ce

la 4

3, 3

01

40 S

an

to

m

er

a (

M

ur

ci

a,

 S

p

ai

n)

.

N

B

T

hi

ce

rt

ifi

ca

te

 o

G

ua

ra

nt

ee

 m

us

b

fil

le

d

 in

 f

ul

ly

 in

 o

rd

er

 t

ob

ta

in

 g

ua

ra

nt

ee

 r

ig

ht

s.

 T

he

 d

at

of 

p

ur

ch

ase 

an

se

lle

r’s 

st

am

ar

co

m

p

ul

so

ry

. P

le

ase

, a

tt

ach 

co

py 

of 

yo

ur 

sa

le

in

vo

ic

es

. I

ad

d

iti

on

, f

or 

ne

w c

ons

tr

uc

tio

ns i

nc

lu

d

e t

he C

er

tif

ic

at

e o

f F

irs

t O

cc

up

at

io

n.

C

E

R

T

IF

IC

A

T

E

 O

F

 G

U

A

R

A

N

T

E

RE

F

E

RE

N

C

E

:

 S

E

R

IE

S

:

US

E

R

:

HO

M

E

 A

D

D

R

E

S

S

:

TO

W

N

:

POS

T

C

O

D

E

:

P

R

O

V

IN

C

E

CO

U

N

T

R

Y

:

TE

L

E

P

H

O

N

E

:

SE

L

L

E

R

’S

 S

TA

M

P

:

PU

R

C

H

A

S

E

 D

A

T

E

:

EM

A

IL

:

C

E

R

TI

FI

C

AT

E O

F G

U

A

R

A

N

TE

E

C

ut al

on

g t

he d

ot

te

d l

in

Summary of Contents for DELTA ULTIMATE

Page 1: ...Instructions manual Mounting installation start up and operation DELTA Ultimate radiator ...

Page 2: ...u very much for choosing Rointe heating Before using the low consumption DELTA Ultimate digital electric radiators we recommend you to read this instruction manual in order to ensure correct operation Thank you ...

Page 3: ...ion 8 1 4 Locking the control panel 9 1 5 Setting the day and time 9 1 6 Main menu 11 1 7 Open windows function 23 2 INSTALLATION MOUNTING 24 2 1 Mounting 24 2 2 Fixing the supports 25 2 3 Placing the radiator 26 3 MAINTENANCE CLEANING 27 4 INSTALLATION SAFETY PRECAUTIONS EN 60335 STANDARDS 27 4 1 Installation precautions 27 4 2 Safety precautions 27 5 GUARANTEE 29 ...

Page 4: ...ON OF THE DELTA ULTIMATE RADIATOR 1 1 Front panel description ICON INDICATION On Off Accept Decrease temperature Move left Increase temperature Move right Access Back to menu Move up Access to program menu Move down ...

Page 5: ...ay NUM INDICATION 1 Programming hours 2 Days of the week 3 Time of day 4 Selected temperature 5 Locking the control panel 6 Manual Automatic functions 7 Comfort Economy Anti frost modes 8 Net connection status 1 3 9 8 7 11 10 2 4 5 6 ...

Page 6: ... Energy consumption indicator green yellow red Heating element on Fuzzy Logic Energy Control working Connected to the server and router sending and receiving Connected to the server and router maximum net signal Connected to the server and router minimum net signal Not connected to the server or to the internet Connected to router Not connected to the server Not connected to the router ...

Page 7: ...ing Manual function on when USER function is working Pilot wire control function on when USER function is working Locked through radiator control panel Remote lock Locked through IR remote control or Rointe Connect App 1 2 Switching On Off stand by By pressing the key you can switch the radiator on or off The following image will appear on the screen when the radiator is switched on ...

Page 8: ...mode with the word standby displayed After 5 seconds the Rointe logo will appear 1 3 Temperature selection By pressing or you can change the temperature When the room temperature is lower than the set temperature the radiator will come on with the symbol appearing When the Fuzzy Logic Enery control technology is functioning this symbol will appear instead of ...

Page 9: ...he following symbol will appear on the screen if any button is pushed To unlock press the and buttons together for 3 seconds When the radiator is locked from the App or the AIR Control remote the remote keypad lock will appear on the screen If any button is pressed the image on the right will be displayed When the keypad has been locked remotely it can only be unlocked remotely via the App or the ...

Page 10: ...ess to access In the configuration menu use the and buttons to select the clock option and press to access Press the button the hours minutes and days of the week will flash according to the number of times it is pressed 1 for hours 2 for minutes and 3 for day of the week Pressing the buttons and set the correct time and day Confirm by pressing the button To leave the time and date adjust feature ...

Page 11: ...on the following screen take you to the following submenus Settings submenu Energy submenu Balance function Program submenu 1 6 1 Settings submenu The submenu settings configure technical parameters To access select the icon displayed in the main menu screen Pressing the buttons and we can move across the different options on the submenu The screen shown on the right appears The icons represent th...

Page 12: ...ress to exit Internet settings This prepares the product to communicate with the selected Wi Fi network To start the PAIRING mode press the network configuration option On the next screen the name of the network NET and password PIN will appear Press the button to exit the pairing mode and return to the main screen Pairing your device To pair your device with your home internet network correctly f...

Page 13: ...utes and day of the week in the product To set the time and day in your product refer to section 1 5 1 6 2 Energy submenu The Energy submenu provides access to functions related with the energy management Access by selecting the icon from the main menu to enter the screen shown on the right The icons represent the following options Open windows function Rointe eye detect function only Class II pro...

Page 14: ...when the radiator temperature sensor reads a drop of at least 4ºC in 30 minutes Rointe eye detect function Only available on Class II products Allows you to enable or disable the Rointe eye detect function With the keys and select ON to activate or OFF to disable Once the desired option is selected press to confirm and return to the temperature main screen Effective power function This function di...

Page 15: ...formation option using the keys and and confirm pressing the button To leave press 1 6 3 Balance submenu The balance function returns the radiator to a constant 19 C Access this submenu by selecting the from the main menu By pressing this option the radiator will return to the main screen in Manual function with the temperature set to 19ºC 1 6 4 Program submenu This section explains the operationa...

Page 16: ... 3 Automatic function This function activates the programming that has been previously set in the radiator Pilot Wire function This function allows the radiator to be controlled by a central programmer What are Comfort Eco and Anti frost modes These modes are the different temperature ranges available within the product Icon Mode Temperature range Comfort From 19ºC to 30ºC Eco From 7 5ºC to 18 5ºC...

Page 17: ...lowing Manual Automatic functions Start programming User function Pilot wire mode only Class II products Manual Automatic functions Press the button to switch between manual and automatic functions In the main screen the symbol will appear for the Automatic function and the symbol for the Manual function The automatic function activates the programming you have already established in the product ...

Page 18: ...l flash Press and proceed to the selection of the Eco temperature between 7 5ºC and 18 5ºC The symbol and the temperature will flash After pressing the button once again the days of the week will start flashing and show as DAY 1 DAY 2 DAY 3 We can go forwards and backwards using the button and Press to select the day or days that you wish to program Select DAY 3 Select ECO temperature 2 Select COM...

Page 19: ...the button you can select between Comfort Eco and Anti frost modes for every hour 12h To finish the programming press or leave it for 30 seconds without pressing any buttons To change the programming go back to point 1 and proceed as described before User function To enter the User function select the icon using the and buttons and confirm by pressing Set Mode to each HOUR 4 ...

Page 20: ...following icons will appear on the main screen depending on which mode it is currently in Automatic Manual or Pilot To access this feature enter the PIN code the default PIN code is 0000 Enter the numbers using the buttons and and confirm by pressing If the PIN is entered incorrectly the INCORRECT PIN screen will show Once the PIN number has been entered correctly the main control screen will be s...

Page 21: ...function and when in Pilot Wire control function At the top of the screen the icon will appear when in Automatic function and a when in Manual function If the icon appears the radiator will be set on Pilot Wire function Changing the PIN code You can change the access PIN code for this feature To access first introduce the current PIN code Use the and buttons The default PIN is 0000 If this PIN cod...

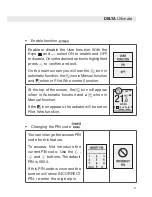
Page 22: ...the radiator Using the and buttons scroll through until you reach your desired upper maximum working temperature Press to confirm and exit Lower temperature limit This sets the lower limit of the working temperature of the radiator Using the and buttons scroll through until you reach your desired lowest minimum working temperature Press to confirm and exit To exit press the button or leave the rad...

Page 23: ... the main screen the symbol will appear The pilot wire mode allows your heating only to be controlled via a pilot wire programmer That means you can not use the Rointe Connect App to manage the products 1 7 Open windows function This function is activated when the temperature sensor detects a drop of 4ºC from the set temperature within 30 minutes On activation of this function the following image ...

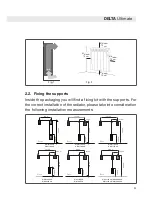
Page 24: ...t never be installed immediately below a power point In bathrooms the radiator must never be installed where the switches and other devices may be within the reach of someone in the shower or bathtub 2 1 Mounting The DELTA Ultimate radiator works by means of natural air convection Figure 1 In order to achieve optimal functioning and an even distribution of heat the lower part of the radiator once ...

Page 25: ...r please take into consideration the following installation measurements DIW0330RAD DIB0330RAD Floor 260 mm 260 mm 680 mm 680 mm 79 mm 79 mm 162 mm 245 mm 325 mm 405 mm 243 mm 405 mm 567 mm 730 mm 894 mm 680 mm 680 mm 680 mm 680 mm 260 mm 260 mm 260 mm 260 mm Floor Floor Floor Floor Floor DIW0990RAD DIB0990RAD DIW0550RAD DIB0550RAD DIW1210RAD DIB1210RAD DIW1430RAD DIW1600RAD DIB1430RAD DIB1600RAD ...

Page 26: ...he provided cardboard template against it Make small marks on the places where the holes of the template are located Remove the template Make holes in the wall where the marks are Place the upper brackets on the wall using the plugs and screws provided within the packaging Place the bottom bracket checking its correct position Hang the radiator from the top ...

Page 27: ...s The radiator is designed for household or residential use You are advised to have the radiator installed by an authorized dealer or personnel Make sure the radiator is properly connected to 240V and is earthed 4 2 Safety precautions This appliance can be used by children aged from 8 years and above and persons with reduced physical sensory or mental capabilities or lack of experience and knowled...

Page 28: ...r the heater Don t insert any kind of object in the air vents Never use with wet hands Don t place any containers with water such as glasses vases etc on the radiator Don t use insecticides paints or aerosols on the radiator Don t sit on the radiator or place anything in front of it European Directive 2012 19 EC Under the European Directive 2012 19 EC on waste electrical and electronic equipment W...

Page 29: ...your Rointe radiator can be seen to quickly by the manufacturer Rointe provides a contact telephone number for any technical support 01432 598 024 or the following email address support rointe co uk through which we will instruct you on how to solve the problem You will need to state the product reference located on the label indicating product features serial number date of purchase and the type ...

Page 30: ...d or modified after the original product purchase 5 3 2 The guarantee only applies to those cases that concern material design and manufacturing defects and under no circumstances covers damage to the radiator for the following reasons a Incorrect use of the product i e used for other purposes that are not construed as its normal use or for not respecting the instructions of use and maintenance gi...

Page 31: ...er s only protection Rointe its offices distributors and installers may not be held responsible for any accidental damage that emerges due to infringement of any rules implicitly related to this product 5 6 All the materials are covered by the respective guarantees for any manufacturing faulty from the date of sale and acceptance of the fault by our Technical department will be required before the...

Page 32: ...AD DIB0550RAD 5 550 W 230 V 585 510 97 120 13 3 kg DIW0770RAD DIB0770RAD 7 770 W 230 V 585 675 97 120 17 5 kg DIW0990RAD DIB0990RAD 9 990 W 230 V 585 835 97 120 21 5 kg DIW1210RAD DIB1210RAD 11 1 210 W 230 V 585 992 97 120 25 2 kg DIW1430RAD DIB1430RAD 13 1 430 W 230 V 585 1 160 97 120 27 kg DIW1600RAD DIB1600RAD 15 1 600 W 230 V 585 1 320 97 120 33 2 kg ...

Page 33: ...E Parcela 43 30140 Santomera Murcia Spain NB This certificate of Guarantee must be filled in fully in order to obtain guarantee rights The date of purchase and seller s stamp are compulsory Please attach a copy of your sales invoices In addition for new constructions include the Certificate of First Occupation CERTIFICATE OF GUARANTEE REFERENCE Nº SERIES USER HOME ADDRESS TOWN POSTCODE PROVINCE CO...

Page 34: ......

Page 35: ......

Page 36: ...R15V2 UK ROINTE UK Catalyst House 720 Centennial Court Centennial Park Elstree Herts WD6 3SY Technical Support T 01432 598 024 Contact T 01432 598 019 F 0208 953 5861 rointe rointe co uk www rointe co uk ...

Reviews: