2
Programmable thermostat
EASY SETUP GUIDE
ST.2
EN
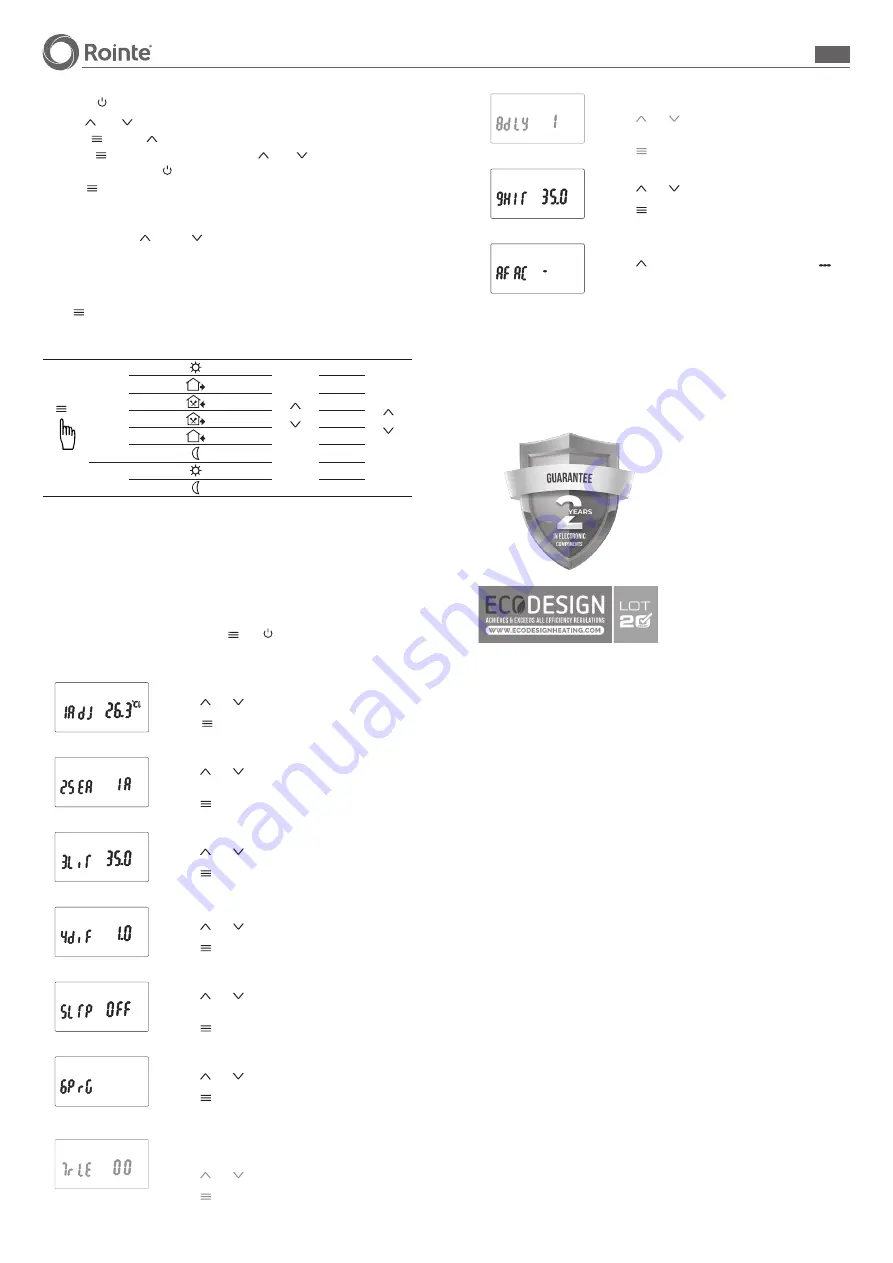
USER OPERATION
1. On / Off “ ”
2. Press “ ” or “ ” to increase or decrease the temperature.
3. Press “
“ and “ ” hold for 5 seconds at the same time to adjust time.
Press “ “ to choose object to adjust; Press “ ” or “ ” to increase or decrease
your set values; Press “ ” to confirm and exit.
4. Press “ “ key to select manual mode or clock-controlled program mode.
5. It displays the time or the temperature alternatively, and it displays the measured
temperature directly.
6. When you press “ ” and “
” at the same time and hold for 5 seconds, the
thermostat will be locked/unlocked. When it is locked, no operation can be carried
out until it is unlocked.
PERIOD PROGRAMMING
Press “ “ key and hold for 5s to start programming.
KEY
EVENT
SYMBOL
TIME
MODIFY
TEMP.
MODIFY
Day
1-5
1
06:00
Event
Time
20ºC
Temp.
2
08:00
15ºC
3
11:30
15ºC
4
12:30
15ºC
5
17:00
22ºC
6
22:00
15ºC
Day
6-7
1
08:00
22ºC
2
23:00
15ºC
SENSOR FAILURE
E0
: Built-in sensor short-circuited or disconnected.
E1
: External sensor short-circuited or disconnected.
When shows E0/E1 error, thermostat must be checked until the error is eliminated.
ADVANCED SETTINGS
When the thermostat is powered off, press “ “ & “ ” keys simultaneously.
1ADJ: Temperature calibration
Press
“ ”
or
“ ”
key to adjust present checked value,
adjustable scale: ±9,9ºC
Press
“ “
key to enter to next step.
2SEN: Sensor mode
Press
“ ”
or
“ ” key to choose sensor working mode
IN: built-in (air). OUT: floor sensor. All: both sensors, in this
mode floor sensor will be the limit sensor.
Press “ “
key to enter to next step.
3LIT: Max. floor temperature
Press
“ ”
or
“ ”
key to set the temperature floor.
Range: 5~60ºC
Press “ “
key to enter to next step.
4DIF: Sensor tolerance
Press
“ ”
or
“ ”
key to set your sensor tolerance.
Range: 0,5~10ºC
Press “ “
key to enter to next step.
5LTP: Anti-frost mode
Press
“ ”
or
“ ”
key turn on/off.
If you activate it, the anti-frost will start when the thermostat
is off.
Press “ “
key to enter to next step.
12345
6PRG: Set program day mode
Press
“ ”
or
“ ”
key to choose your program day cycles:
5/2 days; 6/1 days; 7 days.
Press “ “
key to enter to next step.
Not applicable to electric systems.
For Rointe electric systems, please skip this step.
7RLE: Potential-free output and main power output in
same/different way
Press
“ ”
or
“ ”
key to change the present linkage state.
00: in same way; 01: in different way.
Press “ “
key to enter to next step.
Not applicable to electric systems.
For Rointe electric systems, please skip this step.
8DLY: Delay time of potential-free output
Press
“ ”
or
“ ”
key to change the present linkage delay
time.
Range: 0~5min
Press “ “
key to enter to next step.
9HIT: Max. air temperature
Press
“ ”
or
“ ”
key to set the temperature air.
Range: 35~90ºC
Press “ “
key to enter to next step.
AFAC: Reset to factory settings
Press
“ ”
key for 5 seconds until the screen shows
Range: 35~90ºC
Switch thermostat off to save your settings
.
GUARANTEE
Rointe guarantees this product, to be free from defects in the workmanship or materials,
under normal use and service, for a period of two (2) years from the date of purchase by
the consumer. If at any time during the guarantee period the product is determined to be
defective, Rointe shall repair or replace it, at Rointe’s discretion.
If the product is defective, please either,
i) return it, with a bill of sale or other dated
proof of purchase, to the place from which
you purchased it or
ii) contact Rointe. Rointe will determine
whether the product should be returned,
or replaced.
This guarantee does not cover removal
or reinstallation cost, and shall not apply
if it is shown by Rointe that the defect or
malfunction was caused by damage which
ocurred while the product was in the
possession of the end user.
Rointe’s sole responsibility shall be to repair
or replace the product within the terms
stated above.
ROINTE SHALL NOT BE LIABLE FOR ANY LOSS OR DAMAGE OF ANY KIND, INCLUDING ANY
INCIDENTAL OR CONSEQUENTIAL DAMAGES RESULTING, DIRECTLY OR INDIRECTLY, FROM
ANY BREACH OF ANY WARRANTY, EXPRESSED OR IMPLIED, OR ANY OTHER FAILURE OF THIS
PRODUCT. THIS WARRANTY IS THE ONLY ECPRESS WARRANTY ROINTE MAKES ON THIS
PRODUCT. THE DURATION OF ANY IMPLIED WARRANTIES, INCLUDING WARRANTIES FOR
COMMERCIAL USE OR FIT FOR A PARTICULAR PURPOSE, IS HEREBY LIMITED TO THE TWO-
YEAR DURATION OF THIS WARRANTY.
This Warranty does not affect your statutory rights.
Please register your product at:
www.rointe.co.uk


