background image

45

TOVARE 

OVAL

FR

Ne pas pulvériser ou mouiller le produit. Pendant le fonctionnement, tenez 
le produit éloigné des matériaux combustibles tels que les rideaux, les 
meubles, etc. Ne placez rien d’autre que des vêtements, des serviettes ou 
des tissus ininflammables sur le produit.
Le sèche-serviettes doit être installé de manière à ce que la prise de 
courant soit toujours accessible. Le câble d’alimentation ne doit jamais 
être en contact avec le produit pendant son fonctionnement.

AVERTISSEMENT - 

Ne touchez jamais le produit avec les mains 

ou toute autre partie du corps mouillée.

AVERTISSEMENT - 

Certaines parties de ce produit peuvent 

devenir très chaudes et causer des brûlures. Une attention 
particulière devrait être accordée lorsque des enfants et des 
personnes vulnérables sont présents. 

Contenu

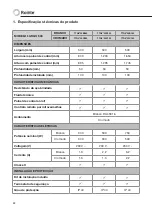
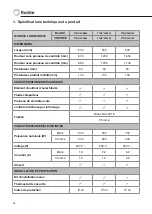
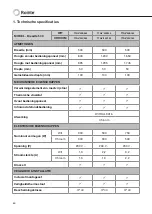
1. Spécifications techniques du produit  .................................................................................................... 46
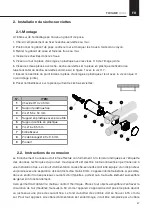
2. Installation d’un sèche-serviettes Rointe .......................................................................................... 47

2.1. Montage ....................................................................................................................................... 47
2.2. Instructions de connexion .................................................................................................................. 47
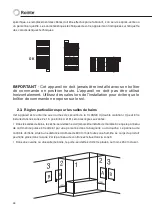
2.3.  Règles particulières pour les salles de bains................................................................................... 48

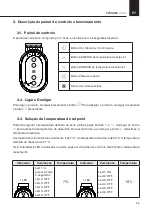
3. Description du panneau de contrôle et de son fonctionnement.............................................................. 49

3.1.  Panneau de contrôle............................................................................................................................. 49
3.2. Mise en marche et mise en veille......................................................................................................... 49
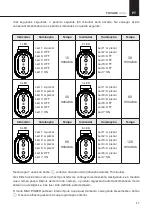
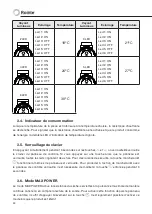
3.3. Sélection de la température de consigne............................................................................................. 49
3.4. Indicateur de consommation.............................................................................................................. 50
3.5. Verrouillage du clavier........................................................................................................................ 50
3.6. Mode MAX POWER....................................................................................................................... 50
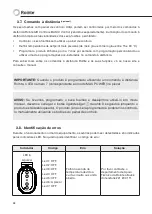
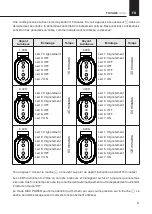
3.7. Contrôle par télécommande............................................................................................................ 52
3.8. Identification des erreurs..................................................................................................................... 52

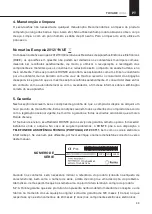
4. Entretien et nettoyage ........... ....................................................................................................................  53
5. Garantie ............................................. ......................................................................................................  53
6. Comment enregistrer la garantie du produit ....................................... ................................................  55
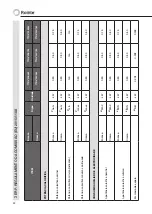
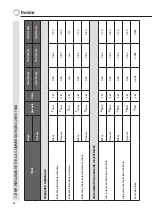
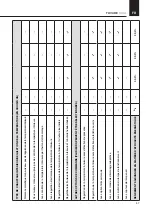
7. ERP. Règlement de la Commission (EU) 2015/1188. ............................................................................  56

Summary of Contents for Tovare electric OVAL 500

Page 1: ...ellen OVAL 500 MANUAL DE INSTALACIÓN Y USO Página 16 MANUAL DE INSTALAÇÃO E UTILIZAÇÃO Página 30 ES PT INSTRUCTIONS INSTALLATION GUIDE Page 02 EN INSTALLATIE EN GEBRUIKERSHANDLEIDING Bladzijde 58 NL MANUEL D INSTALLATION ET D UTILISATION Page 44 FR ...

Page 2: ...ons with reduced physical sensory or mental capabilities or lack of experience and knowledge if they are supervised or have been given instruction concerning use of the appliance in a safe way and understand the hazards involved Children should not play with the appliance Cleaning and user maintenance should not be carried out by children without supervision Children must be supervised at all time...

Page 3: ...body parts CAUTION Some parts of this product may become very hot and cause burns Particular care should be taken when children and vulnerable persons are present Contents 1 Technical Specifications 4 2 Product Installation 5 2 1 Mounting 5 2 2 Connecting instructions 5 2 3 Specific regulations for bathrooms 6 3 Control panel description and functions 7 3 1 Control panel 7 3 2 Power and Stand by 7...

Page 4: ...Depth mm 50 50 50 Installed depth mm 100 100 100 MECHANICAL CHARACTERISTICS Stainless steel heating element Thermal fluid Oval control panel Infrared remote control Finish White RAL 9016 Chrome ELECTRICAL CHARACTERISTICS Nominal power W White 300 500 750 Chrome 300 300 500 Voltage V 230 V 230 V 230 V Current A White 1 3 2 2 3 2 Chrome 1 3 1 3 2 2 Clase II SAFETY INSTALLATION Installation kit inclu...

Page 5: ... x 45 mm rawl plug 2 Bracket 3 5 5 x 50 mm screw 4 Plastic bracket with M6 nut 5 Bracket head 6 6 x 35 mm screw 7 Cap 8 8 x 26 mm fixig screw 9 Product 2 2 Connecting instructions Connection to the mains must be made observing the voltage stated on the product technical data label This product is designed to be permanently installed connected to fixed facilities The product power supply circuit mu...

Page 6: ...ntrol panel will not be in contact with the floor 2 3 Specific Regulations for Bathrooms This product can be safety installed in Zones 3 For installations in Zones 2 check the scheme below please consider the following limitations In bathrooms the product must never be installed in such a way that the control panel may be touched by someone in the bathtub or having a shower The control panel shoul...

Page 7: ...mperature selection You can regulate the set temperature of the towel rail by the buttons and Pressing the key increases the setpoint temperature In the same way pressing the key reduces the setpoint temperature The minimum operating temperature is 7ºC and the maximum is 30ºC The factory set temperature is 21ºC The 6 LED indicators located in the upper part of the control panel identify the establ...

Page 8: ...nds you can lock unlock the control panel keypad If any key is pressed while the panel is locked all the LEDs will flash twice For safety reasons the on off button will respond even if the panel is locked To switch the product on or off when the panel locked press and hold the button for 3 seconds 3 6 MAX POWER mode The MAX POWER mode activates the towel rail heating element to maximum power conti...

Page 9: ...ed 1 flashing Led 2 flashing Led 3 flashing Led 4 flashing Led 5 flashing Led 6 flashing Led 7 ON 120 minutes If you press the button 7 times you will return to the starting point activation for 15 minutes The LEDs will work as a countdown turning off as the time elapses Once the time has elapsed the product will automatically return to the previous mode or will switch off if it was already in sta...

Page 10: ... the product unlocked The product will no longer be programmed and you will be able to control it manually using the buttons on the control panel 3 8 Troubleshooting During normal operation of the towel rail any malfunctions can be indicated by the LED indicators on the product See table below to identify the error codes Indicator Code Error Solution LED 6 flashing Led 1 OFF Led 2 OFF Led 3 OFF Le...

Page 11: ...01 553 0523 for technical support If you live in a different country please check the correct phone number on the back of this manual TOVARE 500 300W TTOVN45B080 300 W You will need to state the product reference located on the label indicating product features serial number proof of purchase and the type of incident at hand when contacting us so that we can check the guarantee In addition please ...

Page 12: ...the control of Rointe such as lightning fires floods public disorders etc 5 3 3 Any repairs or substitutions that are included in this guarantee do not allow any additions or new periods of guarantee 5 3 4 Any repairs or substitutions covered under this guarantee must be parts that are functional ly equivalent The defective parts or parts removed or replaced shall become the property of Rointe 5 4...

Page 13: ...se such as invoice in PDF JPEG or PNG format This is not mandatory but by doing so you ensure your guarantee period is accurate 7 Click Register 8 Congratulations Your product is now registered EMAIL 1 Send an email to support rointe co uk with the following information Customer name Address and postcode Telephone number and email address Product reference as described above Serial number as descr...

Page 14: ...nom kW 0 30 0 30 0 50 Minimal heat output P min kW n a n a n a Maximum continuous heat output White P max c kW 0 30 0 50 0 75 Chrome P max c kW 0 30 0 30 0 50 AUXILIARY ELECTRICITY CONSUMPTION At nominal heat output White el MAX kW 0 30 0 50 0 75 Chrome el MAX kW 0 30 0 30 0 50 At minimum heat output White el MIN kW 0 30 0 50 0 75 Chrome el MIN kW 0 30 0 30 0 50 In standby mode el SB kW 0 002 0 00...

Page 15: ... temperature control Electronic indoor temperature control and daily timer Electronic indoor temperature control and weekly timer OTHER CONTROL OPTIONS MULTIPLE SELECTIONS POSSIBLE Interior temperature control with presence detection Interior temperature control with detection of open windows With remote control distance option With adaptive start up control With operating time limitation With bla...

Page 16: ...onocimientos siempre que estén supervisados o hayan recibido instrucciones sobre el uso del aparato de forma segura y entiendan los peligros que conlleva Los niños no deben jugar con el aparato La limpieza y el mantenimiento del usuario no deben ser realizados por los niños sin supervisión Los niños deben ser supervisados en todo momento para asegurarse de que no interfieren con el producto Este p...

Page 17: ...drían ponerse muy calientes y causar quemaduras Se debe prestar atención especial cuando niños y personas vulnerables estén presentes Contenido 1 Especificaciones técnicas de producto 18 2 Instalación del secatoallas Rointe 19 2 1 Montaje 19 2 2 Normas de conexión 19 2 3 Reglas particulares para los cuartos de baño 20 3 Descripción del panel de control y funcionamiento 21 3 1 Panel de control 21 3...

Page 18: ... 50 50 50 Fondo instalado mm 100 100 100 CARACTERÍSTICAS MECÁNICAS Resistencia de acero blindado Fluido térmico Panel de control oval Control a distancia por infrarrojos Acabado Blanco RAL 9016 Cromo CARACTERÍSTICAS ELÉCTRICAS Potencia nominal W Blanco 300 500 750 Cromo 300 300 500 Voltaje V 230 V 230 V 230 V Corriente A Blanco 1 3 2 2 3 2 Cromo 1 3 1 3 2 2 Clase II INSTALACIÓN Y PROTECCIÓN Kit de...

Page 19: ... Soporte de plástico con tuerca M6 5 Cabezal de plástico soporte 6 Tornillo Ø 6 x 35 mm 7 Embellecedor de plástico soporte 8 Tornillo de bloqueo Ø 2 9 x 9 5 mm 9 Producto 2 2 Normas de conexión La conexión a la red debe efectuarse respetando la tensión indicada en la etiqueta de características técnicas del producto Este aparato está destinado a ser permanentemente conectado a una instalación fija...

Page 20: ...uelo 2 3 Reglas particulares para los cuartos de baño Este aparato es conforme con las normas de seguridad de CLASE II doble aislamiento Puede estar instalado en las Zonas 2 y 3 posiciones A y B siempre que se respeten las siguientes normas En los cuartos de baño el secatoallas nunca debe ser instalado de tal forma que el panel de control puedan ser alcanzado por una persona que se encuentre en la...

Page 21: ...e el mismo 3 3 Selección de temperatura de consigna Podemos regular la temperatura de consigna del secatoallas mediante los pulsadores y Al pulsar la tecla incrementamos la temperatura de consigna De igual manera al pulsar la tecla reducimos la temperatura de consigna La temperatura mínima de funcionamiento es de 7ºC siendo la máxima de 30ºC La temperatura configurada desde fábrica es 21ºC Los 6 i...

Page 22: ...ía parpadeará el último led indicativo de temperatura 3 5 Bloqueo de teclado Pulsando simultáneamente durante 3 segundos las teclas y bloqueamos desbloqueamos el teclado del panel de control Si pulsamos cualquier tecla estando el panel bloqueado parpadean todos los leds 2 veces Por seguridad el botón de encendido apagado si responderá aun estando el panel bloqueado Para realizar la acción de encen...

Page 23: ... parpadeo Led 2 parpadeo Led 3 parpadeo Led 4 parpadeo Led 5 OFF Led 6 OFF Led 7 ON 60 minutos Indicador Iluminación Tiempo Indicador Iluminación Tiempo 5 LED Led 1 parpadeo Led 2 parpadeo Led 3 parpadeo Led 4 parpadeo Led 5 parpadeo Led 6 OFF Led 7 ON 90 minutos 6 LED Led 1 parpadeo Led 2 parpadeo Led 3 parpadeo Led 4 parpadeo Led 5 parpadeo Led 6 parpadeo Led 7 ON 120 minutos Si pulsamos 7 veces...

Page 24: ...E Cuando el producto es programado utilizando un mando a distancia Rointe el led número 7 correspondiente al modo MAX POWER parpadeará AVISO Si hemos programado nuestro secatoallas y deseamos volver a utilizaro en modo manual deberemos mantener pulsado el botón de encendido apagado durante 3 segundos estando el producto desbloqueado El producto dejará de estar programado y podremos controlarlo man...

Page 25: ...ción a la correcta eliminación de su aparato 5 Garantía En este apartado se describen las condiciones de garantía que dispone el comprador al haber adquirido un nuevo producto de la marca Rointe Estas condiciones reúnen todos los derechos que tiene el comprador de acuerdo con la legislación nacional vigente así como la garantía y los derechos adicionales que ofrece la marca Rointe 5 1 Cualquier in...

Page 26: ...o la instalación o el uso incorrecto del producto que pueda no cumplir con las normas técnicas de seguridad vigentes ii La corrosión de cualquier parte del producto causada por la exposición directa al agua salada Cuando el producto se instale a menos de 200 m de la costa el período de garantía para los daños causados por la corrosión se reducirá en un 50 iii Cualquier modificación no autorizada o...

Page 27: ...al aseguras de que tu período de garantía es exacto 7 Haga clic en Registro Enhorabuena Su producto ya está registrado CORREO ELECTRÓNICO 1 Envía un correo electrónico a sat rointe com con la siguiente información Nombre del cliente Dirección y código postal Número de teléfono y dirección de correo electrónico Referencia del producto alfanumérica y en mayúsculas Número de serie 26 dígitos situados...

Page 28: ... 0 30 0 30 0 50 Potencia carlorífica mínima P min kW n a n a n a Potencia carlorífica máxima continuada Blanco P max c kW 0 30 0 50 0 75 Cromo P max c kW 0 30 0 30 0 50 CONSUMO AUXILIAR DE ELECTRICIDAD A potencia calorífica nominal Blanco el MAX kW 0 30 0 50 0 75 Cromo el MAX kW 0 30 0 30 0 50 A potencia calorífica mínima Blanco el MIN kW 0 30 0 50 0 75 Cromo el MIN kW 0 30 0 30 0 50 En modo de es...

Page 29: ... interior Control electrónico de temperatura interior y temporizador diario Control electrónico de temperatura interior y temporizador semanal OTRAS OPCIONES DE CONTROL PUEDEN SELECCIONARSE VARIAS Control de temperatura interior con detección de presencia Control de temperatura interior con detección de ventanas abiertas Con opción de control a distancia Con control de puesta en marcha adaptable C...

Page 30: ...tais reduzidas ou com falta de experiência e conhecimentos se lhes tiver sido dada supervisão ou instruções relativas à utilização do aparelho de uma forma segura e compreender os perigos envolvidos As crianças não devem brincar com o aparelho A limpeza e a manutenção do utilizador não devem ser feitas por crianças sem supervisão As crianças devem ser sempre supervisionadas para garantir que não i...

Page 31: ...lhada CUIDADO Partes deste produto podem tornar se muito quentes e causar queimaduras Preste especial atenção quando estão presentes crianças e pessoas vulneráveis Conteúdo 1 Especificações técnicas do produto 32 2 Instalação do seca toalhas Rointe 33 2 1 Montagem 33 2 2 Regras de ligação 33 2 3 Regras instalação nas casas de banho 34 3 Descrição do painel de controlo e funcionamento 35 3 1 Painel...

Page 32: ...0 50 50 Profundidade instalado mm 100 100 100 CARACTERÍSTICAS MECÂNICAS Resistência do aço blindado Fluido térmico Painel de control on off Controlo remoto por infravermelhos Acabamento Branco RAL 9016 Cromado CARACTERÍSTICAS ELÉTRICAS Potência nominal W Branco 300 500 750 Cromado 300 300 500 Voltagem V 230 V 230 V 230 V Corrente A Branco 1 3 2 2 3 2 Cromado 1 3 1 3 2 2 Classe II INSTALAÇÃO E PROT...

Page 33: ... plástico fixo 3 Parafuso Ø 5 5 x 50 mm 4 Suporte plástico com porca M6 5 Apoio de cabeça em plástico 6 Parafuso Ø 6 x 35 mm 7 Guarnições de suporte de plástico 8 Parafuso de bloqueio Ø 2 9 x 9 5 mm 9 Produto 2 2 Regras de ligação A ligação à rede deve ser feita em conformidade com a tensão indicada na etiqueta de dados técnicos do produto Este dispositivo destina se a ser permanentemente ligado a...

Page 34: ...ão utilize calços para evitar que o painel de controle seja apoiadono chão 2 3 Regras particulares para quartos de banho Este aparelho cumpre as normas de segurança da CLASSE II duplo isolamento Pode ser instalado nas Zonas 2 e 3 posições A e B seguindo as as seguintes regras Nas casas de banho o seca toalhas nunca deve ser instalado de modo a que o painel de controlo possa ser alcançado por uma p...

Page 35: ...o da temperatura de setpoint Podemos regular a temperatura definida do seca toalhas pelos botões e Carregar no botão para aumenta a temperatura do desejada Da mesma forma ao carregar a tecla reduzimos a temperatura definida A temperatura mínima de funcionamento é de 7ºC e a temperatura máxima é de 30ºC A temperatura definida de fábrica é de 21ºC Os 6 indicadores LED localizados na parte superior d...

Page 36: ... LED indicador de temperatura irá piscar 3 5 Bloqueio de teclado Carregar simultaneamente durante 3 segundos nas teclas e para bloquear desbloquear o teclado do painel de controlo Se carregar no botão enquanto o painel estiver bloqueado todos os LEDs piscarão duas vezes Por razões de segurança o botão on off responderá mesmo que o painel esteja bloqueado Para executar a ação de ligar desligar com ...

Page 37: ... OFF Led 6 OFF Led 7 ON 60 minutos Indicador Iluminação Tempo Indicador Iluminação Tempo 5 LED Led 1 A piscar Led 2 A piscar Led 3 A piscar Led 4 A piscar Led 5 A piscar Led 6 OFF Led 7 ON 90 minutos 6 LED Led 1 A piscar Led 2 A piscar Led 3 A piscar Led 4 A piscar Led 5 A piscar Led 6 A piscar Led 7 ON 120 minutos Se carregar 7 vezes no botão voltará a ativação inicial ativação durante 15 minutos...

Page 38: ...MPORTANTE Quando o produto é programado utilizando um comando à distância Rointe o LED número 7 correspondente ao modo MAX POWER irá piscar AVISO Se tivermos programado o seca toalhas e desejarmos utilizá lo em modo manual devemos carregar o botão ligar desligar durante 3 segundos enquanto o produto está desbloqueado O produto já não será programado e poderemos controlá lo manualmente utilizando o...

Page 39: ...eu aparelho 5 Garantia Nesta secção descrevem se as condições de garantia de que o comprador dispõe ao adquirir um novo produto da marca Rointe Estas condições reúnem todos os direitos do comprador de acordo com a legislação nacional vigente bem como a garantia e todos os direitos adicionais que a marca Rointe oferece 5 1 Se tiver de enviar o seu Radiador ROINTE para o serviço de garantia remeta o...

Page 40: ...zação incorrecta do produto que possa não estar em conformidade com as normas técnicas de segurança em vigor ii Corrosão de qualquer parte do produto causada pela exposição directa a água salgada Quando o produto é instalado a menos de 200 m da costa o período de garantia para danos por corrosão será reduzido em 50 iii Qualquer modificação ou reparação não autorizada do produto por um terceiro ou ...

Page 41: ...tal como uma factura em formato PDF JPEG ou PNG Isto não é obrigatório mas ao fazê lo garante que o seu período de garantia é preciso 7 Clique em Registar 8 Parabéns O seu produto está agora registado EMAIL 1 Enviar um e mail para sat rointe com com as seguintes informações Nome do cliente Endereço e código postal Número de telefone e endereço de correio electrónico Referência do produto Número de...

Page 42: ...W 0 30 0 30 0 50 Potência carlorífica mínima indicativa P min kW n a n a n a Potência carlorífica máxima continuada Branco P max c kW 0 30 0 50 0 75 Cromo P max c kW 0 30 0 30 0 50 CONSUMO AUXILIAR DE ELECTRICIDADE A potência calorífica nominal Branco el MAX kW 0 30 0 50 0 75 Cromo el MAX kW 0 30 0 30 0 50 A potência calorífica mínima Branco el MIN kW 0 30 0 50 0 75 Cromo el MIN kW 0 30 0 30 0 50 ...

Page 43: ...peratura interior Controle eletrónico de temperatura interior e temporizador diário Controle eletrónico de temperatura interior e temporizador semanal OUTRAS OPÇÕES DE CONTROLE PODEM SELECCIONAR SE VÁRIAS Controle de temperatura interior com detecção de presença Controle de temperatura interior com detecção de janelas abertas Com opção de controle a distancia Com controle de posta em marcha adaptá...

Page 44: ...xpérience et de connaissances si elles ont été supervisées ou ont reçu des instructions concernant l utilisation de l appareil en toute sécurité et comprennent les risques encourus Les enfants ne doivent pas jouer avec l appareil Le nettoyage et l entretien des utilisateurs ne doivent pas être effectués par des enfants sans surveillance Les enfants doivent être surveillés à tout moment pour s assu...

Page 45: ...t devenir très chaudes et causer des brûlures Une attention particulière devrait être accordée lorsque des enfants et des personnes vulnérables sont présents Contenu 1 Spécifications techniques du produit 46 2 Installation d un sèche serviettes Rointe 47 2 1 Montage 47 2 2 Instructions de connexion 47 2 3 Règles particulières pour les salles de bains 48 3 Description du panneau de contrôle et de s...

Page 46: ... 50 Profondeur produit installé mm 100 100 100 CARACTÉRISTIQUES MÉCANIQUES Élément chauffant d acier blindé Fluide caloporteur Panneau de contrôle ovale contrôle à distance par infrarouge Finition Blanc RAL 9016 Chrome CARACTÉRISTIQUES ÉLECTRIQUES Puissance nominale W Blanc 300 500 750 Chrome 300 300 500 Voltage V 230 V 230 V 230 V Courrant A Blanc 1 3 2 2 3 2 Chrome 1 3 1 3 2 2 Class II INSTALLAT...

Page 47: ...upport en plastique avec écrou M6 5 Support de tête en plastique 6 Vis Ø 6 x 35 mm 7 Embellisseur 8 Vis de blocage Ø 2 9 x 9 5 mm 9 Produit 2 2 Instructions de connexion Le branchement au réseau doit être effectué conformément à la tension indiquée sur l étiquette des données techniques du produit Ce dispositif est destiné à être connecté en permanence à une installation fixe Le circuit d alimenta...

Page 48: ... 3 Règles particulières pour les salles de bains Cet appareil est conforme aux normes de sécurité de la CLASSE II double isolation Il peut être installé dans les zones 2 et 3 positions A et B selon les règles suivantes Dans les salles de bains le sèche serviettes ne doit jamais être installé de manière à ce que le panneau de commande puisse être atteint par une personne dans la baignoire ou la dou...

Page 49: ...rature de consigne Nous pouvons régler la température de consigne du sèche serviettes à l aide des touches et En appuyant sur la touche vous augmentez la température de consigne De la même manière en appuyant sur la touche nous baissons la température de consigne La température minimale de fonctionnement est de 7ºC et la température maximale de 30ºC La température réglée en usine est de 21ºC Les 6...

Page 50: ...cation de température clignote 3 5 Verrouillage du clavier En appuyant simultanément pendant 3 secondes sur les touches et on verrouille déverrouille le clavier du panneau de contrôle Si vous appuyez sur une touche alors que le panneau est verrouillé toutes les leds clignotent deux fois Pour des raisons de sécurité la touche marche arrêt fonctionnera même si le panneau est verrouillé Pour procéder...

Page 51: ...s 4 LED Led 1 Clignotement Led 2 Clignotement Led 3 Clignotement Led 4 Clignotement Led 5 OFF Led 6 OFF Led 7 ON 60 minutes 5 LED Led 1 Clignotement Led 2 Clignotement Led 3 Clignotement Led 4 Clignotement Led 5 Clignotement Led 6 OFF Led 7 ON 90 minutes 6 LED Led 1 Clignotement Led 2 Clignotement Led 3 Clignotement Led 4 Clignotement Led 5 Clignotement Led 6 Clignotement Led 7 ON 120 minutes Si o...

Page 52: ...TANT Lorsque le produit est programmé à l aide d une télécommande Rointe la led numéro 7 correspondant au mode MAX POWER clignote ATTENTION Si nous avons programmé notre sèche serviettes et nous souhaitons l utiliser à nouveau en mode manuel nous devons maintenir la touche marche arrêt enfoncée pendant 3 secondes avec le produit déverrouillé Le produit ne sera plus programmé et nous pourrons le co...

Page 53: ...oits dont dispose l acheteur selon la législation nationale en vigueur ainsi que la garantie et les droits supplémentaires offerts par la marque Rointe 5 1 Tout incident détecté sur votre produit peut être suivi par le vendeur du produit ou de manière plus agile par le fabricant met à votre disposition un TÉLÉPHONE D ASSISTANCE TECHNIQUE FRANCE 01 73 05 70 01 où nous vous indiquerons les étapes à ...

Page 54: ...torisé ou ouverture du sèche serviettes par des personnes non autorisées Accidents imprévus indépendants de la volonté d Rointe tels que foudre incendie inondation désordre public etc 5 3 2 2 Les réparations ou remplacements couverts par cette garantie ne prolongent ni ne redémarrent la période de garantie 5 3 2 3 Les réparations ou remplacements couverts par cette garantie doivent être effectués ...

Page 55: ...ve d achat telle qu une facture sous format PDF JPEG ou PNG Ce n est pas obligatoire mais cela permet de garantir l exactitude de votre période de garantie 7 Cliquez sur Enregistrement 8 Félicitations Votre produit est maintenant enregistré EMAIL 1 Envoyez un courriel à rointe rointe fr avec les informations suivantes Nom du client Adresse et code postal Numéro de téléphone et adresse électronique...

Page 56: ... kW 0 30 0 30 0 50 Puissance thermique minimale P min kW n a n a n a Puissance thermique maximale continue Blanc P max c kW 0 30 0 50 0 75 Chrome P max c kW 0 30 0 30 0 50 CONSOMMATION AUXILIAIRE D ÉLECTRICITÉ À la puissance thermique nominale Blanc el MAX kW 0 30 0 50 0 75 Chrome el MAX kW 0 30 0 30 0 50 À la puissance thermique minimale Blanc el MIN kW 0 30 0 50 0 75 Chrome el MIN kW 0 30 0 30 0...

Page 57: ... Régulation électronique de la température intérieure et minuterie journalière Régulation électronique de la température intérieure et minuterie hebdomadaire AUTRES OPTIONS DE COMMANDE PLUSIEURS PEUVENT ÊTRE SÉLECTIONNÉES Régulation de la température intérieure avec détection de présence Régulation de la température intérieure avec détection de fenêtre ouverte Avec option télécommande Avec command...

Page 58: ...ke of geestelijke vermogens of gebrek aan ervaring en kennis mits ze onder toezicht staan of instructies hebben gekregen over hoe het apparaat op een veilige manier gebruikt kan worden en ze de gevaren ervan begrijpen Kinderen mogen niet met het apparaat spelen Reiniging en gebruikersonderhoud mogen niet zonder toezicht door kinderen worden uitgevoerd Kinderen moeten te allen tijde onder toezicht ...

Page 59: ...of andere natte delen van het lichaam WAARSCHUWING Delen van dit product kunnen zeer heet worden en brandwonden veroorzaken Bijzondere aandacht moet worden besteed aan de aanwezigheid van kinderen en kwetsbare personen Inhoud 1 Technische specificaties 60 2 Installatie van Rointe handdoekrekken 61 2 1 Montage instructies 61 2 2 Aansluitinstructies 61 2 3 Specifieke voorschriften voor badkamers 62 ...

Page 60: ...0 Geïnstalleerde diepte mm 100 100 100 MECHANISCHE EIGENSCHAPPEN Verwarmingselement van roestvrij staal Thermische vloeistof Ovaal bedieningspaneel Infrarood afstandsbediening Afwerking Wit RAL 9016 Chroom ELEKTRISCHE EIGENSCHAPPEN Nominaal vermogen W Wit 300 500 750 Chroom 300 300 500 Spanning V 230 V 230 V 230 V Stroomsterkte A Wit 1 3 2 2 3 2 Chroom 1 3 1 3 2 2 Klasse II VEILIGHEID INSTALLATIE ...

Page 61: ...tten met de 5 x 12 mm schroef 8 Plaats de hoes op het stuk dat het product ondersteunt Nº ITEM 1 Rawlplug Ø10 x 45 mm 2 Vaste kunststof steun 3 Schroef Ø 5 5 x 50 mm 4 Plastic steun met moer M6 5 Plastic hoofdsteun 6 Schroef Ø 6 x 35 mm 7 Afdekplaat 8 Borgschroef Ø 2 9 x 9 5 mm 9 Product 2 2 Aansluitinstructies Bij de aansluiting op het elektriciteitsnet moet rekening worden gehouden met de spanni...

Page 62: ...alleerd met het bedieningspaneel aan de bovenzijde Dit product mag niet horizontaal worden geïnstalleerd Gebruik bij de installatie wiggen zodat het bedieningspaneel niet in contact komt met de vloer 2 3 Specifieke voorschriften voor badkamers Dit toestel voldoet aan de veiligheidsnormen van KLASSE II dubbele isolatie Hij kan worden geïnstalleerd in zone 2 en 3 posities A en B volgens de onderstaa...

Page 63: ...tuurselectie U kunt de ingestelde temperatuur van het handdoek radiator reguleren met de en knoppen Op de knop drukken verhoogt de ingestelde temperatuur Op dezelfde manier zorgt het drukken op de knop voor verlaging van de ingestelde temperatuur De minimale werkende temperatuur is 7ºC en de maximale is 30ºC De standaardtemperatuur na fabricatie is 21ºC De 6 LED lampjes die zich bovenaan het bedie...

Page 64: ...den kunt u het toetsenpaneel van het bedieningspaneel vergrendelen ontgrendelen Indien er een knop wordt ingedrukt terwijl het paneel vergrendeld is zullen alle LED lampjes tweemaal knipperen Vanwege veiligheidsredenen reageert de aan uitknop wél zelfs als het paneel vergrendeld is Om het product aan of uit te zetten terwijl het paneel vergrendeld is houd de knop 3 seconden lang ingedrukt 3 6 MAX ...

Page 65: ... Led 4 Knipperend Led 5 Knipperend Led 6 UIT Led 7 AAN 90 minuten 6 LED Led 1 Knipperend Led 2 Knipperend Led 3 Knipperend Led 4 Knipperend Led 5 Knipperend Led 6 Knipperend Led 7 AAN 120 minuten Indien u de knop 7 keer indrukt zult u terugkeren naar het startpunt 15 minuten actief De LED lampjes tellen de tijd af waarbij elk lampje uitgaat na een bepaalde tijd Zodra de hele tijd afgelopen is zal ...

Page 66: ...e aan uitknop 3 seconden lang in te drukken wanneer het product ontgrendeld is Het product volgt niet langer een programma waardoor u in staat bent om het handmatig te bedienen middels de knoppen op het bedieningspaneel 3 8 Probleemoplossing Onder normale werkomstandigheden van de handdoek radiator worden enige defecten aangegeven via de LED lampjes op het product Zie de tabel hieronder om de fout...

Page 67: ...n die zijn uitgelegd in de geldende nationale wetgeving evenals alle aanvullende rechten en garanties die door Rointe worden geboden 5 1 Elk incident dat u in uw Rointe product ontdekt kan door de productverkoper of snel door de fabrikant worden opgelost Neem voor technische ondersteuning contact op met Rointe door te bellen naar NEDERLAND 010 742 00 46 Als u in een ander land woont raadpleeg dan ...

Page 68: ...et 50 verminderd 5 3 2 2 Ongeautoriseerde reparaties uitgevoerd door ongeautoriseerde technici of het openen van het product door ongeautoriseerde mensen 5 3 2 3 Alle ongevallen die geacht worden buiten de controle van Rointe te vallen zoals blikseminslag branden overstromingen openbare onrust enz 6 3 3 Eventuele reparaties of vervangingen die onder deze garantie vallen staan geen aanvullingen of ...

Page 69: ...js zoals factuur in pdf jpeg of png indeling Dit is niet verplicht maar hierdoor zorgt u ervoor dat uw garantieperiode klopt 7 Klik op Registreren 8 Gefeliciteerd Uw product is nu geregistreerd EMAIL 1 Stuur een e mail naar verkoop rointe com met de volgende informatie Klantnaam Adres en postcode Telefoonnummer en e mailadres Productreferentie zoals hierboven beschreven Serienummer zoals hierboven...

Page 70: ...m kW 0 30 0 30 0 50 Minimale warmte output P min kW n a n a n a Maximale continue warmte output Wit P max c kW 0 30 0 50 0 75 Chroom P max c kW 0 30 0 30 0 50 AANVULLEND ELEKTRICITEITSVERBRUIK Bij nominale warmte output Wit el MAX kW 0 30 0 50 0 75 Chroom el MAX kW 0 30 0 30 0 50 Bij minimale warmte output Wit el MIN kW 0 30 0 50 0 75 Chroom el MIN kW 0 30 0 30 0 50 In stand bymodus el SB kW 0 002...

Page 71: ... temperatuurbeheersing Elektronische indoor temperatuurbeheersing en dagelijkse timer Elektronische indoor temperatuurbeheersing en wekelijkse timer ANDERE CONTROLE OPTIES MEERDERE SELECTIES MOGELIJK Interieur temperatuurbeheersing met aanwezigheidsdetectie Interieur temperatuurbeheersing met open ramen detectie Met afstandsbediening afstandsoptie Met aanpasbare opstartcontrole Met tijdslimitatie ...

Page 72: ... Nederland 3197 LG Botlek RT T 010 742 00 46 Copyright Rointe Heating 2021 All rights reserved As part of our policy of continuous improvement we reserve the right to alter or modify any product or specifications without prior notice This also applies to products that have already been ordered provided that such alterations can be made without subsequent changes to the already agreed specification...

Reviews: