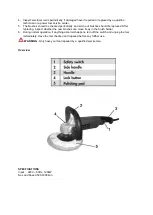
ASSEMBLY
1. Install the auxiliary handle.
For your personal safety we recommend using the auxiliary handle at all times. The auxiliary
handle with help you grasp your tool more firmly. The auxiliary handle can be installed on either
the right or the left side of the tool. Secure the handle with the hex key and tighten firmly. Always
hold your polisher firmly with both hands when operating.
2. Install the Polishing Disc & the Polishing Pad.
Before using polisher, install polishing disc and the polishing pad.
•
Place the polishing disc onto the spindle.
•
Cover the polishing disc with the woolen bonnet - the polishing pad.
•
Install the hexagon flange and by pressing the spindle lock button and tightening securely
using the hexagon wrench.
Attention:
The spindle lock button must only be used when changing the pad. Never press it when
the pad is rotating.
WARNING!
After installing the Polishing Disc and Polishing Pad, operate the tool for 1 minute with no load to
check the assembly installation.
OPERATION
1. ON/OFF.
The On/Off switch is incorporated with a Safety Button for preventing accidental starting. To start
the polisher, first press down the Lock Off button, then press the On/Off switch. To turn off the
polisher, simply release the On/Off switch.
NOTE
– Start the polisher on low speed. The polisher is equipped with a soft start device which
will delay the start for 1-2 seconds.
2. Variable Speed Control.
The polisher can be operated at different speeds. Adjust the Variable Speed control to increase or
decrease the speed. There are 6 range of polishing speed (1- 2- 3- 4- 5 - 6). When adjusted to
range 1, the speed is 500/ min. When adjusted to range 6, the speed will be 3300/ min.
3. Using the Polisher.
•
Make sure that the work surface is not covered with mud or dust before polishing. If this situation
occurs, clean the surface before using the polisher.
•
Spread about a tablespoon of polish evenly over the entire surface of the pad cover. Do not apply
polish directly to the work surface.
•
Rest the polishing disc on the work surface.
•
While the polishing disc is resting on the work surface, grasp the polisher securely and turn it on.
Move the polisher around the car or the furniture lightly.
NOTE
- The polisher is supplied with over-load protection device. When the tool is burdened with
obsessive workload, the polisher will stop work immediately. Release the overload, the tool will start
running again.
MAINTENANCE
WARNING! Always unplug the polisher from the power supply before performing any
maintenance or repairs.
1. For safe operation & good performance, clean the tool body with dry cloth after each use.
•
Switch off the polisher and take off the polishing pad.
•
Clean the tool with dry cloth.
•
Clean the polishing pad, then dry it before storage.
CAUTION
- Never use strong solvent, such as gasoline to clean plastic parts of the tool.
2. Keep the air vent of the tool clean from dirt, clean off the accumulated dust or oil dirt periodically.
3. Always keep the handles clean and free of oil and grease.


