background image

L O C A T I O N

Your K3 CD Di should be located in a well ventilated area and kept away from sources 

of heat, dust, humidity and direct sunlight.

The CD player may be positioned either as a free standing unit or alongside other 

audio/video product(s).  Never place the CD player on other electronic equipment, 

carpet or any surface likely to hinder normal ventilation.  Never allow liquids or other 

objects to fall into the unit.

NOTE:

 This unit contains no user serviceable parts.  Do not remove any panels or 

attempt to service it yourself.  

Unauthorised servicing will void the warranty.

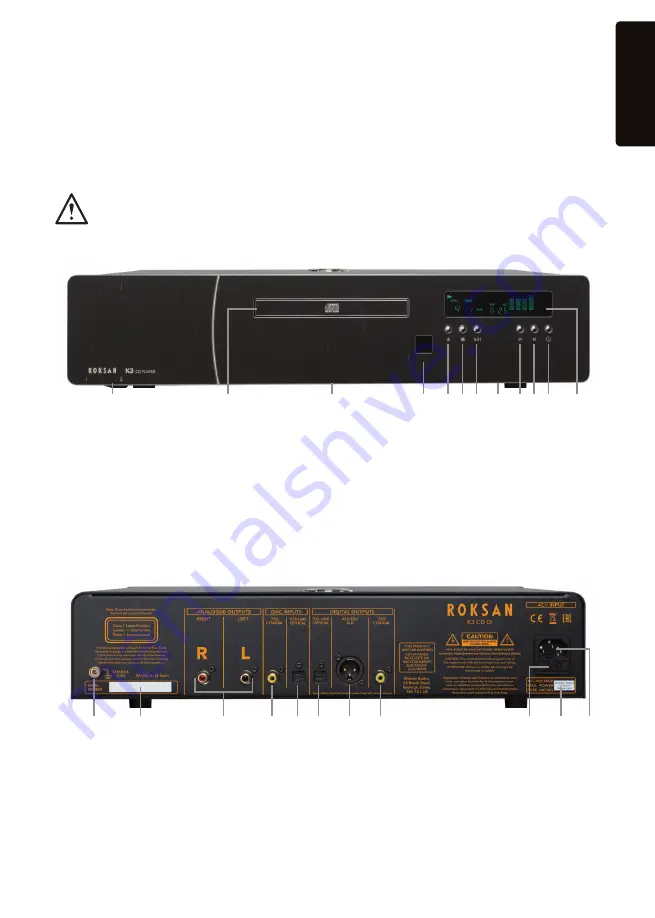
F R O N T   P A N E L   V I E W

1. 

AC Mains Power Switch

2. 

CD Drawer

3.  Digital Input Indicator LED (under 

unit)

4. 

IR Receiver

5. 

Open/ Close Button

6.  Stop Button

7. 

Play/ Pause Button

8. 

Digital Input Selection Switch

9. 

Previous Track Button

10. 

Next Track Button

11.  Display Button
12.  Display

1

2

4

5

12

10 11

6 7 8 9

3

R E A R   P A N E L   V I E W

1.  Chassis Ground Terminal
2.  Serial Number
3.  Right & Left Analogue RCA Outputs
4. 

Digital Coaxial Input 

5.  Digital Optical Input
6.  Digital Optical Output

7.  Digital Balanced XLR Output
8. 

Digital Coaxial Output

9.  AC Mains Fuse Holder
10.  Voltage & Fuse Rating Label
11.  AC Mains Input Socket

1

2

3

4

5 6

7

8

9

10 11

3

K3 CD Di

ENGLISH

Summary of Contents for K3 CD Di

Page 1: ...K3CD Di Set Up Guide and Product Manual roksan com...

Page 2: ...Roksan is a member of...

Page 3: ...with the correct mains power plug for your country One Roksan R7 Remote Control and CR2032 battery One information pack After removing these items please retain all packing material Correct packing i...

Page 4: ...se of it safely so that it cannot be plugged into a mains socket whilst in a potentially dangerous condition If your lead has been damaged please obtain a complete replacement lead from your dealer Sh...

Page 5: ...e it yourself Unauthorised servicing will void the warranty F R O N T PA N E L V I E W 1 AC Mains Power Switch 2 CD Drawer 3 Digital Input Indicator LED under unit 4 IR Receiver 5 Open Close Button 6...

Page 6: ...n Stop mode press Shuffle to play the tracks in a random order To cancel press Stop REPEAT Press once to repeat all tracks Press again to repeat current track Press again to cancel repeat mode 4 roksa...

Page 7: ...nding input of an amplifier with a digital input or to an outboard Digital to Analogue Converter DAC Digital Inputs The K3 CD Di features two digital inputs 1 x Coaxial RCA 1 x Toslink Optical Any dev...

Page 8: ...aying a disc press Play Pause Button on the remote control or front panel once The disc will play from the beginning Press the Play Pause button a second time to pause the disc whilst it is playing Pr...

Page 9: ...connected to the K3 CD Di by either the coaxial or optical digital input options on the rear of the K3 CD Di Now select the correct input via the rocker switch located on the right underside of the u...

Page 10: ...Roksan products please keep your receipt of purchase safe as this validates your warranty This warranty excludes 1 Damage caused due to accident misuse neglect and incorrect installation adjustment o...

Page 11: ...ay does not show the number of tracks and playing time Disc inserted upside down Disc is dirty or scratched Condensation on the laser lens Dirt on the laser lens Re insert disc Clean disc discard scra...

Page 12: ...ital Outputs 75 Coaxial RCA 110 Balanced AES EBU XLR Optical Tos Link Digital Inputs Coaxial RCA 75 24 bit 96 kHz Optical Tos Link 24 bit 96 kHz D A Conversion PCM1730E Advance Segment Audio Stereo DA...

Page 13: ......

Page 14: ......

Page 15: ......

Page 16: ...Designed and built in Great Britain roksan com info roksan com Version 3 1 2020 ROK 1219 Roksan 24 Brook Road Rayleigh Essex SS6 7XJ UK 44 0 1268 798900...

Reviews: