background image

WhAt tO DO

 steP 1

Ready for the step-by-step? We’ve only got four…

connect your PLAyer

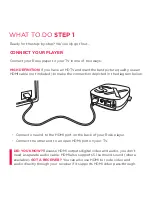
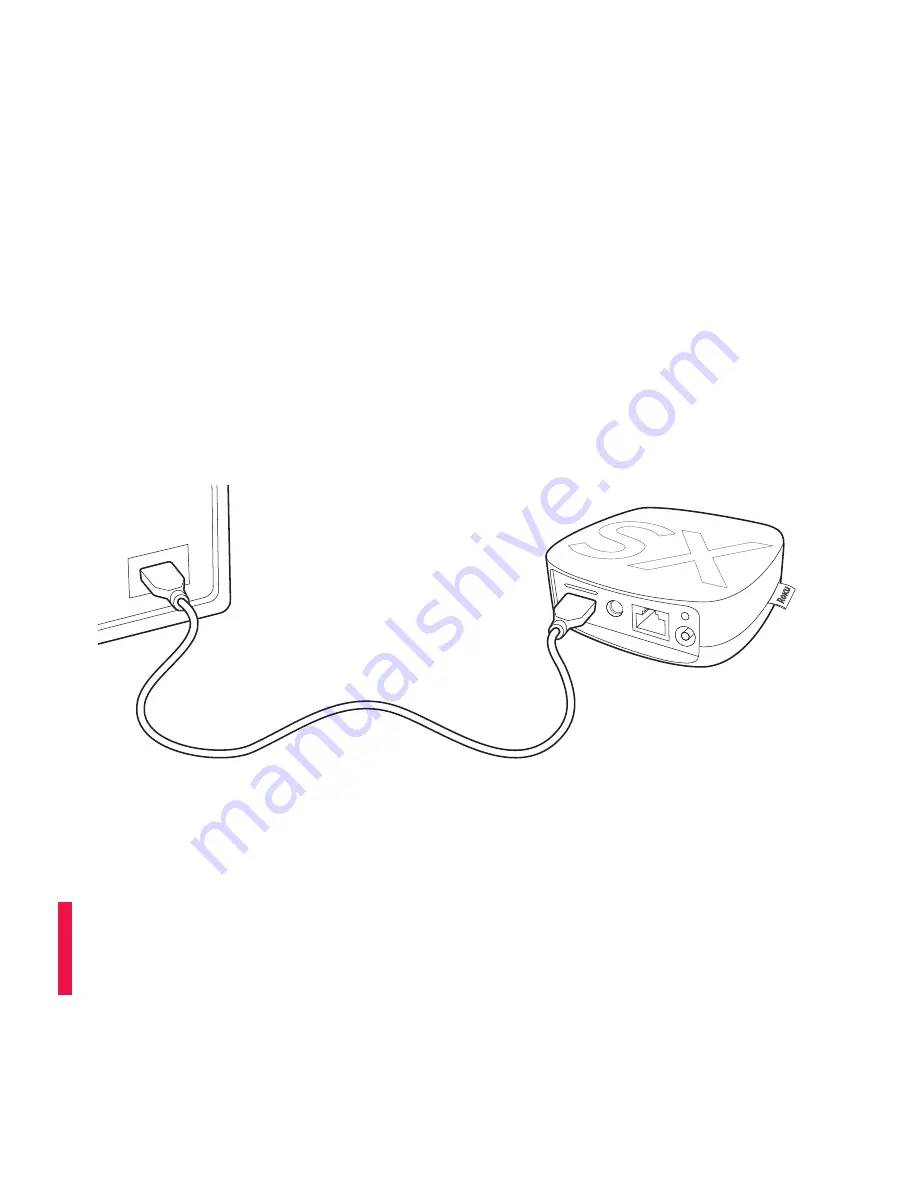
Connect your Roku player to your tV in one of two ways:

HiGH DeFinition: 

If you have an hDtV and want the best picture quality, use an 

hDMI cable (not included) to make the connection depicted in the diagram below:

DiD you Know?

 Because hDMI outputs digital video and audio, you don’t 

need a separate audio cable. hDMI also supports 5.1 surround sound (where 
available). 

Got A receiVer?

 you can also use hDMI to route video and 

audio directly through your receiver if it supports hDMI video pass-through. 

• 

Connect one end to the hDMI port on the back of your Roku player.

• 

Connect the other end to an open hDMI port on your tV.

Summary of Contents for ROKU2 XS

Page 1: ...Hi Let s get started...

Page 2: ...2009 2012 by Roku Inc All rights reserved Roku and the Roku logo are registered trademarks of Roku Inc Other brand and product names are trademarks or registered trademarks of their respective holders...

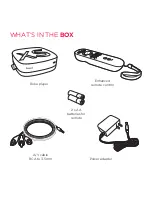
Page 3: ...What s in the Box Roku player Enhanced remote control 2 x AA batteries for remote A V cable RCA to 3 5mm Power adapter...

Page 4: ...G F Get to know your roKu B C D H Front view Back view A E...

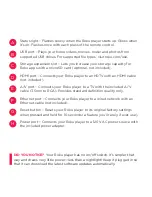
Page 5: ...MI port Connects your Roku player to an HDTV with an HDMI cable not included D A Status light Flashes slowly when the Roku player starts up Glows when it s on Flashes once with each press of the remot...

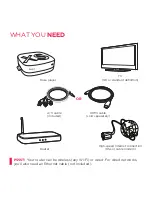
Page 6: ...ard definition High speed Internet connection DSL or cable modem Router A V cable included HDMI cable sold separately OR Pssst Your router can be wireless any Wi Fi or wired For wired networks you ll...

Page 7: ...e the connection depicted in the diagram below Did you know Because HDMI outputs digital video and audio you don t need a separate audio cable HDMI also supports 5 1 surround sound where available GOT...

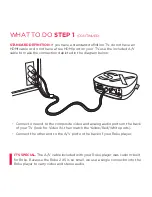
Page 8: ...iagram below Connect one end to the composite video and analog audio ports on the back of your TV look for Video IN then match the Yellow Red White ports Connect the other end to the A V port on the b...

Page 9: ...l over and locate the rectangular battery door on the rear of the unit Press the latch at the top of the battery door down while simultaneously removing the battery door Insert the batteries into thei...

Page 10: ...on your TV and look for a Roku message to fill the screen BLANK SCREEN If your TV does not display a Roku screen make sure your TV input matches the physical connection used to connect your Roku play...

Page 11: ...ess as your network connection and have your network name and password ready to do the following Select your network from the list of available networks Enter your network password if you use one Reme...

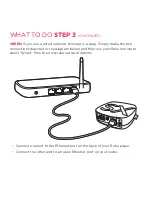
Page 12: ...nap Simply make the two connections depicted in the diagram below and then use your Roku remote to select Wired from the on screen network options Connect one end to the Ethernet port on the back of y...

Page 13: ...ore about on the following pages to personalize your channel line up stream movies or play games The fun part has just begun we promise YOUR ROKU ACCOUNT During Guided Setup you ll be prompted to crea...

Page 14: ...KNOW YOUR roku REMOTE The Roku remote should feel right at home in your hand We designed it to be incredibly intuitive for watching TV and great for gaming too B K J F A E H I C D G...

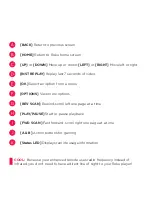
Page 15: ...oku home screen INST REPLAY Replay last 7 seconds of video UP or DOWN Move up or down LEFT or RIGHT Move left or right PLAY PAUSE Start or pause playback A B Action buttons for gaming FWD SCAN Fast fo...

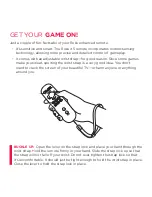
Page 16: ...orting the wrist strap is a very good idea You don t want to crack the screen of your beautiful TV or harm anyone or anything around you Buckle up Open the lever on the strap lock and place your hand...

Page 17: ...on one end and to a working power source on the other end If the Roku player is powered the status light on the front of the unit will be on If you are using HDMI with a home theater receiver make sur...

Page 18: ...way Make sure the volume on your TV or home theater receiver is turned up and isn t on mute If you connected your Roku player to a home theater receiver make sure you receiver is turned on Make sure...

Page 19: ...ese steps 1 Be sure to turn off or move other devices that are near the Roku player 2 Open the Roku remote battery compartment using the instructions in Step 2 3 Place the Roku remote in close proximi...

Page 20: ...e naviguer dans la configuration guid e avec votre t l commande Roku vous pouvez jumeler manuellement la t l commande en suivant les tapes suivantes 1 teignez tous les autres appareils se trouvant pr...

Page 21: ...tionner un r seau sans fil S IL N Y A PAS DE SON Assurez vous que les connecteurs des c bles reliant votre lecteur Roku et votre t l viseur ou r cepteur de cin ma maison sont bien enfonc s Assurez vou...

Page 22: ...l entr e vid o Assurez vous que l une des extr mit s du c ble d alimentation du lecteur Roku est bien branch e au lecteur Roku et que l autre est bien branch e une source d alimentation active Si le...

Page 23: ...ter la dragonne autour de votre poignet Vous ne voulez pas briser l cran de votre superbe t l viseur ni blesser quelqu un ou briser quelque chose autour de vous Attachez vous ouvrez le levier sur le v...

Page 24: ...ST Reprise vid o de 7 secondes HAUT ou BAS Monter ou descendre GAUCHE ou DROITE Aller gauche ou droite LECTURE PAUSE D marrer la lecture ou la mettre sur pause A et B Boutons d action pour les jeux AV...

Page 25: ...RE T L COMMANDE ROKU La t l commande Roku devrait se sentir comme chez elle dans votre main Elle a t con ue pour tre intuitive lorsque vous regardez la t l vision mais aussi lorsque vous jouez des jeu...

Page 26: ...ages vous apprendrez comment personnaliser vos canaux couter des films en mode continu et jouer des jeux Le plaisir ne fait que commencer c est une promesse VOTRE COMPTE ROKU Lors de la configuration...

Page 27: ...uer les deux branchements illustr s dans le diagramme ci dessous puis s lectionnez C bl sur les options r seau l cran l aide de votre t l commande Roku Branchez l une des extr mit s dans le port Ether...

Page 28: ...au et ayez en mai le nom et le mot de passe de votre r seau puis suivez les tapes suivantes S lectionnez votre r seau dans la liste des r seaux disponibles Entrez le mot de passe de votre r seau si vo...

Page 29: ...de Roku appara tre l cran VOTRE CRAN EST IL VIDE Si l cran Roku n appara t pas sur votre t l viseur assurez vous que le choix d entr e de votre t l viseur correspond au branchement physique utilis pou...

Page 30: ...la t l commande et localisez le couvercle du compartiment piles au bas du dispositif Appuyez sur le verrou en haut du compartiment batteries tout en retirant le couvercle Ins rez les piles en vous ass...

Page 31: ...xtr mit s dans les ports vid o composite et audio analogique situ s l arri re de votre t l viseur cherchez Video IN puis respectez la couleur des ports soit jaune rouge et blanc Branchez l autre extr...

Page 32: ...nexion illustr e ci dessous Le saviez vous Le HDMI sert la fois de sortie vid o et audio Vous n avez donc pas besoin d un c ble audio distinct Le HDMI est compatible avec le format de son ambiophoniqu...

Page 33: ...ition standard Connexion Internet haute vitesse DSL ou modem c ble Routeur C ble AV fourni C ble HDMI vendu s par ment OU Pssst Votre routeur peut tre sans fil peu importe le Wi Fi ou c bl Pour les r...

Page 34: ...l aide d un c ble HDMI non inclus D A T moin lumineux clignote lentement lors du d marrage du lecteur Roku Il est allum lorsque le lecteur est en marche Chaque fois que vous appuyez sur une touche de...

Page 35: ...G F Apprendre conna tre votre roKu B C D H Vue de face Vue arri re A E...

Page 36: ...CONTENU DE L emballage Lecteur Roku T l commande Roku am lior e 2 piles AA pour la t l commande C ble AV RCA prise 3 5 mm Adaptateur secteur...

Page 37: ...s droits r serv s Roku et le logo de Roku sont des marques de commerce d pos es de Roku Inc Les autres marques et noms de produits sont des marques de commerce ou des marques de commerce d pos es de l...

Page 38: ...Bonjour D butons...

Reviews: