background image

5

ROL | ERGO Sweden    W: www.rolergo.com    P: +46 36 36 88 80

1.1 

Designated Use

This stand is intended for use for electrical height adjustment of a sit-stand workstation 
commercially or in home environments. Any other uses are viewed as improper. The 
stand shall only be operated indoors in dry, enclosed environments. For maximum 
intended load and additional specifications see 1.2 Product Specifications. 

1.2 

Product Specifications

1. 

GENERAL INFORMATION

EPI EE stand 470

EPI EE stand 500

EPI EE stand 650

Maximum load*

120 kg

120 kg

120 kg

Stroke

470 mm

500 mm

650 mm

Speed**

<40 mm/s

<40 mm/s

<40 mm/s

Noise

43 dB

43 dB

43 dB

Electrical rating

Input

Output

100-240VAC

50-60Hz, 3,2A

35V

100-240VAC

50-60Hz, 3,2A

35V

100-240VAC

50-60Hz, 3,2A

35V

Duty cycle

1:9

1:9

1:9

*Load shall be evenly distributed
**Speed may vary with load

1.3 

Standards & Certificates

The complete stand/base is developed to harmonize with standard requirements:
EN 527-2:2016 Office furniture – Work tables – Part 2: Safety, strength and durability 
requirements
EN 1730 Furniture – Tables – Test methods for the determination of stability, strength 
and durability

The paint/surface of the stand is approved according to standard:
EN 12720:2009+A1:2013 Furniture – Assessment of surface resistance to cold liquids
EN 15186:2012 Furniture – Assessment of the surface resistance to scratching

The electronics are certified according to:
RoHs, Reach, EMC directive, UL962

Summary of Contents for Serie Ei - iDrive

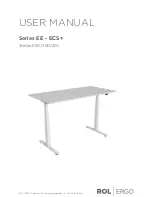
Page 1: ...ROL ERGO Sweden W www rolergo com P 46 36 36 88 80 USER MANUAL Series EE ECS Stroke 650 500 470...

Page 2: ...PI BENCH 4 COLUMN 2 STAGE 470 EPI BENCH 4 COLUMN 3 STAGE 650 Are manufactured in conformity with Machine Directive 2006 42 EG partly completed Machine EMC Electromagnetic Compatibility Directive 2014...

Page 3: ...You will find important safety information in a variety of forms Safety messages are preceded by a safety alert symbol and one of three signal words DANGER WARNING or CAUTION These safety messages ar...

Page 4: ...3 1 Assembly Instruction 9 3 2 System Procedure 10 4 OPERATION INSTRUCTIONS 12 4 1 Basic Functions 12 4 2 Manual Reset 14 5 MAINTENANCE REPAIRS 15 5 1 Cleaning Inspection Storage 15 5 2 User Maintena...

Page 5: ...43 dB 43 dB Electrical rating Input Output 100 240VAC 50 60Hz 3 2A 35V 100 240VAC 50 60Hz 3 2A 35V 100 240VAC 50 60Hz 3 2A 35V Duty cycle 1 9 1 9 1 9 Load shall be evenly distributed Speed may vary w...

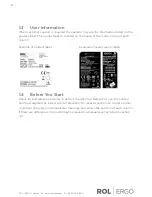
Page 6: ...f each column 1 4 Before You Start Check for and remove obstacles in path of the desk top Before first use the control unit must register the lowest point of elevation Do reset as section 4 2 Under no...

Page 7: ...d is damaged A damaged cord shall only be changed by authorised personnel Do not expose the power supply handset or other electrical device to water or other liquids including moisture drips splashes...

Page 8: ...between static objects and moving surfaces During the lowering or rising of the desktop the operator must ensure that no person or object risk being harmed by the operation The desk must only be oper...

Page 9: ...Assembly Instruction The official assembly instruction can be found with the base components Make sure to ask your desk vendor for an approved combination of desktop and frame NOTICE Make sure that t...

Page 10: ...t be unplugged during the setup To set up the desk 1 Connect the motor cables to the control unit 8 pin motor connections 2 Connect the handset to the relevant socket at the control unit ECS 3 Connect...

Page 11: ...ch as the power supply bus cable or the handset the strain relieve hook must be pressed before removing the connector When inserting the connector an audible click indicates that the strain relieve ho...

Page 12: ...rating the control unit If chosen handset is not covered this user manual please see separate user manual supplied with the hand set NOTICE The desktop will continue moving upwards until you release t...

Page 13: ...set the desk will stop when the memory position is reached To drive the desk outside the memory position press the up or down button for a minimum of 5 seconds How to set memory end positions 1 Drive...

Page 14: ...ly a reset homing cycle MUST be performed A reset cycle should be made with an evenly distributed weight of approx 45 kg 100 lbs applied on the desk Perform a reset by Simultaneously pressing the up a...

Page 15: ...mns for loose connections and damaged plugs wires Inspect power supply for loose connections and damaged plugs wires The power supply and the handset is sealed and maintenance free 5 3 Repairs Check a...

Page 16: ...nformation regarding the elevation of the desk at all times This information will remain stored even in case of power failure or if the power cable is disconnected from the power outlet 5 4 Servicing...

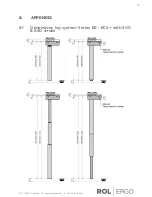
Page 17: ...17 ROL ERGO Sweden W www rolergo com P 46 36 36 88 80 6 APPENDIX 6 1 Dimensions leg system Series EE ECS with 500 650 stroke...

Page 18: ...18 ROL ERGO Sweden W www rolergo com P 46 36 36 88 80 6 2 Dimensions leg system Series EE ECS with 470 stroke...

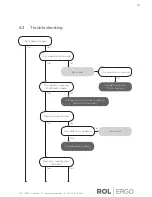
Page 19: ...to move Only one column moving Two columns moving at different speeds Do a reset Change the column that is moving faster than the other Only one column moving Change the column that is moving No No Ye...

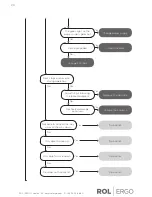
Page 20: ...ble to drive all the way up or all the way down Something is blocking the table movement Mechanical damage on column Do a reset Do a reset Do a reset Do a reset Remove the obstacle Change the columns...

Page 21: ...bles are connected The green light on the power supply is lit Change the power supply Follow install instructions Change ECS box No Yes No Yes Desk stuck in absolute top or bottom position Do a reset...

Reviews: