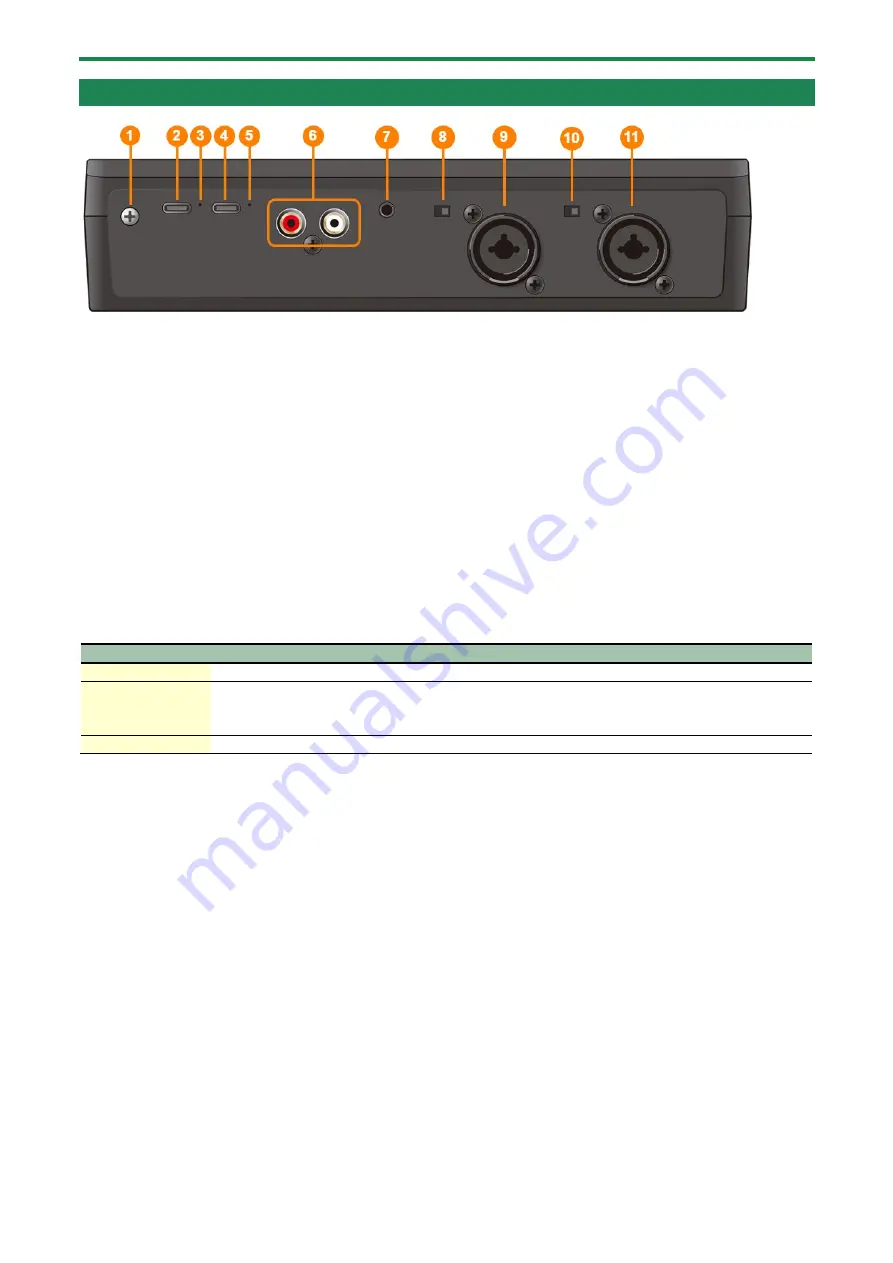
Panel
Descriptions
7
Rear Panel
1.
Ground terminal
Connect this to an external earth or ground if necessary.
2.
DC IN 5V port (USB Type-C)
Use the included USB Type-C to USB Type-A cable to connect a USB AC adaptor (commercially available).
The use of a USB AC adaptor with an output of at least 5 V/1.0 A is recommended.
3.
POWER indicator
Lights when power is supplied from the DC IN 5V port or the DEVICE port.
4.
DEVICE port (USB Type-C)
Use the included USB Type-C to Lightning cable to connect with your iPad.
When connecting to a computer or to an iPad with a USB Type-C port, you must use the appropriate cable.
5.
DEVICE indicator
Shows the status of the device connected to the DEVICE port.
Indicator
Status
Blinks slowly
Connected
Blinks rapidly
Error detected
●
The USB device is not connected correctly.
●
An unsupported USB device such as a USB AC adaptor is connected.
Unlit
Not connected
6.
MONITOR OUT L/R jacks (RCA phono type)
These output the resulting audio mix. Connect these jacks to your monitor speakers.
7.
LINE IN jack (stereo mini type)
Use this jack for audio input. Connect this to your audio player or similar device.
8.
[MIC 2 +48V] switch
Switches the phantom power for the MIC 2 connector on/off.
This should be switched on if you connect a condenser mic that needs phantom power.
Be sure to turn phantom power off if it’s not necessary. This is because dynamic mics, audio playback and other devices may
malfunction when supplied with phantom power.
9.
MIC 2 connector (XLR, TRS)
Use this connector for audio input. Connect a mic or audio device here.
The XLR type connector can supply phantom power (+48 V).
Phantom power on the VRC-01
48 V DC, 8 mA max. (when connecting a USB AC adaptor of least 5 W/1.0 A)
48 V DC, 4 mA max. (when using bus power; only MIC 1 can be used)


