3 Replacement of Main Parts
20
3
3
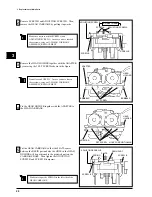
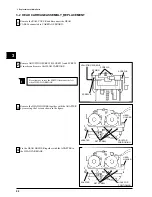
Remove the HEAD HOLDER together with the ADAPTER
by removing the 3 SET SCREWs shown in the figure.
5
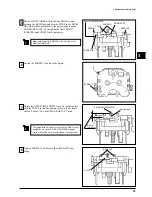
Put the HEAD CARRIAGE so that the PLATE comes
between the RESIN part and also the HOLE in the HEAD
HOLDER will be positioned to the projected part on the
CARRIAGE BASE. Then tighten the ADJUSTING
SCREW B and SCREW B temporary.
SCREW C
SCREW C
ADAPTER
2
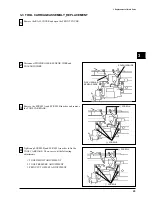
Remove SCREW B and ADJUSTING SCREW B. Then,
remove the HEAD CARRIAGE by pulling it upwards.
Make sure not to touch the SCREW A and
ADJUSTING SCREW A. In case you have touched
these screws, carry out 3-2 HEAD CARRIAGE
ASSEMBLY_REPLACEMENT.
SCREW A
ADJUSTING SCREW B
SCREW B
SCREW B
DO NOT TOUCH
Do not loosen SCREW C. In case you have loosen
these screws, carry out 3-2 HEAD CARRIAGE
ASSEMBLY_REPLACEMENT.
SET SCREW
HEAD
HOLDER
4
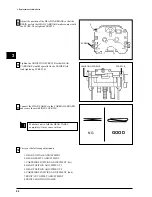
Fix the HEAD HOLDER together with the ADAPTER to
the HEAD CARRIAGE.
ADAPTER
SET SCREW
HEAD
HOLDER
Make sure to put the SPRING to the left side of the
HEAD CARRIAGE.
SPRING
SCREW B
SCREW B
ADJUSTING SCREW A
RESIN PART
PLATE
HOLE FOR POSITIONING
ADJUSTING SCREW B
Summary of Contents for Color Camm Pro PC-60
Page 4: ... MEMO ...
Page 6: ...2 1 Structure Spare Parts 1 1 2 FRAME 1 ...
Page 8: ...4 1 Structure Spare Parts 1 1 3 FRAME 2 ...
Page 88: ...84 4 Adjustment 4 MEMO ...


