About the SAMPLING MENU
85
85
Importing Multiple Audio Files
(To Multisample)
“IMPORT To Multisample” combines the steps used to create a
“multisample”. This includes simultaneous importing of multiple
audio files, assigning the audio files to the desired notes on the
keyboard, and playing different waves for each note.
1 .
To begin, put the audio files you want to import
into the folder you choose on a USB flash drive.
MEMO
It’s useful to first know the pitch of the sample that you are
importing.
NOTE
¹
Use a USB flash drive that you’ve already formatted on the
FANTOM.
¹
This operation might take some time, depending on the size
of the file to import.
2 .
Press the [SAMPLING] button.
The SAMPLING MENU screen appears.
3 .
Touch IMPORT <To Multisample>.
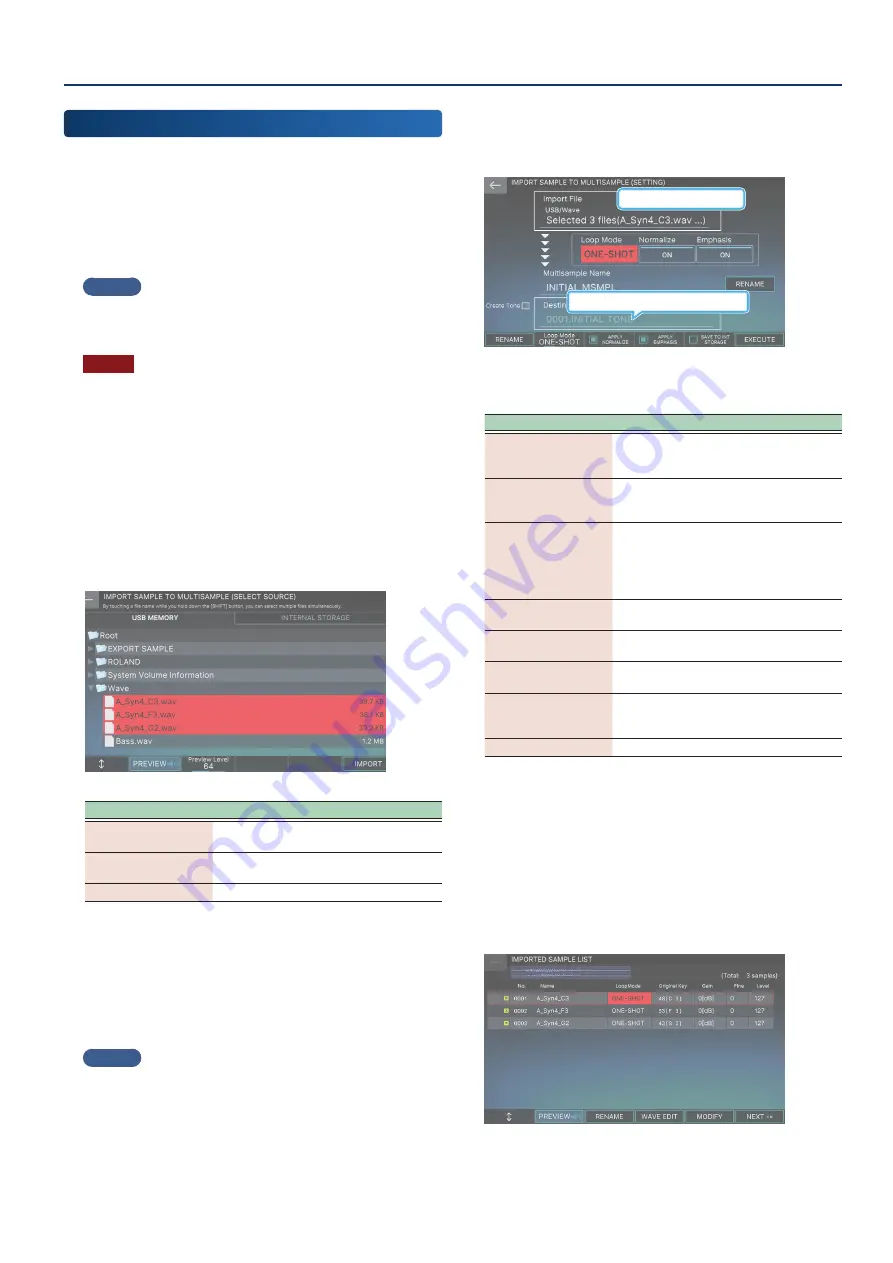
The IMPORT SAMPLE TO MULTISAMPLE (SELECT SOURCE)
screen appears.
Menu
Explanation
[E2] PREVIEW
Lets you listen to the audio file to make
sure it sounds the way you want.
[E3] Audio File
Preview Level
Sets the volume used for previewing.
[E6] IMPORT
Advances to the next operation.
4 .
Touch the filename of the file you imported to
select it.
You can select multiple files at once by touching the filenames
while holding down the [SHIFT] button, or by turning the VALUE
dial while holding down the [SHIFT] button. When you select
multiple files, the first file is previewed.
MEMO
You can select the INTERNAL STORAGE tab and import the audio
files in the LIBRARY folder.
5 .
Select [E6] IMPORT.
The IMPORT SAMPLE TO MULTISAMPLE (SETTING) screen
appears.
Information of file to import
Name of tone where the file is written to
6 .
Edit the desired parameters.
Menu
Explanation
Destination Tone
If “Create Tone” is on, select the number of
the user tone that uses the audio file you
imported.
Create Tone
When this is on, a user tone is created with
the multisample that is generated set as
partial 1.
[E1] RENAME
Use this to assign a name to the
multisample that is created by the import.
When “Create Tone” is on, this also applies
to the user tone that is generated at the
same time.
[E2] Loop Mode
Selects how the sample is played back
[E3] APPLY
NORMALIZE
When this is “ON”, the imported sample’s
sound is normalized.
[E4] APPLY EMPHASIS
When this is “ON”, the high end of the
imported sample’s sound is emphasized.
[E5] SAVE TO
STORAGE
The sampled wave is saved in WAV format
on internal storage (in the INT:KBD_SMPL
folder).
[E6] EXECUTE
Executes the operation.
7 .
Select [E6] EXECUTE.
A confirmation message appears.
8 .
Select [E5] OK.
The IMPORT operation is executed.
If you decide to cancel, select [E6] CANCEL.
When the import finishes, the IMPORTED SAMPLE LIST screen is
shown.
Summary of Contents for FANTOM-06
Page 6: ...6 6 Memo Memo ...
Page 52: ...52 52 Memo Memo ...
Page 78: ...78 78 Memo Memo ...
Page 108: ...108 108 Memo Memo ...
Page 174: ...174 174 Memo Memo ...
Page 190: ......


