107
Chapter 5 What to Do If
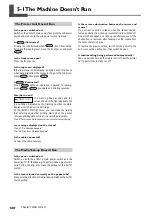
5-7 If a Message Appears
These are the main messages that appear on the machine's
display to prompt correct operation. They do not indi-
cate any error. Follow the prompts and take action ac-
cordingly.
[1
■
2
■
3
■
4
■
...]
Only a small amount of ink remains. Replace the cartridge
indicated by the flashing number with a new cartridge.
[CHECK DRAIN BOTTLE]
This appears when a certain amount of discharged fluid
collects in the drain bottle. To clear the message, press
. If this screen appears, go to the [DRAIN BOTTLE]
menu and discard the discharged fluid in the bottle.
☞
p 50 "Disposing of Discharged Ink"
[CLOSE THE COVER (RIGHT SIDE COVER/LEFT
SIDE COVER/FRONT COVER)]
Close the side cover (right), the front cover, or both. For
safety, the carriage doe not operate while a cover is open.
[DO NOT USE MEDIA CLAMPS]
Make sure the media clamps have been removed. The me-
dia clamps cannot be used when the height of the print
heads is set to "LOW." (Using them may cause malfunc-
tion.) After verifying, press
.
[INSTALL DRAIN BOTTLE]
Check whether the drain bottle is installed. Install the drain
bottle, then press
.
[REMOVE CARTRIDGE]
Remove the ink cartridge indicated by the flashing number.
This message appears at times such as during head clean-
ing.
[REMOVE CL-LIQUID]
Remove the cleaning cartridge indicated by the flashing
number. This message appears at times such as during head
cleaning.
[SET CARTRIDGE]
Insert the ink cartridge indicated by the flashing number.
This message appears at times such as during cartridge re-
placement.
[SET CL-LIQUID]
Insert the cleaning cartridge indicated by the flashing num-
ber. This message appears at times such as during cartridge
replacement.
[SHEET NOT LOADED PRESS SETUP KEY]
Load media and press
. This message appears when
an attempt to perform a printing test was made while no
media was loaded.
[TIME FOR MAINTENANCE]
It is time to clean the heads using the cleaning kit. After
verifying, press
.
☞
p 56 "Cleaning the Heads Using the Cleaning Kit"
[TIME FOR WIPER REPLACE]
It is time to replace the wiper. After verifying, press
.
☞
p 60 "Replacing the Wipers"
Summary of Contents for Hi-Fi Express FP-740
Page 22: ...20 ...
Page 23: ...21 Chapter 1 Introduction ...
Page 28: ...26 ...
Page 29: ...27 Chapter 2 Operation ...
Page 50: ...48 ...
Page 51: ...49 Chapter 3 Maintenance and Adjustment ...
Page 68: ...66 ...
Page 69: ...67 Chapter 4 Feature Reference ...
Page 100: ...98 ...
Page 101: ...99 Chapter 5 What to Do If ...
Page 112: ...110 ...
Page 113: ...111 Chapter 6 Specifications ...
Page 118: ...116 ...
Page 119: ......
Page 120: ...R2 070228 ...

