32
Jul. 2015
JD-XA
Analog Adjustment Mode
Items Required
•
Oscilloscope
•
Tester (measurable to 10mV)
Entering the Analog Adjustment Mode
Hold down
01
,
03
and
04
and switch on the power.
* Continue to hold down the three buttons above until the version is displayed on
the screen.
Quitting the Analog Adjustment Mode
Switch off the power.
Skipping Test Items
This is the same as
Test Items
1. Version
This is the same as
Press
to advance to the next test item.
2. OSC Adjust
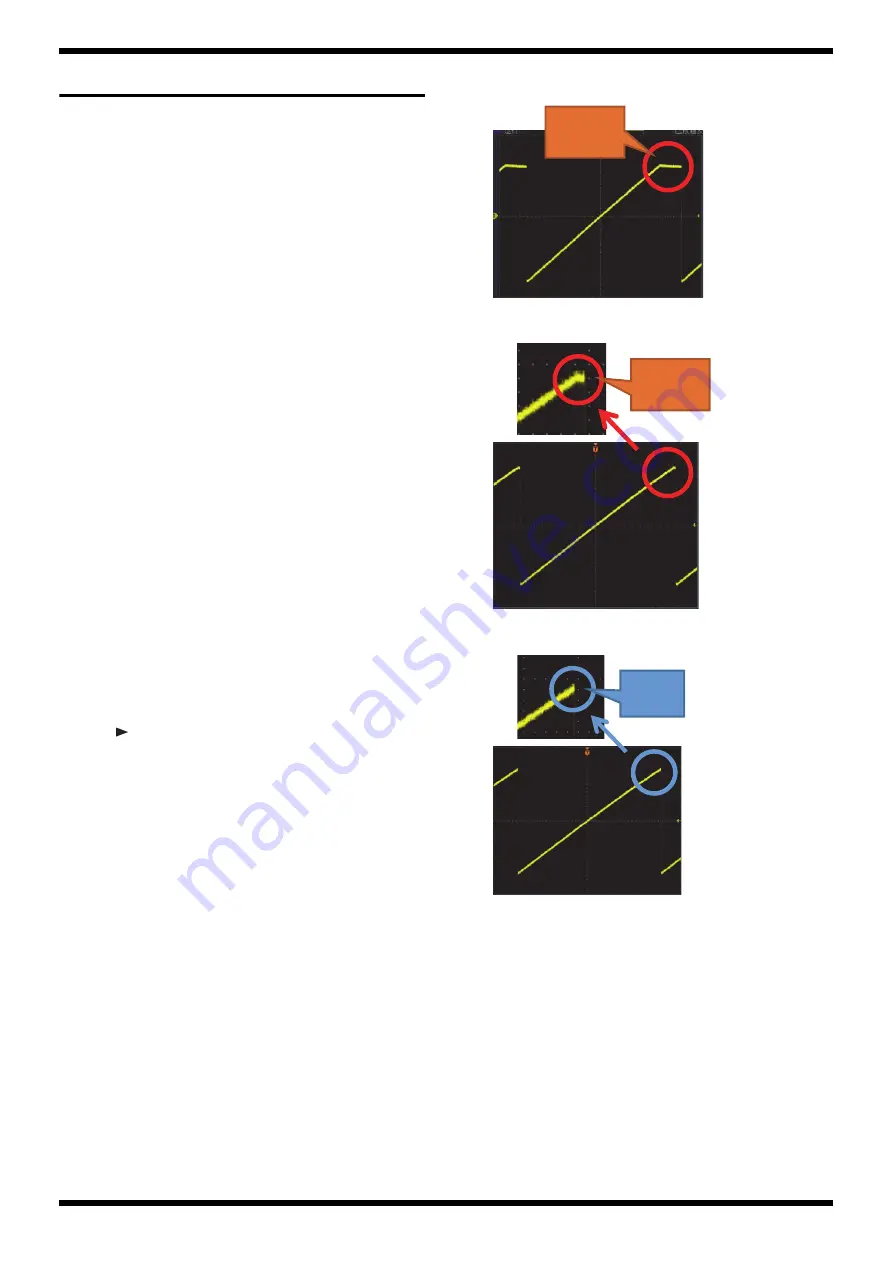
This adjusts the wave form and the level of the saw wave of each
oscillator.
+————————————————+
|A1-OSC1: **|
|Press [ENTER] |
+————————————————+
1.
Connect the oscilloscope to the
ANLALOG DRY
jack.
65-Hz (C2) saw wave is output.
2.
Press
+
or
-
to change the degree of leaning of the saw wave and adjust so
that clipping disappears as shown in the figure below.
fig.test-a-2-1-e.eps
fig.test-a-2-2-e.eps
fig.test-a-2-3.eps
3.
Press
+
or
-
, and when the value on the screen becomes
93
, press
Enter
.
1,046 Hz (C6) saw wave is output and a screen like the one shown below
appears.
+————————————————+
|A1-OSC1: ( **)|
|Press [ENTER] |
+————————————————+
4.
Verify that there is no clip on the wave and the value on the screen is in
the range of
80
to
93
, and then press
Enter
.
Execution advances to the adjustment of the next wave form.
5.
For
A1-OSC2
,
A2-OSC1
,
A2-OSC2
,
A3-OSC1
,
A3-OSC2
,
A4-OSC1
and
A4-OSC2
, adjust in the same way as steps
2
through
4
.
6.
Press
Write
.
The results of adjustment are written and execution advances to the next
test item.
CLIPPED
EDGE
Not OK
CLIPPED
EDGE
Not OK
OK
SHARP
EDGE
Summary of Contents for JD-XA
Page 11: ...11 Jul 2015 JD XA...


