49
Refitting the JX-10/MKS-70 CPU & Voice Boards
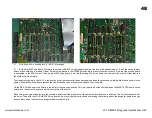
The process of refitting the boards to the JX-10 & MKS-70 is the reverse of removing them. In the JX-10 the shield need to be refitted to the right
Upper voice board. In the MKS-70 the cpu must be fitted first followed by the Upper voice board and the Lower voice board is fitted last.
In the JX-10 The 4 plugs from the keyboard scan lines need to be moved and plugged into the KiwiSJX cpu daughter board.
Replace all the screws that were removed when removing the boards. In the MKS-70 the cables ties can be slid back over the posts when they
are screwed back in. These only need to be finger tight so do not over tighten these as they are easily damaged.
For the JX-10 make sure the Aftertouch wire from the keyboard to the bender board is not under the top panel metal support and close the
synth.
For both synth types refit the screws removed in Step 1.
Tuning the JX-10/MKS-70
After the install is complete the synth should be tuned. This only needs to be done once as the results are stored in permanent memory and used whenever
the synth is powered on.
Press and Hold the MASTER TUNE button as you power on the synth and until you see a message that the Lower voice board is being tuned. Each voice
board has 12 voices (2 per note) and these are done one at a time.
Each voice should take 1-2 seconds to tune. If one or more take 10+ seconds then the voice(s) Saw wave is faulty and the hardware should be checked.
www.kiwitechnics.com
JX-10/MKS-70 Upgrade User Manual v100
Summary of Contents for Kiwitechnics KIWI-SJX
Page 1: ......
Page 6: ...Kiwi SJX JX 10 Flow Chart...
Page 7: ...Kiwi SJX MKS 70 Flow Chart...
Page 8: ...Kiwi SJX JX 10 Front Panel...
Page 9: ...Kiwi SJX MKS 70 Front Panel...
Page 89: ...89 www kiwitechnics com JX SJX Upgrade User Manual v100...


