126
Image Tuning (Paper Page) [DEFAULT SETTING: 0]
In the event that you are processing extremely fine and detailed designs requiring near- microscopic edge-
to-edge precision, you will need to adjust the image tuning setting. To adjust this setting, we recommend
that you engrave a small black square design as a sample and use a magnifying glass to view the engraved
results.
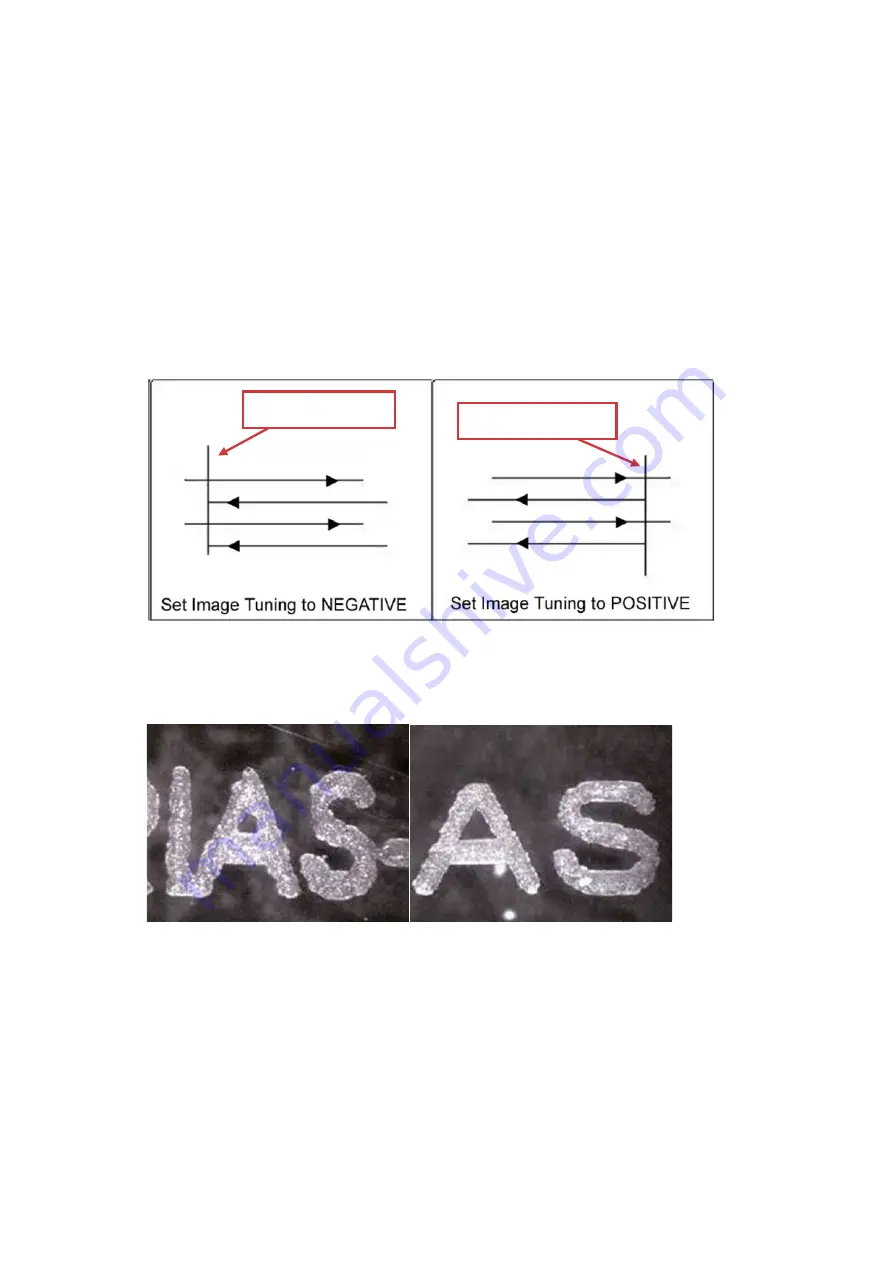
When you look at your engraved test square under a magnifying glass, you may notice the edges of your
square may be slightly offset, with every consecutive engraved even or odd line protruding past the square’s
ideal edge. This occurrence may occur on the left or right side of the square and can be compensated for by
the image tuning setting. In the diagram below, the arrows refer to the direction the laser head is moving to
generate that engraved line. If the first and every other line protrude to the left of the square’s ideal edge,
you will want to set the image tuning to a negative value. If the first and every other consecutive line protrude
to the right of the square’s ideal edge, you will want to set the image tuning to a positive value. The further
the protruding lines are from the square’s ideal edge, the larger you will need to set the Image Tuning value
to compensate.
The following is an example that has the proper image tuning, and demonstrates this significance when
engraving fine, small, intricate text. The following two pictures show engraved text magnified with no image
tuning (left picture) and image tuning enabled (right picture).
Square’s Left Edge
Square’s Right Edge
Summary of Contents for LV-290
Page 1: ......
Page 25: ...23 3 Chapter 3 Mechanical Overview Front View Top View Right View Left View Rear View...
Page 34: ...32...
Page 35: ...33...
Page 36: ...34...
Page 41: ...39...
Page 42: ...40...
Page 50: ...48 3 Click Next 4 The installation would be finished in few seconds...
Page 74: ...72 5 1 4 Graphic Control Panel Navigation Chart...
Page 185: ...183...
Page 187: ...185...
Page 199: ...197 Cutting edges achieved with the different lenses...
Page 211: ...209 9 Chapter 9 Basic Troubleshooting...
Page 213: ...211 10 Chapter 10 Appendix Glossary Specification Sheet...
Page 216: ...FA01785 R1 190805...


